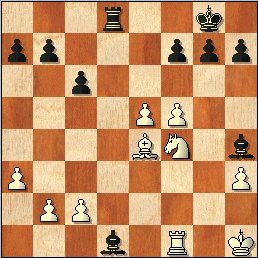
1.e4 d5 2.exd5 Qxd5 3.Nc3 Qd6 4.d4 Nf6 5.Nf3 Bg4 6.h3 Bh5 7.g4 Bg6 8.Ne5 c6 9.Bg2 9.Bf4 looks more direct, but there is not a lot wrong with the game continuation. 9...Nbd7 10.Bf4 Qb4 11.0-0? 11.Nxg6 first was necessary. 11...Nxe5 12.Bxe5 Now black can take the b-pawn with impuntiy as c2 and c3 are also hanging. Surprisingly, neither side seems to think this is too big a deal. 12...Nd7?! 13.Re1?! Nxe5 14.dxe5 Rd8 15.Qe2 e6?! 16.Rab1 Finally, after what appears to have been bluffing by white, de Coverley protects the b-pawn. 16...Be7 17.a3 Qc5 18.Rbd1 0-0 19.Kh1?! This appears to be a move that white can ill afford, especially given the problems it causes white surrounding the f2-pawn. 19...Bh4 19...Bg5, aiming to hit the centre pawn from f4, is another way of playing the position. 20.Rxd8 Rxd8 21.Rf1 Qd4 22.f4 White has now achieved his f4 push, and if allowed to consolidate will not stand too badly. 22...Qd2 23.f5 Starting a forcing sequence, the consequences of which to not appear to bad for black. 23...Qxe2 24.Nxe2 exf5 25.gxf5 Bh5 26.Nf4 Bd1 27.Be4 Diagram