Aprilia Falco Wheel Information

Wheel removal is pretty straightforward on the Falco. The only special tools required are the stands to support the bike.

Front Wheel

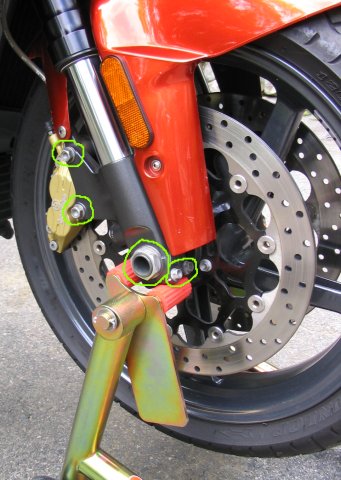
Falco front wheel

To remove the front wheel, suspend the front of the bike any way except through the axle. A fork stand or steering head stand works well. Be warned that most front stands must be used along with a rear stand for stability.

The calipers must be removed in order to release the wheel. After removing the two bolts on each caliper, loosen the axle nut, then the axle pinch bolts (two on each side). You can just slip the calipers off the rotors and out of the way. I can usually hold the wheel up with my boot while I knock the axle out with a mallet.

Replacing the wheel is simple. Remember to clean and replace the spacer on the throttle side of the wheel (the side with the axle nut). If you get confused, the direction of rotation is shown as an arrow cast into one of the spokes on the wheel. I generally try to tighten down the large axle nut as much as possible before tightening the axle clamp bolts. When the axle spins, I then tighten the the pinch bolts. Tighten all fasteners to the specs given below. Its a good idea to clean the caliper bolt threads and use thread-locking compound on them.
Rear Wheel

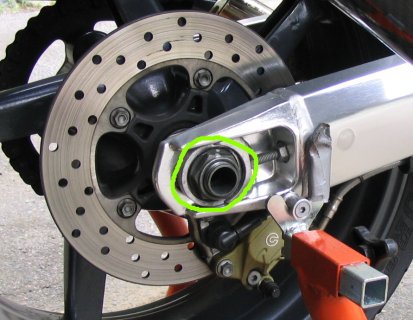
In order to remove the rear wheel, only the large axle nut needs to be removed. After knocking out the axle (support the tire with your boot), you can maneuver the wheel inwards a bit and remove the chain from the sprocket. Hang the chain out of the way on the swingarm. The wheel can usually be lowered to the ground with the caliper still in place. The caliper is mounted to a bracket that rides on a single boss (pin) on the inside of the swingarm. With the wheel leaned out of the way, slip the caliper bracket inwards off the pin and move it out of the way. The wheel should be free for removal now (don't scratch it on the caliper boss).

Before replacing the wheel, clean up the caliper bracket, boss, and chain adjustment blocks. Hold the wheel back in place with your boot, and slip the caliper over the disc and onto the swingarm pin. Start the axle through from the chain side, but before driving it all the way, replace the chain on the sprocket. My rear stand interferes with the axle blocks a bit if I don't remember to put them in place before replacing the axle. Line up the caliper mounting bracket with the wheel bearings and finish driving the axle through.

After adjusting my chain, and before tightening the rear wheel, I usually put a screwdriver in the teeth of the rear sprocket and rotate the chain over it. This will pull the wheel in snug against the chain adjustment screws so you can tighten the axle nut.

Falco rear wheel

Tightening torques


Tightening torques
Front axle nut30 mm wrench 58 ft-lbs (80 Nm) torque
Front axle pinch bolts10 mm 16 ft-lbs (22 Nm)
Front caliper mount bolts13 mm 36 ft-lbs (50 Nm)
Rear axle nut32 mm 87 ft-lbs (120 Nm)

Go back to the Falco home page.

Hosted by www.Geocities.ws

1