Go to the beginning of this article.
If you were unlucky enough to find a valve or two out of adjustment, you'll have to swap shims. Sometimes you can swap shims within your bike to bring all the valves back into spec. For instance, if you have a tight intake valve, you may be able to swap shims with a looser valve to make them both acceptable. If you can't do this, or don't want to be taking out more cams than necessary, you'll need to measure up your shims and head to the dealer. At any rate, you'll need to know what your current valve clearance is, so don't start tearing out the cams until you've recorded it. Once you've recorded the clearances, you can begin taking out the cams.
Make sure you are at TDC. While its possible to measure clearances without bringing a cylinder to TDC, you can't remove the cams if either of the cams are pressing down on the valves. Also, in case you lose your cam alignment marks, you have a prayer of realignment if the crankshaft is in the TDC position. If you can't see the timing marks on the front cylinder, you can unbolt the upper nylon chain guide and bump the engine with it off. Just stuff a rag into the cases when you are unbolting it in case you drop a bolt. Once the cylinder you are working on it at TDC, remove the key, throw the kill switch and don't think about bumping the motor over until the cams are back in place. Aprilia calls out a tool to lock the crankshaft in place. This is really not necessary.
Mark the cam to chain alignment. If you haven't already removed it, start by unbolting the nylon chain guide on the top of the gears. Once the top guide is off, use contact cleaner to clean the chain and gears, and make an indelible mark on the top of each gear (12 o'clock) extending onto the chain. This will help you get the chain back on the sprockets in the right position. Now, count the number of chain pins between the marks. If you rub one mark off, you can use this count to replace it. Every orientation mark you can make will help. If you are working on the rear cylinder, you have the balance shaft drive to work around. Mark the backside of the gears if it is easier.
|
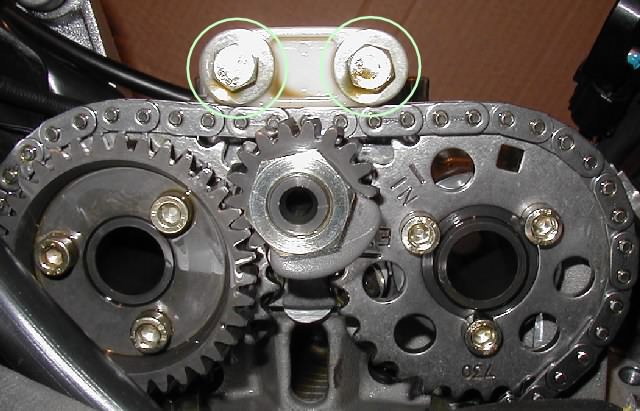
Remove the upper nylon chain guide, but don't drop the bolts in the case. Front cylinder has two vertical bolts. Rear has two horizontal bolts. | |
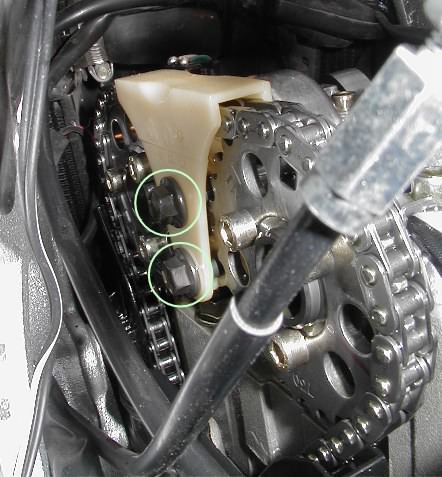
Remove the chain tensioner. The next step in cam removal is usually to release the chain tensioner. The Falco tensioner is a hydraulic plunger that pushes on a nylon guide on one side of the chain run from the cam to the crankshaft (the side facing the "V" between cylinders). After removing the tensioner, the chain should be slack enough to be removed from the gears (you must hang it from a coat hanger because dropping it into the cases would be bad!). If there isn't enough slack from just releasing the tensioner, sliding a guide out should do the trick. I believe only the guide opposite the tensioner should slide out. I say "should" and "believe" a lot in this paragraph because I found it very difficult to get onto the tensioner plug for the front cylinder. After rounding out a spot in the plug with a ball-end allen key, it looked like I was going to have to drain the cooling system and start removing the coolant manifold. Looking for a lazy way out, I sought another way to release the cams. So, not having even seen a manual, I can't offer any tensioner removal advice yet.
| The chain tensioner access plugs are on the sides of the cylinders. The front is well hidden beneath a coolant manifold. The rear is more easily found. |  |
Alternatively, unbolt the cam gear. There really isn't any tension on the chains at all. So it appeared to me that I could unbolt the cam that I needed to remove from the gear. This turned out to be just the trick. Before starting, I zip-tied the chain very tightly to each gear. This way, I didn't have to worry about re-alignment of the chain and gear. The only possible misalignment now is the cams to the gears, and since the cams can only go on one of three ways this is very easy. In fact, if you remember the cams face away from each other at TDC you're all set. On the rear cylinder (which I didn't touch), there's the extra gear on the exhaust cam to drive the balance shaft. Make sure you mark this gears alignment to the cam gear and to the balance shaft gear. You must put the balance shaft back in phase with the rest of the motor! Now you can unbolt the gear on the cam you need to remove. Again, keep a rag stuffed in the case so you can't drop a bolt into the engine.
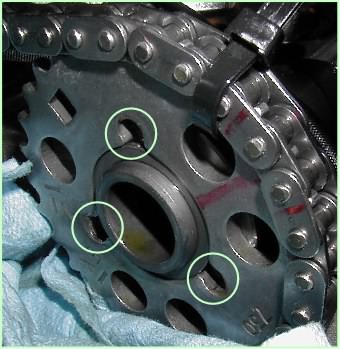 |
Three socket cap bolts (removed in this picture) hold on the cam gear. The boss on the cam will retain the gear while the bolts are removed. These bolts are installed with thread lock. Note the zip-tie maintaining chain to gear alignment, and the rag stuffed in the case. |
Remove the cam holder. It's time to free the cams! On the front cylinder, there is a cam position sensor covered in silastic. You do not need to remove this. The cam holder isn't going far and there's plenty of slack in this sensor. On the rear head (which I didn't do), there's a balance shaft. It appears to me that the shaft is retained by two additional bolts behind the cam gears (which you can leave alone) and remains in the cam holder. It shouldn't cause any extra grief, except that it must be properly realigned when reinstalled. There are eight socket cap screws retaining the cam holder. Remove them in a crossways pattern. Make sure you get the washers with the screws, and don't drop them!
| Remove these eight bolts and the cam holder can be lifted out of place and set aside. There isn't enough chain tension to rock the cams, so don't worry about that. | 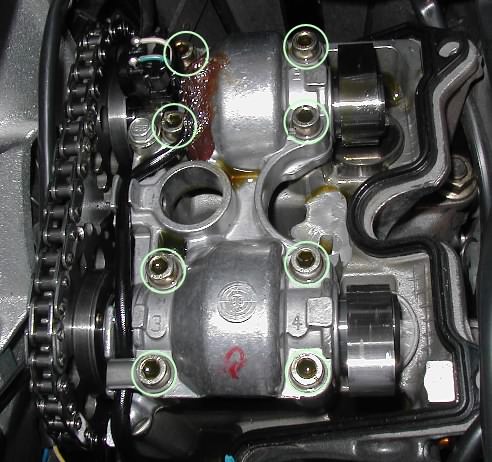 |
Remove the cam. Now you can slide the gear off the cam and lift the cam out of its seat. The buckets over the valve you need to adjust can be lifted out with a magnet, or a suction cup valve lapping tool. Sometimes the shims stick to the underside of the bucket, so be prepared for that and don't drop the shim in the motor! If the shim is still on the valve stem, you can lift it off with the magnet. If you remove more than one bucket, remember to mark them so you can reinstall buckets on the same cam lobe they came off of.
 |
Once the cam is out, you can pick up the bucket with a magnet. The shim can be seen here still on the valve, but I've had them stick to the bucket if the magnet is powerful enough. Don't pull the bucket off the magnet over the motor or the shim could drop out into the cases. |
Continue to the New Shim Selection page.
Go back to the Falco home page.