The initial complaint with the factory settings is that the ride is very harsh. On New England roads, a set of frost heaves will set your teeth chattering and cause a momentary loss of steering. In particular, there were a couple washboards at the ends of exit ramps on my daily commute. In an area of high acceleration, the front end felt like it was floating over the bumps. Its hoped that the factory settings, a compromise between one-up and two-up riding, can be tuned for better solo riding.
Before adjusting anything else, you must verify preload, front and back.
|
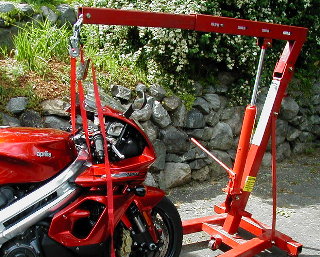
In order to measure static sag, you need a reference measurement with the suspension unloaded. A front stand that supports the bike at the steering head will help. Or you can suspend the bike from the top. Measure from a fixed point on the suspended part of the bike to a fixed point on the unsprung part of the bike (See fig 2.) |
| Fig 1. Measuring unloaded
suspension |
| Measuring the extended length of the fork tube in order to calculate static sag. These measurements are from a 2000-1/2 Aprilia Falco. | 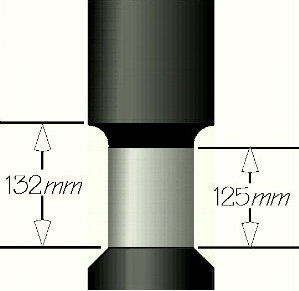 |
| Fig 2. Front fork dimensions,
fully extended |
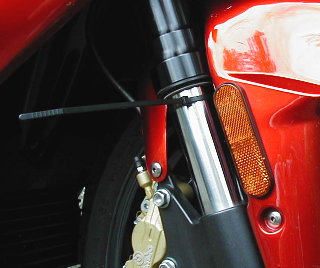 |
To measure sag, wrap a tie-wrap around the fork leg. Gear up, fill the tank, and get a helper to hold the bike up while you sit on the bike in your normal stance. Friction can affect the measurement, so you may want to do this twice, once after having your assistant pull the bike up, and once after letting it bounce down. The difference between the unloaded seal position and the current position of the tie wrap gives you the suspension sag. |
| Fig 3. Measuring static sag |
Sag is necessary to reserve some suspension movement to allow the bike wheel to fall into depressions in the road. With no sag, the wheel would hang over the top of bumps, losing contact with the road. For a bike ridden on average roads, one third of the suspension travel is reserved for depressions, and two thirds for raised bumps and braking. For a smooth road racing track, one-fourth/three fourths is a typical setting. Suspension experts recommend equal percentage sag front and rear.
If you want to calculate percentage sag accurately, you need to know your fork stroke. This can be measured by removing the springs and measuring the compressed fork dimensions, but this much travel may not be possible in reality if the springs compress completely. Measuring the spring wire width times the number of coils plus spacer heights should give you a clue as to whether the fork bottoms because of spring compression limits.
| Factory Fork Settings, '00-1/2 Aprilia SL1000 | |
|---|---|
| Distance, seal to bottom, unloaded | 125 mm |
| loaded with rider, gear, half tank gas | 100 mm |
| Static sag | 25 mm |
| Fork stroke, claimed | 127 mm |
| Static sag | 20% |
| Preload cap | 5 lines showing |
| Compression damping | full CW, minus 1.0 turns |
| Rebound damping | full CW, minus 1.25 turns |
In this case, the preload was a bit much for rough street use, and reducing the preload (increasing the sag) was in line with the goal of softening up the ride and maintaining control under bump roads. One third of a 127 mm fork travel would be 42 mm, one fourth would be 32 mm. The factory setting is 25 mm. Adjusting the fork caps all the way out sets sag to 30 mm. This is a reasonable starting point. Going further may require cutting internal spring spacers, or reducing the spring rate.
| New Fork Settings | |
|---|---|
| Static sag | 30 mm |
| Static sag | 24% |
| Preload cap | full out |
| Compression damping | full CW, minus 1.5 turns |
| Rebound damping | full CW, minus 1.5 turns |
The compression and rebound damping was also reduced. In general, softer spring rates and less preload require less damping. In this case, the settings were reset to the recommended starting points givn in the owner's manual. For some reason, the bike as delivered was set harsher. This is a reasonable starting point.
The rear was measured too, suspending the bike from the channel through the frame behind the engine. A stand used on the swingarm pivot would have worked too. In the case of the rear, wheel travel is measured from the rear axle to a point on a plumb line through the bike body above the axle. On the Aprilia, the axle to inner fender measurement was used as a reference.
Knowing the rear wheel travel is important. If not given in the owner's manual, you can remove the rear shock and measure the travel, or remove the spring from the damper and measure the stroke. Again, you have to take into account the length of the spring when totally compressed. It's not likely the wheel could hit the inner fender without bringing the damper to its bump stops.
| Factory Shock Settings, '00-1/2 Aprilia SL1000 | |
|---|---|
| Distance, unloaded axle to inner fender | 430 mm |
| loaded with rider, gear, half tank gas | 389 mm |
| Static sag | 41 mm |
| Wheel travel, claimed | 135 mm |
| Static sag | 30% |
| Threads showing above lock ring | 1-5/8 in |
| Rebound damping | full CW, minus 16 clicks |
| New Shock Settings | |
|---|---|
| Static sag | left alone at 30% |
| Rebound damping | full CW, minus 15 clicks |
As before, the damping adjustment (rebound only, in this case) was reset to the recommendations in the owner's manual.
There's no chassis dyno that I know of, so I hit some familar and unfamiliar pieces of road (local and Vermont 100). The cornering was very stable. Bumps were still jarring, but the steering was much easier during the washboards. Ground clearance is not an issue.
My next complaint is that the front end of the bike pushes instead of holding a line in a high speed corner. The more throttle you use, the more it just wants to drift out. I think more front bias is necessary, but as of yet, I haven't attacked the problem. My first step will be to match the rear preload to the front amount, as soon as I can free the lock ring on the shock (it's gorilia tight, and I've already broken a notch on it and nearly broke my adjuster tool!)
Update: November 2000
Since originally writing this, I have spent a little more time adjusting the suspension. It was in the last waning days of Fall here, so I was going to wait until I had more mileage on the bike to comment. But since so many people have asked me, here's what I've done.
I will update this page completely in the Spring when I get some more miles on the bike.
Update: April 2001
I got to take my first "fun" ride since I replaced the fork oil last fall. My first thought is, "What have I done?" This bike handles worse than ever. A few months off the bike riding my old CB-1 made that obvious. I had a hard time pin-pointing why until I started swapping bikes with my friends. This is a great way to feel back-to-back differences. The old turn a click and ride method has slowly led me into some bad setups. Here's a few comments for now:
5W as soon as possible. Also...With these changes, the bike feels much more comfortable. Cornering confidence leaves a bit to be desired. I really don't like the way the bike turns in, and it seems very sensitive to throttle position. You really want to be cornering on the gas to make the rear of the bike feel settled. But the traction seems a lot better now, that much has improved.
Update: May 2001
I'm now running a Penske shock and love it. I raised the rear ride height by about an inch (unloaded). I'm running 40 mm rider sag out back, 15 mm static sag (145 lb rider with 850 lbs/in spring). I've reduced rebound two clicks from stock, and I've backed the compression all the way down to position "1". The ride is very comfortable, only getting harsh on a really sharp set of bumps. The turn-in is better, but when I switched to D207 tires from the old MEZ3's it became wonderful. The rear doesn't squat as much now, which means it doesn't bounce up on you on turn-in either. Overall, these was where I was lacking confidence before.
I've also reduced the rebound on the forks a bit, as well as the compression damping which I already had reduced.
The bike moves around a bit now but is still controlled and has gobs of traction. Overall, a lot more comfortable, except on the New England ruts which still get through the shock. Cornering is better. A bit of initial fork dive when you get on the brakes--using a good bit of rear brake helps this. If anything, I think my next goal will be to try and get the front and rear to move together, as I think the front is stiffer now. Also, I'd like to have the shock rebuilt with a bit less high-speed compression damping.
Update: July 2001
The Penske has broken in nicely, and I've cranked the preload up again to 35 mm range (rider). The bike still sags by itself, I think 5 mm but I can't remember for sure. This cost me a barely noticeable amount of traction, but it doesn't wiggle as much when you are on neutral throttle before turning in either. I am still shopping around for fork springs.
I had a chance to do another track day. It was much more fun this time. The D207's were awesome, only getting greasy if I really scrubbed off the speed in the corners. They wore nicely too, minimal slippage and no tearing so I'd say the new shock was worth every penny. For track use, I needed "3" on the shock compression adjuster to keep my bike from bottoming in "the bowl". I could have stood more rebound up front too but was too busy having fun to break out the screwdriver.
Update: August 2001
I've finally replaced my fork springs. I went conservative at 0.95 kg/mm (by measuring spring dimensions, it appeared that this was a 6% reduction from stock rate). I wasn't expecting a big difference, but it really does feel better. I targeted 35 mm rider sag (as recommended by several local track pros, and by Traxxion Dynamics). This gave me 22 mm or so of static sag, basically saying that the spring rate is dead on. I didn't remember my damping settings, so I baselined the compression and rebound at 1.5 turns out as described in the owner's manual. This feels pretty good. Under hard braking, I'm using all but a quarter inch of fork travel! I haven't bottomed yet, but its likely that more compression damping is needed.
An interesting observation is that I set my oil level lower than stock, under recommendations of Traxxion Dynamics. It feels fine. You'd expect this would only make a difference under nearly full fork compression. I'm using nearly my full travel now, and I've never detected any front wheel hopping or anything else harsh.
I've done some high speed mountain roads with this setup, and I'm very pleased. My attention now is always on how warped my rotors feel. When you stop noticing your suspension, that's a good sign. Also, when swapping bikes with someone, I now like the feel of mine best. This has never happened to me before. I'll never stop trying to improve the bike, but I'm not in any hurry to touch it now.
Update: January 2002
At the end of the summer, I made some damping changes. This was mainly based on conversations with Max at Traxxion Dynamics on how rebound damping is supposed to be baselined. I set the fork rebound so that they were just "critically-damped" without me on the bike. By that, I mean that if I stand in front of the bike and bounce the forks down, they return to the starting position without overshooting. I increased rebound a little at a time until the "overshoot" just disappeared. In the rear, I have a slower rebound. A shock does not need to be so fast-acting. You should be able to see the tail come up (maybe a second from full compression to original position). The Penske is about right at mid-clicks. Lastly, I had my wife stand along side the bike as I bounced it up and down (Max calls this the "jockey" test). I've found it important to be on the bike and equally loading the pegs and not the bars. The main objective is to get the front and rear of the machine to act together. I added a couple more clicks rebound in the back and it looked "perfect".
With so much extra rebound, I was expecting to bottom on some of the washboards around here. It hasn't happened yet. The bike feels pretty controlled. I recommend you try setting up your own bike with these techniques (when the weather and suspension is warm). I went to a suspension seminar during at Penguin Racing's Pro School, and Eric Wood talked a lot about bouncing bikes and getting a feel for what's good and what's bad. It didn't mean a lot to me then, but I now see that you can indeed tell a lot about a bike's damping before you actually ride it.
My rebound setting now is 3/4 turns out from full in on the forks (that's more rebound than stock, and I am running 5W fork oil). The shock is somewhere around 2-4 clicks above middle. Its such a pain to get on that rebound screw I haven't counted the clicks out yet (sorry).
Future
You never can be satisfied with your bike, can you? Actually, the better you make it feel the more picky you get. I do still find the Penske to be a bit hard on sharp bumps, but driving around with the compression on setting "1" makes the tail squat a bit when you go hard on the throttle. I wasn't sure anything could be done about this, but I recently purchased a Penske for my racebike with the middle-of-the-line compression reservoir. The $750 shock I have on the Falco has six compression trim positions, and it switches the size of an orifice to accomplish this. Orifices provide velocity-squared resistances, which generally feels too soft at low speeds and too harsh at high speeds. Using it as just a trim, not the main compression damping, not a lot of damping needs to be provided by the orifice so the shock isn't as bad as some of the stockers. But what I found on the $950 version of the shock is that the compression trim is provided by preloading a shim stack. You would think this would provide a more linear velocity curve, and should be able to be tuned for less harsh bumps and less squat on acceleration. I'll see how I like the shock on the racebike and perhaps I'll upgrade my Penske on the Falco. [I have since raced the 250 with the new compression reservoir and my first race and it was truly a great product.]
There are also replacement compression and rebound valves available for these forks. I believe both Race Tech and Traxxion Dyanmics have a product. But at this point I don't really have any complaints about the stock valving (we'll see).
Sag Target Numbers
The "experts" don't seem to be talking about percentage sag anymore. Instead, there are some starting numbers that everyone appears to be using. I suspect this is because the amount of suspension travel seems to be pretty much the same amount all bikes now. Anyways, here's some sag targets that I've had good luck with (on sportbikes).
| Fork sag, bike only: | about 20 mm |
| Fork sag, bike+rider+gear: | 35 mm |
| Rear sag, bike only: | 5-10 mm |
| Rear sag, bike+rider+gear: | 30 mm |
I can't emphasize enough how important it is to have some amount of sag on the rear of the bike when its not loaded. Maybe a 125 cc racer can be topped out, but the worse riding bikes I've ever experienced have been the bikes with the rear suspension solidly topped out. If you find you can't get close to these unloaded sag numbers while hitting the loaded numbers, this is an indication that you need to change your spring rate. Do it! At $100 for front or rear, its so worth it.
Go back to the suspension summary page.
Go back to the Falco home page..