Aprilia/RSC SL-Carbon Slip-On Installation Details
Installation steps: EPROM (injection/advance field map)
-
Remove passenger seat or solo cowl piece (using the key)
-
Remove seat (pull back pad on either side towards the
rear--you'll see a socket cap screw on each side. Remove
screws and seat will slide backwards and up).
-
Ron E adds:
"For California bikes, there is a smog canister behind the
ECU box. All you have to do is pull the bolts holding the
plastic cover, then the two socket heads holding the rear
seat/cowl latch and the canister bracket." Thanks, Ron.
-
Remove rubber cover from ECU (half on back side, half on
front side).
-
Carefully remove two connectors from ECU on seat
side--depress release tabs and pry with a fat bladed
screwdriver. Don't pull by the wires!
-
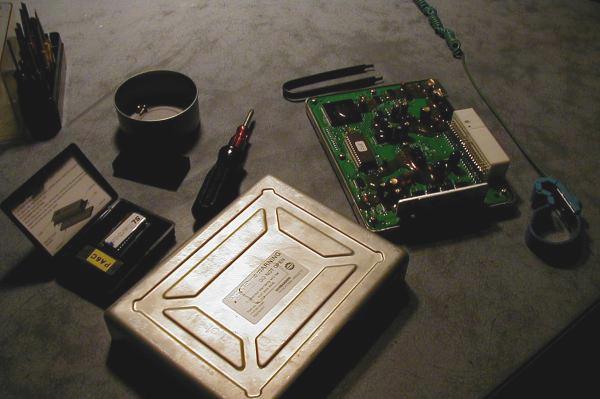
Remove the ECU box (from the rear). Take it somewhere
clean, and preferably humid and conductive.
-
Cut the warranty sticker and remove the four #0 Philips
head screws holding the ECU cover down. Remove the cover.
-
Wearing your ground strap, cut and carefully remove the RTV
sealant from around the stock EPROM, without scratching
through the green solder mask into the small copper traces.
Try to remain in contact with the metal ECU box while you
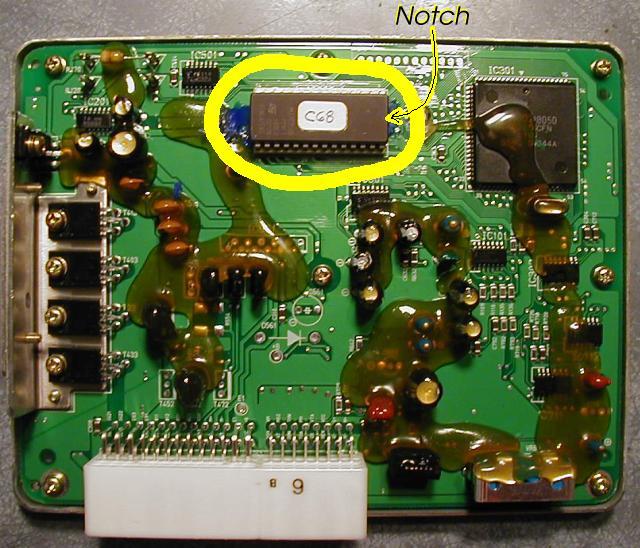
work. I recall it was easy to find the EPROM because it was
the only socketed dual-inline package on the board. Other
components were surface-mounted and soldered.
|
Location of EPROM
|
|
-
Open the package containing the new EPROM. Before removing
it from the conductive foam, touch the conductive foam to
the ECU box to allow both to come to the same potential.
-
Note which end of the old EPROM is notched (some packages
have a smooth dot instead of a notch). This directional
indicator must be observed when installing the new EPROM.
Carefully pry out the old EPROM. A chip puller can be
obtained from Radio Shack for under $2. Alternatively, a
screwdriver can be used. Just try to pry the chip straight
upwards without bending the leads or leveraging off of any
other components. Place the old EPROM in the conductive
foam.
-
Install the new EPROM in the same direction that the old
was removed. Do not remove the EPROM from it's daughter
board. Without the copy protection, the chip is useless.
Line up all the pins on the daughter board with the socket
first, get them all started, then carefully press the board
in place.
-
You may now safely place RTV on the new EPROM/daughterboard
for vibration protection. Try not to make a mess--a couple
stripes like the original will do.
-
Replace the cover, the screws and plug the ECU back into
the bike. Install the plugs, rubber cover, seat and cowl
cover.
Installation steps: Canisters
-
Remove spring holding the stock canister to
collector/header. If you don't have a spring puller, vice
grips work well.
-
Remove the socket cap screw holding the canister to the
passenger footpeg. Note the location of the two washers
next to the rubber mount.
-
Apply a little anti-seize to the inside and outside of the
new canister inlet, one inch from the end.
-
Slip the new canister in place.
-
Install the hanger bolt. Bolt
head-canister-washer-mount-washer-nut is the order I
recall. Try to center up the bolt head on the canister tab
before tightening.
-
Install the spring.
-
Do the other side.
Start her up! The canisters will smoke and stink for a while.
They are a straight-through design, so watch what you are
aiming them at. The inlets don't seal that great, so expect
to clean up a little anti-seize that blows out the joint. If
you detect hot gasses blowing on your beautiful swingarm, you
may want to loosen the mounts and try for a tighter seal.
Go back to SL/Carbon page.
Go back to the Falco home page.