by Joe Iannandrea
Knowing how to mate with a King and Queen against a lone King is something that every Chess player should learn how to do so well that they almost don't need to think about it. For one thing It's a fairly common situation, often the result of Queening your last Pawn after everything else on the board has been traded off. Not only is the pure King and Queen vs. King situation common, but the same ideas can used to in many similar situations. These ideas form the basis for many other typical checkmating patterns that a player needs to be familiar with if they hope to improve.
If you are the one with the Queen in this situation the good news is that the worse that could happen to you is a draw. The better news is that, if you know what you are doing, you can always win. The bad news is that if you don't know what you're doing, there are three things that can go wrong for you:
1. You allow the Queen to be captured- The game would imediately end in a draw by insufficient material since niether side can possibly deliver checkmate.
2. You stalemate the opponent's King- Agian the game ends in a draw.
3. Draw by the 50 move rule- By standard rule, if 50 moves pass without a capture or a pawn move either side may claim a draw. If you play too timidly, worrying more about avoiding stalemate than delivering checkmate, this will probably be your fate. This is why you must know what to do!
Beginners love to check the opponent's King and when you have a King and Queen against a lone King, you can give check whenever you want. However, this usually just gives the opposing King the freedom to move further from where you want him. It is useful to note that you cannot give checkmate with just your Queen. (If you don't believe me try doing it sometime.) You will have to get your King involved to make the final kill. The proceedure for doing this can be broken down into three steps.
1. Using your Queen, force the King to one edge of the board. (Any edge, it doesn't matter.)
2. Bring your King in to hold him down.
3. Checkmate with your Queen.
Let's look at these steps one at a time with an example. We must first understand how to force the King to the edge.
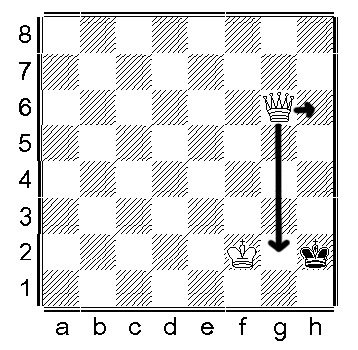
In diagram 1 we see a typical King and Queen vs. King situation. White has just crowned a new Queen on the c8 square on the previous move and Black's King has moved to f4. White wants to cut off as many squares as possible and so the Queen moves to e6. The Black King must now move but the X'd squares are now cut off. No matter where it goes the King must now move closer to the edge of the board.
diagram 1
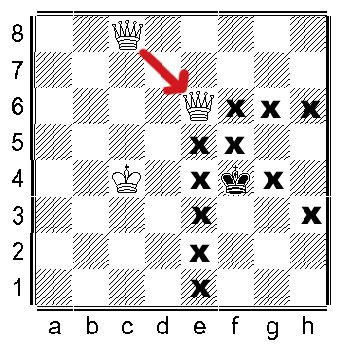
diagram 2
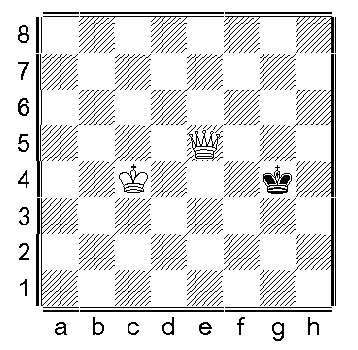
diagram 3
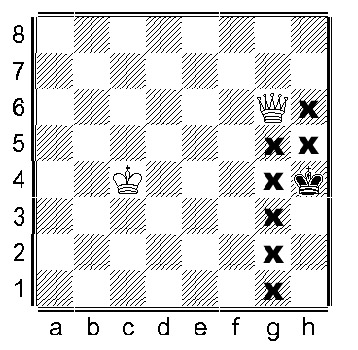
From the position shown in diagram 3, Black's only available move is to h3. The Queen could then move to g5 to further limit the Black King, but it can't get very far anyway, so lets bring in the King. The best move here is to d3, following the movements of the other King. If Black responds by moving back to h4, White's King goes to e4. In our example though, we'll say Black goes to h2 and White responds with e2. Now Black moves into the corner. The paths each King has taken are shown below.
diagram 4
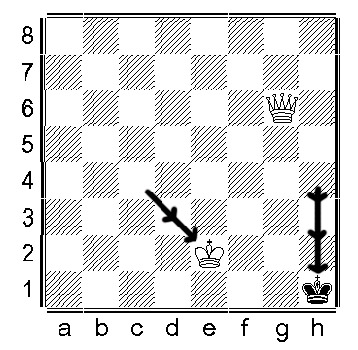
Now at last we are in a position to finish off our opponent with checkmate! In diagram 5, we can see that the White King is positioned opposite the Black King with one row (it can be horizontal or vertical) separating them. This does two things. The space between them is now protected so the Queen can now move in to deliver checkmate. Also, the White King alone is holding the Black to the edge of the board. This means that the Queen can now deliver checkmate by moving to the h file (any of the squares h5, h6 or h7; it doesn't matter.) Either way it spells doom for the Black King.
diagram 5
Of course, Black could have chosen other moves in our example that would have resulted in checkmate somewhere else on the board. No matter what Black did however, White's plan was still the same: confine the opposing King to one edge of the board then move the King in to deliver checkmate. The particular way in which checkmate is delivered depends upon where the Kings are in relation to each other. There are three patterns you should be able to recognize. I have shown them below.
diagram 6
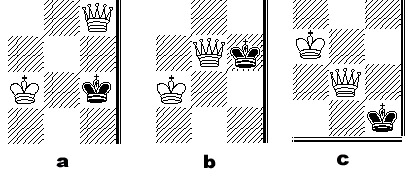
In general, the more of these patterns you can easily recognize, the better chance you will have of delivering checkmate. Learn as many as you can and practice until you know them cold.