
|
I have several filters programs that will create
a perspective shadow, but for the life of me, I can't manipulate those little sliders
in my favor. This little work around makes a pretty respectable perspective shadow
without the guesswork. This tutorial was written for PSP7, but certainly can be done
in other versions.
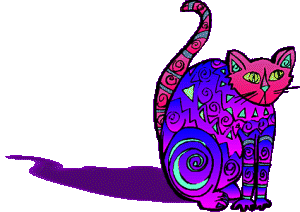
NOTE: this is a fairly simple way to do drop shadows also. Just quickly, here is how...Let's get started on this tutorial so we can get things into perspecive - graphically speaking, that is... As always, please do not take this tutorial and place it on any website, CD or book. This tutorial may be linked from other sites for the purpose of presentation on tutorial lists, forums, boards or sites, but not copied. For more details regarding use, please read my Terms of Use. I would appreciate it if you would drop me a line letting me know when and where you are linking my tutorial. You will need my cat graphic which you can download by clicking here. Then unzip it to your hard drive. OR You can use your own graphic that is on a single layer. It won't hurt my feelings if you don't use my cat. Although, it might hurt his feelings. All right, go ahead and open up the graphic that you will be using for this tutorial. I, for one, will be using the cat image because I know what it is like to live with a shunned cat... You are going to need more elbow room to manipulate your shadow so we will be increasing the canvas size to 500x400 pixels. You do this by selecting Image>Canvas Size and fill in the 500 for width and 400 for height. Add a second layer and name it "shadow". Go back to your graphics layer. Choose the magic wand tool Now you should have "marching ants" around your graphic showing that it is selected. Before we actually do the shadow, there are a couple of things to double check... 1) Make sure that black is your foreground color. 2) Be sure that you are on the "shadow" layer. Use your flood fill tool Apply a Gaussian Blur...Effects>Blur>Gaussian Blur. I gave my shadow a blur of 6, but you may use any number that you prefer - hey your guess is as good as mine Now is the time to drag the "shadow" layer below the image layer. In the layer palette, left click on the "shadow" layer and hold the mouse button down while you drag the "shadow" layer below the image layer. I know what you are thinking - "When are we ever going to make this shadow?!" NOW! Choose the deformation tool First, we will flatten the black form. Go to the middle mark along the top edge of the bounding box. You will see a double headed arrow and rectangle. PSP would not let me make a screen shot of this even if my life depended on it, but the double headed arrow and rectangle should appear when you put your cursor where the yellow arrow indicates(in the screen shot below).  Now we are going to deform that black shape a little more. Hold your cursor over that same spot, on the bounding box, as before. This time though, hold down the shift key. Instead of a rectangle, you will see a parallelogram. That is one of these Do not click "apply" in the tool options box, yet. There may be a few minor adjustments that need to be made first. You will notice that the shadow drops below your image slightly and makes it look like your cat is floating off into space somewhere.  Put your cursor over the small box in the middle of the bounding box. Again, I couldn't get a screen shot of this, but you should see a 4-way arrow (kind of like a compass). Hold your left mouse button down and this will move your shadow. Get it situated so the cat no longer looks like he is floating. Still a little "flighty", but not floating. You can make adjustments, if you like. Maybe flatten it a little more- whatever. When you have things the way you like them, click "apply" in the tool options box. 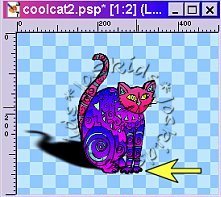 It's looking just about right, but not quite...To finish it off, lower the "shadow" layer's opacity. I have turned mine down to 30, but you can use whatever you wish. 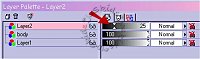 There you have it. Have I put perspective shadows in perspective for you? 1) Select your image. 2) Make a new layer below that image. 3) Flood fill selection with shadow color. 4) Deslect. 5) Apply Gaussian Blur. 6) Lower opacity on shadow layer. No deformation this time. 7) Because the shadow is on it's own layer, below the original graphic, you can move it around freely - without any sliders to get all tangled up in |
