Created September 25, 2001 �Jo Skidmore
Origami cranes are made by people throughout the world as an expression of hope for world peace. Read more about how the this tradition started by clicking here. As I was searching the internet for directions on how to fold these graceful sculptures, it dawned on me that it would surely be an easier project done with Paint Shop Pro. No cramped fingers or paper cuts. Besides, have you ever tried to follow the directions in an origami book?! Hopefully, I will write directions that are easier to follow.
This tutorial was written for PSP7.
For this tutorial you will need the selections file that I have created. You can down the zip here. Unzip it and save it to your hard drive.
If you would like to use this pattern,

Right Click>Copy. Go to Paintshop and right click on the work space and "Paste as new image." You could also use a pattern of your own choosing. Experiment and come up with a variety of different cranes. Consider contributing them to my
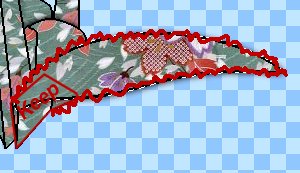
1000 Cranes Internet Peace Project
This is a very simple tutorial because you do the exact same step on each layer, until the shading is added at the end. Ok, let's get a move on...
Open a new image 525x425. A little large, I know, but all the better to see it, my dear.
If you didn't copy and paste the above pattern to your workspace, now is the time to open the one that you want to use.
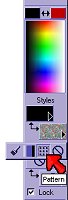
| I will be using black as my outline color in this tutorial so I have set my foreground to black and I have made my pattern as my background/fill color. To change your foreground or background color to a pattern, hold down your left mouse button over the swatch that you want to change. The fly-out menu will appear and you choose the "pattern" icon - shown by the red arrow. |
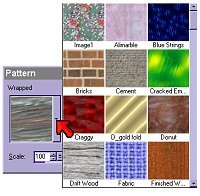 |
After you have chosen to use a pattern, you have to go to the pattern menu to select the pattern that you want to use. Click on the swatch that you just selected to use for your pattern (the background swatch, in my case) and it will bring up the pattern menu. Click where I have indicated with the red arrow and all your pattern choices will appear. Scroll through the choices till you have found the pattern that you will be using and click on it. I have chosen to use scale=100 and angle=0. Click OK. |
| Here are the basic steps for each layer: | |
| 1. | Create a new raster layer. |
| 2. | Load the selection. Selections>Load from Disk> browse to where you saved your selections for this tutorial. |
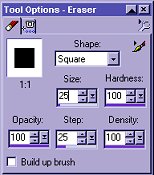
| 3. | Left click to flood fill
|
| 4. | Contract your selection by 2. Selections>Modify>Contract and enter 2. |
| 5. | Right click to flood fill the contracted selection with your pattern. |
|
That is all there is to each layer. Let's get started...I would suggest loading the selections in the order
I have listed so all the cranes' parts are in the right place.
Also, if you are not in the habit of naming your layers, like me, I would suggest naming them
this time because I will be using these names at the end of the tutorial. It will just
keep you from getting confused later on. Create a new layer. Name it "Back Wing" and load selection backwing.sel. Follow steps 3-5 from above. You know the routine...(Flood fill with the outline color, contract and flood fill the contracted selection with pattern.) Add the next layer and call it "Tail". Load selection, tail.sel. Follow steps 3-5. Add a new layer and call it "Front Body". Follow the same old routine...
Now you should have a completed origami crane. Much simpler than those origami books, wouldn't you agree? We aren't finished yet, though. Our crane is a little one dimensional. We wouldn't want anyone to accuse him of being shallow, do we?! Let's add a little depth to him with some shading. This is where it will have been very handy if you took my advice and named the layers that I suggested... Select the "Front Body" layer from the layers palette. We are going to adjust the brightness. Colors>Adjust>Brightness/Contrast. Use these settings: Brightness= -48, Contrast=10. Click OK. Using the same settings as above, adjust the brightness of the following layers: "Underside Back" "Inner Neck" "Back Beak" Ok, we are getting there. Just a few more shadows to make him more substantial. To do this, we need to merge a few layers. In the layers palette, right click on any layer. Choose View>None. Now click on the little glasses on the "front body" layer and the "back" layer. Right click on either of the layers you just made visible. Choose Merge>Merge Visible. You can rename this layer or not. The merged layers shouldn't get too confusing. Make all the layers visible again by right clicking on the merged layer and choosing View>All. Now for the drop shadow. With the merged layer highlighted, in the layers palette, use the magic wand tool
Again, let's make all the layers invisible. Right click on any layer and choose View>None. Now make the "Tail" and "Back Wing" layers visible by clicking on the little glasses on those layers. Now we will merge these two layers. Right click on one of the layers and choose Merge>Merge Visible. Make all the layers visible again by right clicking on any layer and choosing View>All. Make sure you are on the merged layer that you just created. Use the magic wand and click outside the "wing-tail"" shape. You should now see marching ants. In the layers palette, again, highlight the "shadow" layer. Hit delete. This will delete any shadow that is not on the crane. One more shadow and then we will be done. Highlight the "front wing" layer in the layers palette. Use the magic wand tool to select the area around the wing. Invert the selection (Selections>Invert). Again, we are going to put the shadow on it's own layer. Add a new layer and then drag it below the "front wing" layer. Apply a drop shadow (Effects>3D Effects>Drop Shadow). Using these settings= Vertical and Horizontal set to 1, Opacity=100, Blur=10.
And that is it. BUT, before you merge those layers, just double check that everything is in it's place. Here is a screen shot of my layers. If your layers are in the same order (although they may be named differently) everything should be where it should be. 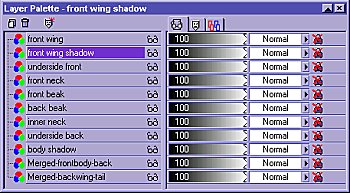 Merge visible layers. Add a drop or perspective shadow or create a scene around it.  Now that your crane is done, I would like to invite you, again, to submit your crane for display on my 1000 Cranes Internet Peace Project Page. Although the specifications are listed at the bottom of the home page, I have listed them here as well...

As always, please do not take this tutorial and place it on any website, CD or book. This tutorial may be linked from other sites for the purpose of presentation on tutorial lists, forums, boards or sites, but not copied. For more details regarding use, please read my Terms of Use. E-Mail me if you have any questions or to let me know when and where you are linking my tutorial. I would really appreciate it. Tutorial Index 
|