|
Miss Liberty Here is Miss Liberty. I saw her in a craft magazine and figured it would be fun to recreate this country-style Statue of Liberty in Paint Shop Pro. Just in time for July 4th!  Created June 21, 2001 �Jo Skidmore This tutorial is written for PSP 7, but can be done in almost any version. Please do not take this tutorial and place it on any website, CD or book. This tutorial may be linked from other sites for the purpose of presentation on tutorial lists, forums, boards or sites, but not copied. For more details regarding use, please read my Terms of Use. I would appreciate it if you would drop me a line letting me know when and where you are linking my tutorial. You can download the zip file containing the selections for this tutorial here After you download the zip file, unzip it and put the selections in a place where you won't forget where they are. No selections, no finished product, unless, of course, you want to attempt this with vectors... If you feel so inclined, you could do this tutorial by making your own vector shapes. I, personally, really like working with vectors, but I figured I would have to make a lot more screen shots to have you do this tutorial from scratch and I was feeling lazy. Maybe next time. Ok, let's get started... I have made a color palette for this tutorial, but feel free to use your own colors and embellish as you wish. You can download the palette by right clicking on the picture and choose "Save Picture As..." to save it to your hard drive. Remember where you saved it cause you now need to open it in psp. File>open and locate the palette file. Double click to open it.  In addition to the color palette, open a new transparent image 350x350. BODY Let's find that first selection, shall we...Selections>Load from Disk. That's as far as I can take you cause I don't know where you hid, I mean, placed all your selections for this tutorial. Once you have located your selections. Double click on body.sel Select the eyedropper tool Choose the flood fill tool Add a new layer and name it "body airbrush" (I add a new layer for the airbrush layers because I tend to be a little heavy handed with the airbrush. With it being on it's own layer, I can then turn down the opacity. In this tutorial I turned it down to a number between 25 & 35). See, here is where you turn down the opacity on the layers palette. 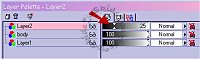
Click on the airbrush tool 
Now, you may deselect. Lower the opacity. If you are happy with your airbrushing, you could merge visible. To do this you would right click on one of the layers. When the flyout appears choose Merge>Merge Visible. This will be slightly different if there are some layers you don't want to merge and I will explain that when the time comes. HOWEVER I find that many times, after I have merged some layers, and continue on with a tutorial I realize that I need to change something on one of the layers I merged and now it is not possible. So rather than have to go back and undo many thousands of steps, I just leave all layers in tact. But that is my own personal choice. STRIPE Add a new layer. Name it "stripe". Load from disk middlestripe.sel. Flood fill with the cream color (if it is still your background color you can use your right mouse button to flood fill with the background color). Add a new layer. Name this layer "stripe airbrush" Change the foreground to black and add your airbrush touches. Turn down the opacity. You could, if you want, merge the "stripe" and "stripe airbrush" layers. Since you don't want to merge these layers with the "body" layer, click on the glasses that appear to the right of the layer name(s) that you don't want visible. Once the layers, that you want to merge, are the only layers visible, right click on one of the layers to be merged. Choose Merge>Merge Visible. But once again, merging limits the amount of changes you can do to that layer, unless of course you don't mind using the undo feature. Deselect. CROWN Add a new layer. Name it "crown back". Load from disk crown2.sel. Use the eyedropper to choose the light grey from the color palette and make your foreground color grey. Click on the flood fill tool and fill the selection with the grey. Add a new layer, yet again. Name it "crown back airbrush". Change your foreground to black. Add black and cream airbrush touches. Lower opacity as needed. If you want, you can merge these two crown layers. Make all other layers invisible and merge visible. We have another part of the crown to make...in order to do that, you guessed it, we need to add another layer. Name it "crown front". Load from disk crown1.sel. Use the eyedropper to choose the dark grey from the color palette and change the foreground color. Fill the selection using the flood fill tool. Now you need to contract the crown1 selection. Go to selections>modify>contract and enter 2. Change your foreground color to light grey. Flood fill the contracted selection. Add a new layer. Name it "crown front airbrush". Change foreground to black. Make sure the background color is cream. Add black and cream airbrush touches. Lower the opacity. Merge the crown front layers, if you want. FACE Guess what?! We are adding another new layer. Name it "face". Load from disk face.sel. Use the eyedropper tool to change the foreground color to peach. Flood fill selection. Add new layer. Name it "face airbrush". Make sure your foreground is black, background is cream. Add your airbrush highlights. Lower opacity. Merge the face layers if you wish. Don't deselect quite yet. Add yet another layer. Name it eyes. Use the paintbrush tool We need another layer for the facial features. Name it "cheeks". Use the eyedropper tool to change the foreground to the pink on the color palette. Using the paintbrush once again. Change the size of the paintbrush to 13. Keep the other settings the same. Put two cheek dots on the face. They need a little blur to soften the edges. Go to Effects>Blur>Gaussian Blur. Enter 2. Now that the cheeks are done, you can deselect. LIBERTY Now we are going to add the writing on the front of Miss Liberty. Feel free to use your own wording. Add a new layer. Name it "liberty". Load from disk liberty.sel. Change the foreground to the blue color, from the color palette, by using your eyedropper tool. Choose the paintbrush tool and change the size to 35 - leaving all the other settings the same. Paint over the liberty selection. You can use the flood fill instead. I just find the paintbrush a quicker technique. I didn't add any spray paint touches to this layer so you don't need to add yet one more layer. But wait, don't get too excited! I still have plenty more layers for you! Deselect. ARMS Shall we add another layer? Say "Yes". Ok, so you can do it now...I'll wait... While you are at it, name it "arms". Load from disk arms.sel. Move this layer to the bottom. You can do this in either of two ways... 1. Drag the layer to the bottom, but that is a long way down if you haven't been merging layers, like me. OR 2. Choose Layers>Arrange>Send to Bottom Flood fill both arms with blue. Now you need to add the airbrush layer. Name it "arms airbrush". Set foreground color to black and background to cream. Airbrush the black and cream on this layer. Lower opacity. Merge the arms layers together, if you prefer. Deselect. STAR Believe it or not, this is our next to last layer. Calm yourself, we can celebrate when the tutorial is finished... Name this layer "star". Load from disk star.sel. Make the yellow the foreground color and flood fill the star. Your last layer is going to be the "star airbrush" layer. Go ahead and add it now. The foreground should be back to black again and the background should be cream. Airbrush this layer with the black and cream. Deselect. Oops, I lied, we have another layer. Make sure you are on the arms layer. Add a new layer. It will appear right above the arms layer. No need to name it unless you are really attached to giving layers names. "Spot" or "Fido" are good names. Load from disk body.sel. Apply a drop shadow. Go to Effects>3D Effects> Drop Shadow. Use these settings 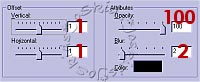 Now do another drop shadow, but change the horizontal and vertical to "-1". Deselect Staying on this same layer, load from disk arms.sel. Invert And there you go...with Miss Liberty, Justice and Layers for all! If you have any questions, comments or suggestions, feel free to e-mail me. I want to thank two fellow members of FlyByNightGraphics, Trish and Meneka, for testing this tutorial for me. They offered some very valuable advice! Meneka has some wonderful tutorials of her own and you can get to them by clicking here. Tutorial Index 
|