 |
| Created July 24, 2001 �Jo Skidmore |
|
In this tutorial we will be making a fading side border background. It can be used on webpages
like I have done so artfully on this web page
or as a backround in your e-mail - now won't your friends be impressed! I wrote this tutorial for PSP7, but it could be made with previous versions. Basically, the only other thing you will need besides PSP, are dingbats. I am using Xspiralmental by McFontsy. You can download the zip file here and then unzip it to your hard drive. McFontsy has a few other fonts at her site. You can check her site out by clicking on the button Of course, you are more than welcome to use any other dingbat that strikes your fancy. As if you don't probably have enough fonts, you could go over to my favorite font site and pick up some more, but come back soon (famous last words) - You have a tutorial to do! Back already?! You have your dingbats? Good, let's start! Open a new image 1024x200. Use the flood fill tool Add a new layer. Double click on the selection tool 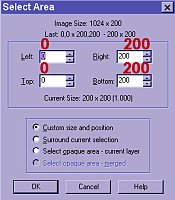 You now have a 200x200 square selection at the far left of canvas. Keep it selected while we head off to do some preparations to fill that area. Follow me. You probably guessed that I was bringing you over to the gradient area. We are going to fill that selection you just made with a foreground/background linear gradient. Set your foreground color with a dark color. The backgound color should match the color you flood filled on layer1.
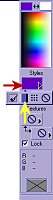
Click on that gradient. In the Gradient box that appears use the settings shown below. Now, don't be in a hurry and click ok, yet. We are going to do a little work on this gradient. Click on Edit (see the red arrow on the left?) 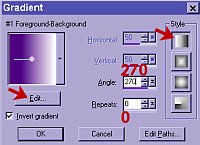 This will open the gradient editor - What an appropriate name, wouldn't you say? Sure beats Margaret or George. 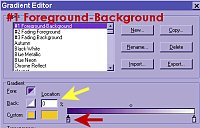 Make sure the gradient type is #1 Foreground-Background. Click and hold left mouse button down on the box with the triangle on the far left of the gradient (shown with red arrow). Slide the slider to the right till the "location" box (shown by yellow arrow) shows 25. Close this box by clicking on OK. Close the gradient box by clicking OK. Using the flood fill tool. Fill your 200x200 selection. You remember the selection... we created it way back before this gradient business. I don't know about your gradient, but mine is a little streaky. Let's diminish those little lines by adding noise. Effects>Noise>Add. Enter a "3" in the noise box and make sure that "uniform" is marked. Hit OK. Lines gone. I could use some of that for those nasty little lines on my face; do you think it comes in a lotion? Deselect Now we are going to place the dings. As tedious as it sounds, I like to place each ding on it's own layer. To add several layers at the same time, hold the shift key down while clicking on the "papers" on the layers palette - you know the place... Click for as many layers as you think you'll need. I put 6 spirals in my image so I clicked 6 times. Make sure that layer3 is selected and then choose your text tool OOoopss, did you notice that we forgot to change the styles?! You didn't?! Look at the text entry box again...Now I could have you close this box and mess around at the layers palette and then reopen the text box, but I would rather show you a cool button I discovered. Look down there, lower left, just above the ok button. Click the box labeled "standard text". Voilà! You get plain text. Woohoo! Isn't that handy! Now choose the ding and the size that you want to place on this first layer. Make sure that floating and antialias are checked. When you are satisfied with your choice, click OK. If the ding isn't quite where you want it, you can move it around before you deselect. If the ding is deselected, you can still move it around by using the move tool Choose layer 4. Place another ding on this layer. Move it around to your heart's content. Deselect Continue placing dings on their own layers till you have them placed just right or until you get tired of adding dings to their own layers - whichever comes first... If you still need to make some adjustments, choose the move tool again. If you click directly on the ding that you want to move, it will automatically select the layer that that ding is on. Once you have all your dings in a row, you can merge the layers. You are done!. This is a pretty simple expample but imagine the possibilities! 
Please do not take this tutorial and place it on any website, CD or book. This tutorial may be linked from other sites for the purpose of presentation on tutorial lists, forums, boards or sites, but not copied. For more details regarding use, please read my Terms of Use. I would appreciate it if you would drop me a line letting me know when and where you are linking my tutorial. Tutorial Index 
|