This tutorial was made with larger screen shots so that the
settings can be seen more easily. Please be patient as it downloads.
 Created November 17, 2001 �Jo Skidmore Like many of my tutorials, I got this idea while flipping through a catalog. If I can't buy it, I might as well make it in Paintshop Pro... It is written for PSP7.
Besides your great sense of adventure around vectors, you will need this swatch of green gingham. 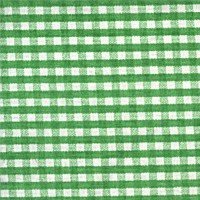 Right click on the gingham and choose copy. Now go to the Paintshop Pro workspace and right click and choose Paste as New Image. Minimize this image for now, we will come back to it later. You will also need this button image 
Click on the red button to download the zip file of the psp image. Once the file has been saved to your hard drive, unzip it and save the psp image somewhere for safe keeping. Now that the prep work is done, let's get started on the ornament. Open a new image 400x400 with a transparent background. On your color palette, make sure the foreground/stroke color is null and the background/fill color is the color you want to make the ornament. I am using #FFD201. Click on the preset shape tool 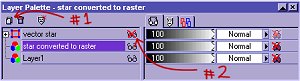
Drag the star layer to the stack of papers in the upper left corner of the layers palette (Shown by the #1 arrow, above). This will create a duplicate vector layer. You could also choose Layers>Duplicate to get the same results. In the layers palette, right click on the first star layer and choose "Convert to Raster". While this layer is still highlighted, choose the magic wand tool Deselect. We are going to continue to work on this newly created raster layer, but to be able to see what you are doing to this layer, turn off the visibility of the vector star layer, above it. Click on the glasses (as indicated in the above graphic by the #2 arrow). To make your ornament "felt-like" in appearance, we are going to apply a texture. Effects>Texture Effects>Texture. Click where the red arrow indicates and choose #6 - Named Brush Strokes from the menu. Then use these settings. 
Hmmm, beginning to look like an ornament, but it's a little flat. Let's add some "stuffing". Apply an inner bevel (Effects>Inner Bevel) with these settings. 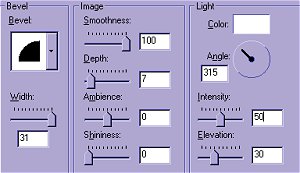
Highlight the copied vector star layer and get ready for some vector magic. Calm yourself, don't let the word "vector" scare you. We are not going to edit or move any node. We are going to create the blanket stitch that will go around the outside of the ornament so the stuffing doesn't fall out. Did you notice, when you highlighted the vector image, your puffy star disappeared? Not to worry, it is just sitting their behind the vector image. It will become visible in a moment. Choose the Object Selector Tool In the tool options dialogue box, choose properties. A new dialogue box will appear. Click on the foreground/stroke color swatch and choose a color for the "stitching". I am using black. The background/fill color should be set at null. Stroke width=3 and click on the drop down menu arrow for Line Styles. Choose #5 Dash for your line styles. You migh be able to see, in the background, your puffy star has reappeared and it now has a dashed outline around it. But, DO NOT click on ok. We haven't finished "stitching" yet. Click on "Custom" In the box titled "First Cap", click as shown and choose the square cap. 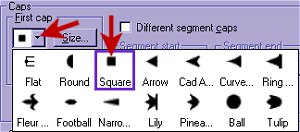 Note that the "Different Segment Caps" box should not be checked. Now we will change the size of the first cap. Click on size and use the settings shown. 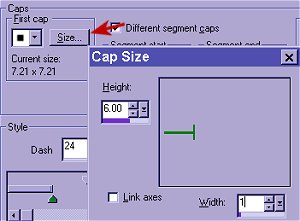 The other segments are grayed out so there is no need to mess with them. Under "Style", change the box titled add dash to 26. Then click on the top slider (as shown by the red arrow - See, it is the upper slider. It will turn dark red when you click on it) and slide it as far as it will go to the left. 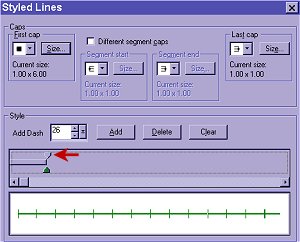
Click "Save As New" and give it a really clever name like, Blanket Stitch. Since this is a blanket stitch, we don't want the stitches hanging off the star like it is. In the layers palette, right click on this "stitching" layer and choose Convert to Raster. Load the alpah channel we made earlier. Selections>Load from Alpha Channel and hit ok. We are going to prep the selection so that when we delete the extra stitching we will have a fairly smooth line. Contract the selection by 2. (Selections>Modify>Contract. Enter 2 and click ok.) Now feather the selection (Selections>Modify>Feather). Enter 1 and click ok. Now delete. Make a duplicate layer of the "stitching" layer. Drag it to the paper stack in the upper left corner of the layers palette or choose Layers>Duplicate. Highlight the lower of the two "stitching" layers and apply an gaussian blur. Effects>Blur>Gaussian Blur. Enter 3, ok. We are going to get rid of the shadow that falls outside the ornament. Load the alpha channel again. Selections>Load from Alpha Channel. Selections>Expand. Enter 2 and then delete. Deselect. The stitching needs a little more depth so we are going to add an inner bevel. Highlight the " stitching" layer - the one without the blur. Apply an inner bevel (Effects>3D Effects> Inner Bevel) with these settings. 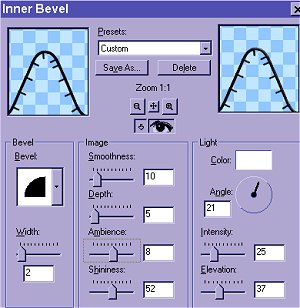
The ornament is done, but doesn't look to countrified. Let's add the heart patch and button. Restore the green gingham swatch that I had you minimize at the beginning of the tutorial. Use the eyedropper tool 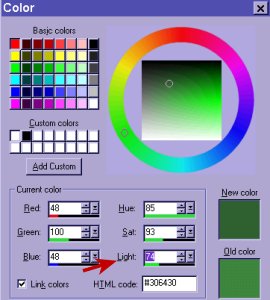 Choose pattern for the background/fill color. Open the pattern menu and choose the green gingham pattern (Scale=30, Angle=0) Choose the preset shape tool and choose a heart shape - or whatever shape you prefer. Use the following settings. 
Click where the red arrow indicates and choose your blanket stitch. Draw a little heart somewhere on the star. I did a little node editing to make the heart a little more rustic. If you aren't comfortable node editing, you can leave the heart just the way it is. Open the button image from the location where you saved it. You do remember where you saved it, don't you?! With the button image active, copy the image. CTRL+C. Then Make the ornament image active and paste the button on it's own layer. CTRL+L. Give the button a drop shadow. I used these settings. 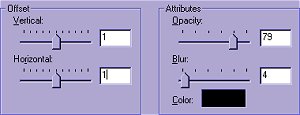
Last but not least, add a hanger. I added a new raster layer. Drag this layer to the bottom of the layers palette or you can use Layers>Arrange>Send to Bottom. I used the rope tube with the scale set to 23 & step at 1 to draw in a cord, but you could use a the freehand draw tool or the paintbrush to add a hanger. Since the rope tube is gold, I adjusted the color out of it. Colors>Adjust>Hue/ Saturation/Lightness. Saturation and Lightness were set at -100. And there you have it, A country felt ornament... Merge visible layers and save.  Thank you so much to Deb Larson, Dyane McSpadden, Sue Cat, Susanne Kleen and Beverly R. for testing this tutorial for me. Their honest opinions helped me to make the tutorial a little more clear.  Tutorial Index Please do not take this tutorial and place it on any website, CD or book. This tutorial may be linked from other sites for the purpose of presentation on tutorial lists, forums, boards or sites, but not copied. For more details regarding use, please read my Terms of Use. Drop me a line if you have any questions or to let me know when and where you are linking my tutorial. I would really appreciate it. |