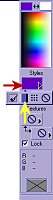
 Created August 4, 2001 �Jo Skidmore I was playing around with my rice paper background tutorial (the background on this page) and I thought, hmmmm, that looks like a feather boa, but then I thought, how useful would a feather boa be to people? Not very... I squinted. I looked at the feather boa upside down. I looked at it backwards and then it started to look a lot like a caterpillar! Ahhh, a caterpillar, now that is something people could use! Maybe. Heck, you could still make it into a feather boa if you wanted... If you would like to try the rice paper tutorial, click here. For those of you who have done the tutorial, some of the settings in this tutorial will look familiar - like you remember the settings of all the tutorials you use! Let's begin This tutorial was written for PSP7. If someone can come up with a good alternative to the fur texture in PSP7, then it might be possible to do this in a previous version, but I have yet to figure an alternative out...sorry. Besides PSP, you will need Paint Engine. Open a new image 300x300. Set your foreground color to white. Use the flood fill tool Now we are going to put our caterpillar shape on the canvas. Your caterpillar can be any color you want - experiment, use solids, gradients, patterns (without white), whatever. For this tutorial, I am using a linear gradient.
I am using the autumn gradient with these settings. The red arrow indicates where you would click if you wanted to choose a different gradient, but then you probably knew that, didn't you?! 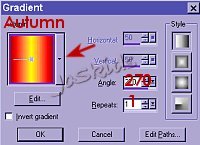 Choose the paintbrush tool 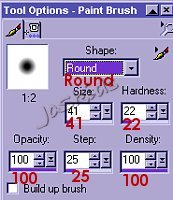 Draw a caterpillar shape on your canvas. Here is an example of my artist talent.  Notice, I made one end slightly bulbous to distinguish which end is his head. Cause unless the little critter is moving, it is hard to tell which end is which. I'd hate to see you put the eyes on the wrong end. Not to mention how embarrassed the caterpillar would be! Now the fuzzy part. Or is that the fun part? Well, actually both, here we go... Go to Paint Engine (Effects>Plug-in Filters>Fantastic Machines>Paint Engine) Choose "Sparks" from the settings drop down menu and then click apply.  (I borrowed this screenshot from one of my other tutorials so the picture won't match this tutorial, but the settings are correct.) Not fuzzy yet...We are going to use the fur texture effect (what else?!) Effects>Texture Effects>Fur.and apply these settings. Click OK.  (I borrowed this screenshot from one of my other tutorials so the picture won't match this tutorial, but the settings are correct.) If you think he looks all cute and fuzzy now, just think of the personality he will have when you add the eyes & antannae. But first, we need to move this critter to a transparent background. Unless, of course, you want to your little critter sitting out there on that great vast white wasteland...We are going to cut him out of the background without losing too much of his fuzziness... Choose the magic wand Change the tolerance on the tools option palette to zero. Now go to Selections>Modify>Select Similar. Selections>Invert. Edit>Copy Open a new image (the original dimensions of 300x300 should be set) and then paste as a new layer. Ok, now for the personality! Add a new layer. Make the foreground black and the background white. Choose the presets shapes tool 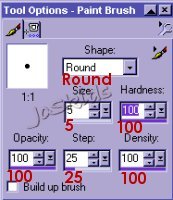 Get out your magnifying glass (better yet, your zoom tool Rather than have you fool around and make another eye from scratch (they probaby wouldn't match anyway.) Just highlight the eye layer in the layers palette and drag it up to the little stack of papers on the top of the layer palette. Although it doesn't look like it, there is a second eye - right on top of the first. Select the move tool Add a new layer. Using the paintbrush tool again, we are going to add antennae. Change the brush size to 1. Draw some characteristic antannae. That is the extent of the face for this tutorial, but if you feel so inclined to add a nose & mouth. Please, be inclined. Once you are satisfied with your caterpillar, Merge visible. Now he is ready to be made into a transparent gif or moved to a scene... 
As always, please do not take this tutorial and place it on any website, CD or book. This tutorial may be linked from other sites for the purpose of presentation on tutorial lists, forums, boards or sites, but not copied. For more details regarding use, please read my Terms of Use. Drop me a line if you have any questions or to let me know when and where you are linking my tutorial. I would really appreciate it. Tutorial Index 
|