


|

|

|

|

|
|

|

|

|

|
||
| Candy canes | Pillar candle |
| Hot glue gun | Ribbon or raffia |
| Glue one candy cane to side of pillar candle with hook part of candy can facing down and out. Glue second candy cane directly opposite first candy cane. You want to have the hooked part of the candy cane as a support base so be careful to glue on a flat surface to assure balance. Continue by gluing third candy cane to candle at a right angle to the two glued (similar to a compass at North, South, East and West). Glue fourth candy cane opposite to third. Continue filling in areas with candy canes. Remember to assure balance when doing this. Once done gluing candy canes on tie a ribbon or raffia around bottom of candy canes and it is complete! Note: Keep plastic on candy canes. Canes should not be sticking above candle when complete so make sure the candle is tall enough. Never leave candles unattended when burning. |
| Oatmeal | Glitter |
|
Mix together oatmeal and glitter. Put some of the mixture in a small plastic bag.
On a heavy piece of construction paper cut to about 2 x 4 1/2, print the following instructions. |
|
Magic Reindeer Food for Christmas Eve
On Christmas Eve, sprinkle the Magic Reindeer Food on your Lawn--The Magic Glitter sparkling in the Moonlight and the smell of the Oats will guide Rudolph to Your House! |
|
After you've finished writing the instructions, fold the paper rectangle in half and staple to the top of the plastic bag.
This makes a perfect Christmas gift for kids to give out to their school-mates before being let out for Christmas holidays |
| 1 Tbsp paint powder |
| 1 Tbsp liquid dish washing soap |
|
Mix together the paint powder and dish washing soap.
Paint different Christmas designs on the window: bells, Santa, reindeer, snowflakes, etc. on windows. After the Christmas season, just use a wet rag to wash off your designs |
| 4 Oranges | 4 Lemons |
| 1/2 c Whole cloves | 1/2 c Whole allspice |
| 10 Cinnamon Sticks, broken | 10 Bay leaves, crumbled |
| 8 oz Decorated jelly jars with -bands & lids |
|
Using a vegetable peeler, peel fruit carefully, removing only the peel, not any of the white pith. Cut or tear into one inch pieces.
Spread peel on paper towel lined pan. Place in preheated oven to 175, or set oven to WARM. Dry in oven for 1 1/2 hours, tossing occasionally. Peels should be leathery and/or slightly crunchy. Spread peels on dry paper towels and let air dry for 24 hours. Combine with remaining ingredients. Fill jars with mixture, place lids on and screw bands on tightly. Yield: 3 or 4 half pint jars. To use: remove lid and leave band on for decoration to fragrance a room. OR put one Tbsp into a jar and fill jar with boiling water to release fragrance. |
| 1 c Applesauce, drained | 1 c Cinnamon |
| 1 oz Cloves, ground | 1 oz Nutmeg, ground |
| 1 oz Ginger, ground | Cinnamon for dusting the cutting board |
|
Combine ingredients to make a stiff dough. Roll out on board dusted with ground cinnamon.
Cut with cookie cutters of your choice. Put hole in top for string. Lay out flat to dry. Turn over every 12 hours until completely dry |
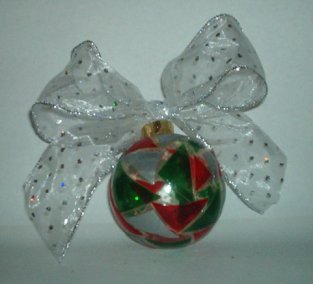
| Glass Ball Ornaments (Various Sizes if Desired) | DecoArt Reusable Styrene Sheets (One for each paint color except Raindrop) |
Click to View Larger Image |
|
DecoArt Liquid Rainbow Paint: Christmas Red, Gold Pearl, Leaf Green, and Raindrop (or colors of your choice) |
8" Length of 1/4" diameter wood dowel for each ornament | |
| Block of floral foam | 1 1/4 " to 2 1/4" wide wire edge ribbon | |
| Craft Sticks | Scissors | |
| Vinegar |
|
Remove the cap and hanger from each ornament. Mix equal amounts of vinegar and water and use mixture to clean the glass ball ornaments. Thoroughly dry the ornaments.
Peel the protective plastic from the styrene blank sheets. Onto separate styrene blank sheets pour one half bottle each of Christmas Red, Gold pearl, and Leaf Green. Use craft sticks to evenly spread paint on the sheets. Let paint dry for 24 hours or until it is transparent. Carefully Peel the paint from the sheets. Use scissors to cut triangles in random sizes from each paint color. Lightly press the triangles onto the ornaments in a mosaic pattern Push a wood dowel into the floral foam block. Invert an ornament on the dowel. Squeeze Raindrop paint onto the entire ornament to run across and evenly cover the ornament. Repeat for each ornament. Let the paint dry. Replace the cap and hanger on each ornament. Thread a length of wire edge ribbon through the hanger and tie it into a bow. |
| **The information for this craft was taken from Better Homes and Gardens Creative Collection Publications Holiday Crafts 2002 Magazine. |
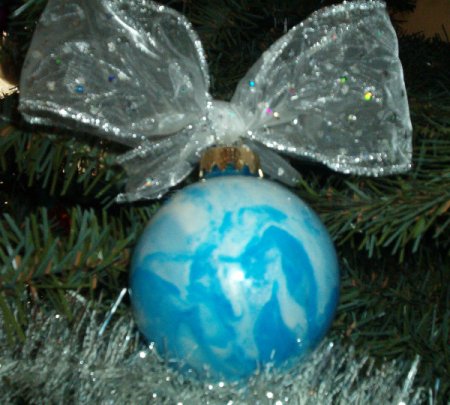
| Glass Ball Ornaments (Various Sizes if Desired) |
|
DecoArt Liquid Rainbow Paint And / Or Gallery Glass Window Color Paint |
| 1 1/4 " to 2 1/4" wide wire edge ribbon |
| Scissors |
|
Remove the cap and hanger from each ornament. Squeeze desired paint colors inside the ornament. Move the ornament around so the paint swirls and covers the entire inside of the ornament.
I found that using one of each of the two types of paint works best. One type is thicker than the other and this prevents the two colors from mixing into one color and gives you the swirled effect. Allow the ornaments to dry thoroughly then replace the cap and hanger on each ornament. Thread a length of wire edge ribbon through the hanger and tie it into a bow. ** Note: It takes a few days for the paint inside the ornaments to dry. You may want to drain the excess paint that collects in the bottom of the ornament periodically. Also some of the paint colors dry transparent. The transparency of the paint may be affected by the use of a second opaque color. |