 Download the LITTLE RED BOX tool
Feel free download anything you want, but if you want to copy or post please ask first!
Mail any questions or comments to: [email protected]
Last updated 19 February, 2002
Tutorials
Rules of Thumb
for x/y axis� & rotations
OK, you�ve created a beautiful object (if you do say so yourself!) You�ve imported it back into Tmog, &.......oh no, what happened to it? It has ghosts, it doesn�t line up right, and if you try it in the game.....AAUUGHGH! Not to worry.....I�ve created a few little rules of thumb to help you along. Be warned, this is NOT written in stone. It doesn�t always work, and appears to differ between types of objects.
First of all I use any tutorial I can get my hands on that makes sense! Presently it seems to be SimGoddesses, but I think I combine a little of every ones! I thank all of them for writing them, I�d have been lost when I first started! I use PSP7 and Photoshop6. In general I let t-mog handle all the zooms and buffers, unless there is a problem. But I do a lot of filigree type work and there it�s not a good idea to alter the alpha channel because your hard work tends to disappear!
As I get more experienced I will add �rules of thumb� for each type of object. But for now here are some simple(hah) steps to follow:
First thing to make sure of is that before you import, while still using your graphics program, that your object is placed in the yellow sprite box approximately where it should be in the game. If you have made an entirely new item, you may have to look where a similar object was placed for a reference.
Here are the rotations used in Tmog. I label them from left to right 1 thru 4.
Position #1-back view of object front facing upper right corner.

Position #2-front view of object front facing lower right corner.
Position #3-front view of object front facing lower left corner.
Position #4-back view of object front facing upper left corner.
From here on I will refer to them as 1,2,3,&4. Note: ALWAYS write down your rotations! Tmog will change them when you re-import and object, and starting all over again might not work.
Each rotation follows certain �rules of thumb� depending on the object. I usually start using the x/y coordinates of the object I cloned, unless I have changed the size or angle drastically. Then I use the x/y coordinates of the object whose appearance, location and actions are the closest to what I want the object to be like.
Example; even though my elevatorsides are cloned from a statue, I used the coordinates of the bookcase to start positioning them in the game, because the bookcase was the closest object in appearance to the way I wanted the sides to be, but I didn�t want my sims to sit and read from the elevator!
Depending on the type of object some rotations may be �flipped.� Use the method of flipping closest to the object the appears the way you want it to flip and rotate in the game. For example if none of the rotations are flipped, a certain formula will apply. If #1 & 4 are flipped a different formula would apply than if # 2 & 3 were flipped etc. These formulas refer to the Graphical States & the Draw Group ID�s(sprites) in Tmog. Each Graphical State will have an x & y coordinate for each Draw Group ID, and each rotations will be different, but follow a numerical pattern. In general if both x & y are 0 the object will not show, although this may not apply to all zooms.
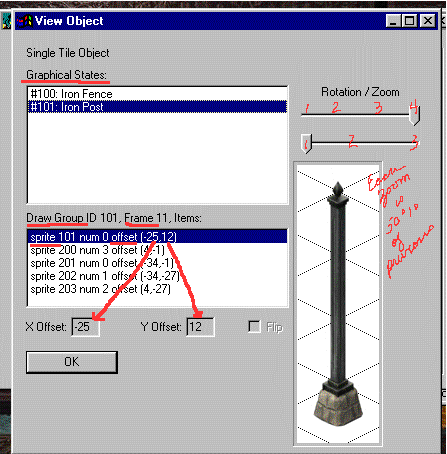
Each zoom is approximately � of the previous zoom, and must be applied to every sprite in every zoom. Which is why multi-tiled and complex objects are so difficult to get right.
In some stationary objects (such as single tile tables) that have no back or front or unique decoration, all the rotations� sprites can be the same the same(yippee.) In other words all the x�s will be the same, and all the y�s will be the same. X very rarely equals y.
thumby rules:
If your object has #3 & 4 flipped; (note: often these are items to be placed against a wall)
for the X offset:1 & 2 will be the same value or close.
-----------------3 & 4 will be the same value or close.
for the Y offset:1 & 4 will be the same
-----------------2 & 3 will be the same.
If your object has # 2 & 4 flipped; (note: your object may not be facing the same way as stated)
position#1-front view facing lower right
position#2-front view facing lower left
position#3-front view facing lower right
position#4-front view facing lower left
for the X offset:2 & 4 are the same or close
-----------------1 & 3 are the same.
for the Y offset:1,2,3, & 4 are the same.
For objects that are square bottomed or centered:
for the X offset: 1, 2, 3, & 4 will be the same or close.
for the Y offset: 1, 2, 3, & 4 will be the same or close.
These rules will follow through to every spite in multi-sprited objects.
Here is the method I use to position my objects:
In position #�s 1 & 3, position your object within the diagonal box the way you want that view to appear.
Now apply the rule for #3 & 4 flipped:
#1 & 4-Y offset is the same.
#1 & 2-X offset is the same or close.
#3 & 4-X offset is the same or close.
#2 & 3-Y offset is the same.
After you get it right apply it to the zooms.
Start with lower part 1;
Get rotations 2 & 4 where you want them to be using the edges of the diagonal tile. Keep them as close to the original as possible. None of the rotations should be flipped.
Adjust according to this theory;
#1 & 2-X offset is the same.
#3 & 4-X offset is the same or close.
#2 & 3-Y offset is the same.
#1 & 4-Y offset is the same.
Adjust all Graphical States and Draw Groups in lower part 1 according to this theory. If your elevator doors open and close the doors should follow the theory as well, remember to adjust them according to the way ( so they appear correctly on the door frame) you have adjusted rotations 2 & 4.
Now move on to Lower Part 2: (note: this is confusing)
If Lower Part 1 = --then --- Lower Part 2 =(is the same as lower part 1's)
Rotation # 1---------------- Rotation # 3
Rotation # 2---------------- Rotation # 4
Rotation # 3---------------- Rotation # 1
Rotation # 4---------------- Rotation # 2
Repeat this for each door(graphical state) and Draw Group.
Now for the good news...it seems the Upper parts are generated automatically so you don�t have to mess with them!
Now for the bad news.....you still have to do all the zooms for each draw group and graphical state! But remember each zoom is approximately 50% of the previous zoom. It�s tedious, but not too complicated.
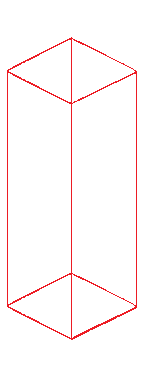
Download the LITTLE RED BOX toolThis is a tool I created because I seemed to always have objects poking because I would make them too big or too long, not because of the z buffers. It is a box as close an approximation to the size of a diagonal tile (height, length, width) within the sims game. It is not exact, simply because I didn�t know how to make it so. But it will help you make a series of objects that fit next to one another without overlapping or infringing upon each other. I have tested it in Photoshop6 and PSP7. It is in Photoshop format because PSP will read Photoshop files, but Photoshop will NOT read PSP files!
Read whichever object tutorial you like best. Using those instructions you will download this tool and use it as a guide, then delete it before importing the object back into t-mog. You must use a a graphics program that supports layers such as PSP7 or Photoshop.
Open your cloned sprite and change to RGB or 16 million colors.
Open the little red box file.
Select the little red box with your magic wand, invert your selection, copy, then paste it into the sprite you want to work on. It should become a layer of it�s own.
Take notice of how the object you cloned or, the object you want to model something close to, was positioned inside the sprite. Also take note of how it was positioned inside the diagonal box in t-mog.
Center the box around the object.
Edit/color/change the object using the tutorial you like. You may have to move the box�s layer forward or backward as you work to see the lines properly, but that is all you should do. The box should serve as your guide. Keep the object within the box.
When finished editing your object, delete the box�s layer before you flatten/convert to 256 colors.
Repeat for all sprites.
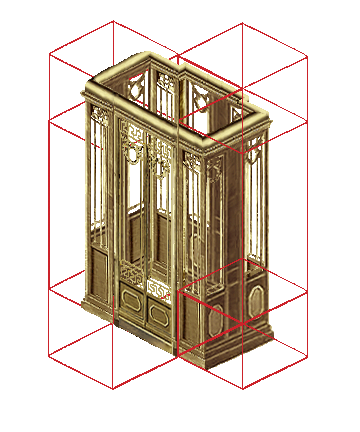
You can also use the box to create new objects that will butt up against each other by placing one or more boxes next to each other. The box can also be used as a guide for multi-tiled objects. Here is an example of how I used the box to make my elevator:
That�s all so far........I�ll add more as I make more objects. Hope it has helped a little.
Cherahnna/[email protected]