Making the Skin
| 01. Open up Photoimpact and make a new file that is 275x348 pixels. You can choose to have any color as the background. | |
| 02. Open up your picture files that you wish to paste on the skin. | |
| 03. Cut and paste the pictures and place them on your new file. | |
| 04. Save your new file. | |
| 05. Open up Skinner and load your new file. |
|
| 06. Choose Continuous from the Adjustment Mode menu. |
|
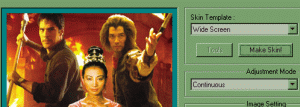
| 07. Choose a template in the Skin Templates Menu; I like to use Wide Screen for my skins. | |
| 08. Click the Make Skin button. | |
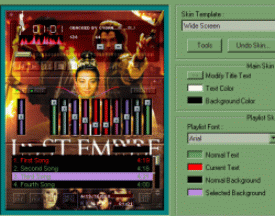
| 09. Now you can modify your title text, choose text font, and choose the colors for your text and backgrounds. Make sure they match with the colors in your file. |
|
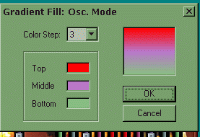
| 10. Then click on the Tools button. Lets go first to the Visualization settings. That's the one that goes right under your time elapsed in your skin. The most common way to do it is a gradient fill which is basically light to dark color or one color to another color. To get a gradient fill, click on the option button. Go to gradient fill and click on fire mode. A window will pop up with three small boxes. The easiest way to do it is switch the color step to 2 instead of 3. That way if you're doing a skin that goes from red to black you dont have to worry about the middle color. Click on the top box and change it to red. Click on the bottom box and change it to black then click ok. It is basically the same in Oscil. mode. Then click your apply button and then hit ok. Now your ready for the Equalizer settings. |
|
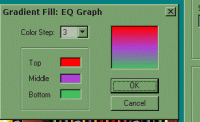
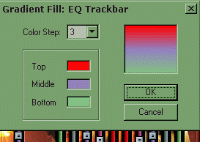
| 11. Click on Tools and go to the Equalizer settings. You do the same thing with the options and the gradient fill. Click on Equalizer graph first. For practice, make the top box red, the middle box purple and the bottom box green. Hit ok and then do the same thing for the Eq trackbar. |
|
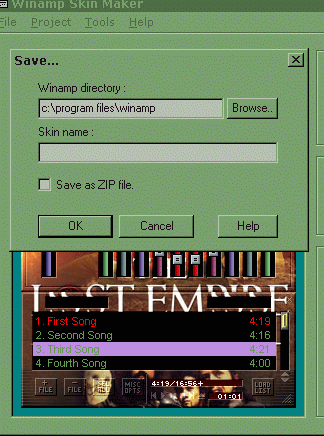
| 12. Go to save and save your skin. It will automatically save it in your current skins folder. Make sure the box that says "Save as ZIP file" is UNCHECKED. |
|