ShuttleBirds Tatting Guild
of Spokane, Washington, USA
Home Guild News & Meetings Tatting Links Officers Patterns Photos Workshop
![]()
P.O. Box 2622
Spokane, WA 99220
![]()
|
|
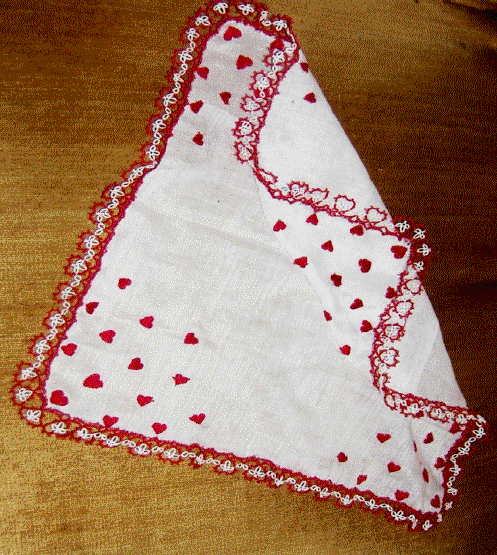
Angel at Heart Edging
By Lynda Klymko Copyright 01/10/2006
I was looking for an edging to go with one of my Mom’s favorite handkerchiefs, I found several that I liked but none that were delicate enough to go with this particular hanky. I tried designs in different sizes of thread, but I wasn’t satisfied. I decided to design my own, and ‘the rest is history’, or so I’m told. Here is my first original design that I feel good enough about to share with my Guild, The ShuttleBirds
Tatting Guild of Spokane, WA.
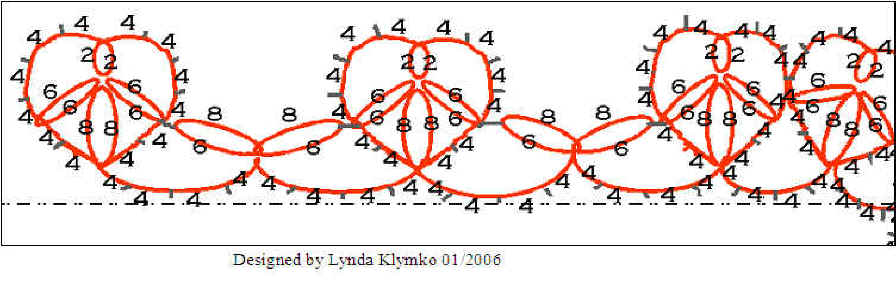
Abbreviations:
First HeartR: 8 – 8, clr, rw
C: 4 – 4, rw R:
6 + 6, clr, rw (join in picot of first ring in heart) C: 4 – 4 – 4 – 4, rwR:
2 + 2, clr, rw
C:
4 – 4 – 4 – 4, rw R:
6 + 6, clr, rw C:
4 – 4, rw; join into the base of first ring. Chain
C: 4 – 4 – 4 – 4, rw
Bow
R: 6 + 8, clr, do not rw; join into base of 4th
ring in Heart.
R: 8 – 6, clr, rw
Chain
C: 4 – 4 – 4 – 4, rw
Heart
SLT: the chain thread should be against the chain, and the ring thread is going out to make a ring so that will come out right next to the chain thread, (Is that as clear as Mud?? R: 8 – 8, clr, rw
C:
4 – 4, rw; join to base of 2nd half of Bow before starting ring R:
6 + 6, clr, rw (join in picot of first ring in heart) C:
4 – 4 – 4 – 4, rw R:
2 + 2, clr, rw C: 4 – 4 – 4 – 4, rw
R: 6 + 6, clr, rw
C:
4 – 4, rw; join into the base of first ring. Bow; Chain;
Corner Heart Turn:
* -- *
5 Hearts with (6) Chains in-between & at either
end *Heart
SLT;
R: 8 – 8, clr, rw
C: 4 – 4, rw; join to picot of 2nd half of Bow before starting
ring
R: 6 + 6, clr, rw (join in picot of first ring in heart)
C: 4 – 4 – 4 – 4, rw
R: 2 + 2, clr, rw
C: 4 – 4 – 4 – 4, rw
R: 6 + 6, clr, rw
C: 4 – 4, rw; join into the base of first ring.
Work Chain; then
go to
Heart; SLT;
R: 8 – 8, clr, rw
C: 4 – 4, rw
R: 6 + 6, clr, rw (join in picot of first ring in heart)
C: 4 + 4 – 4 – 4, rw; join to 7th picot, just before the 4th
ring of the last heart.
R: 2 + 2, clr, rw
C: 4 – 4 – 4 – 4, rw
R: 6 + 6, clr, rw
C: 4 – 4,
rw; join into the base of first ring. . Chain; Heart; Chain; Heart; Chain; Heart, Chain*, and corner is turned.
Bow; Chain, Heart; Chain; Bow (I named each section, so it is easy to just follow the directions for each section, instead of writing it out over and
over again).
You will need to sew the edging on as you go along so you
know where to place the Corners. When finished, ease in last chain to join at the base of the First Heart. Tie and work ends in, then cut off excess thread. I hope you like my first try at designing. If you find any
mistakes, please let me know. I did a lot of searching on the internet, and in the books we have available in the Guild Library, so I believe this is completely original, although some elements are similar to
others I have seen. This pattern may be shared with others, for your and their own use, BUT I reserve the right to publish the pattern, I believe
it is protected. 1/10/2006
|
Last modified: October 16, 2008 |