The following weather instruments are meant to be used to teach concepts. Because you will be making them yourself, they will not be incredibly accurate. To get the main ideas across, they don't need to be accurate, as a simple "Low," "Medium," or "High" is enough to get across the relation of air pressure, for example, to the possibility of rainfall.
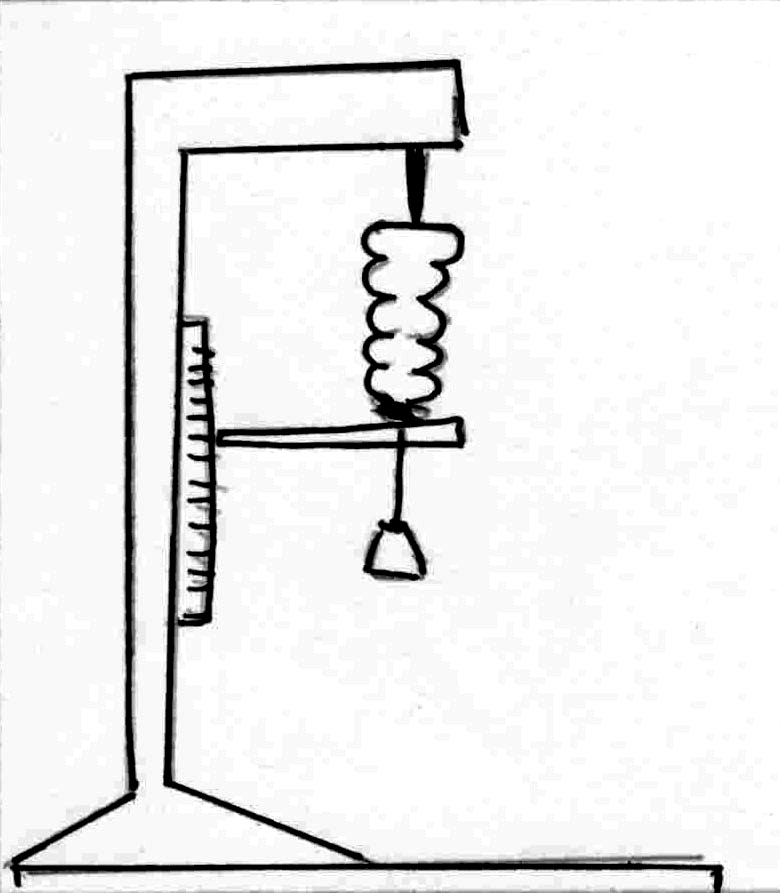
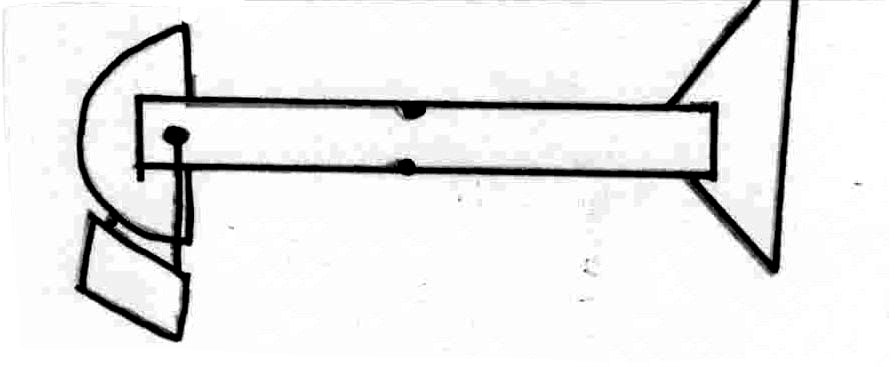
Compress the tube or hand grip and seal both ends with the wooden plugs
and the cement.
Tie the weight to one end of the grip, and hang the grip on the wooden
stand by the other end.
Attach the pointer to the rubber tube so that is lies parallel with
the floor.
Stand the notecard on the stand.
Mark where the pointer contacts with the card. As the air pressure
changes, the tube will expand or contract. Mark these changes on the card.
Barometer Design #2:
This barometer consists of a small sealed plastic
box, bottle, or rubber ball. A spring clip is placed around the sealed
container. As air pressure increases, it causes the spring clip to compress
the container. As air pressure decreases, the greater pressure inside the
container pushes outwards and expands the clip.
Materials:
A sealed soft plastic box,
bottle, or hollow rubber ball
A spring clip
A board to mount the system
on
A small stick to act as
a pointer
A notecard or a piece of
cardboard
Nails
Glue
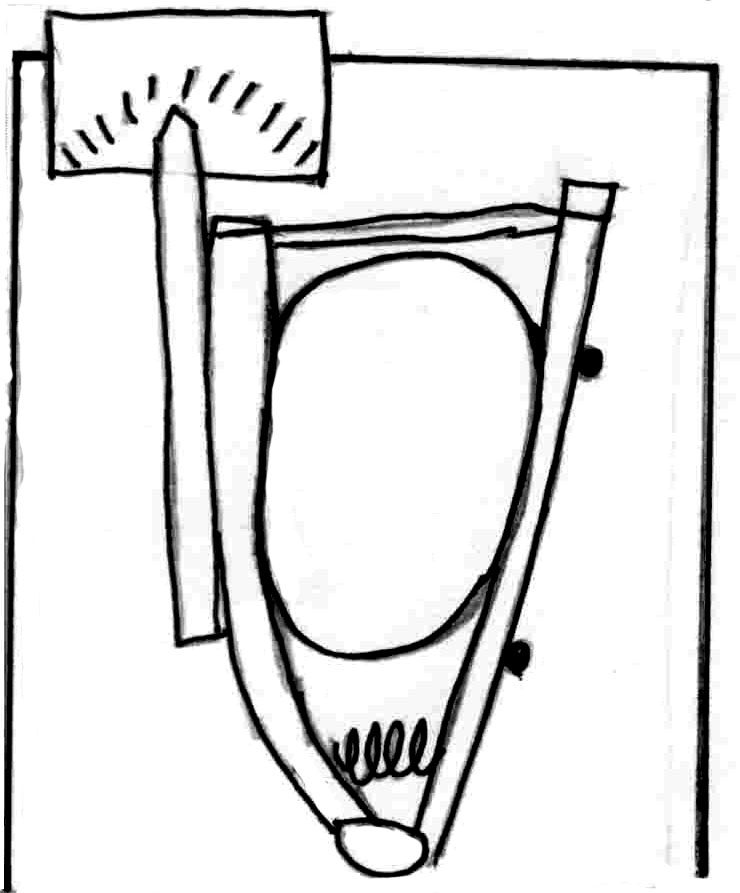
Place two nails into the board. These will be used to mount the barometer
to the board.
Make sure the container is closed and sealed. A little wax or rubber
cement can insure the seal. Place the spring clip around the container.
Mount the spring clip to the board by attaching one of its arms to
the nails.
Attach the pointer to the other arm.
Place the notecard under the pointer, and mark where the pointer lies.
As the pointer changes position, mark the new position on the card.
Beaufort Scale:
One of the easiest measures of windspeed is scale by Sir Francis Beaufort
in1805. Beaufort orbserved, measured, and classified windspeeds and by
the effect of the wind on the environment.
|
|
|
|
|
|
|
|
|
|
|
|
|
|
|
|
|
|
|
|
|
|
|
|
|
|
|
|
|
|
|
|
|
|
|
|
|
|
|
|
|
|
|
|
|
|
|
|
|
|
|
|
|
|
|
|
|
|
|
|
|
|
|
|
|
|
|
|
|
|
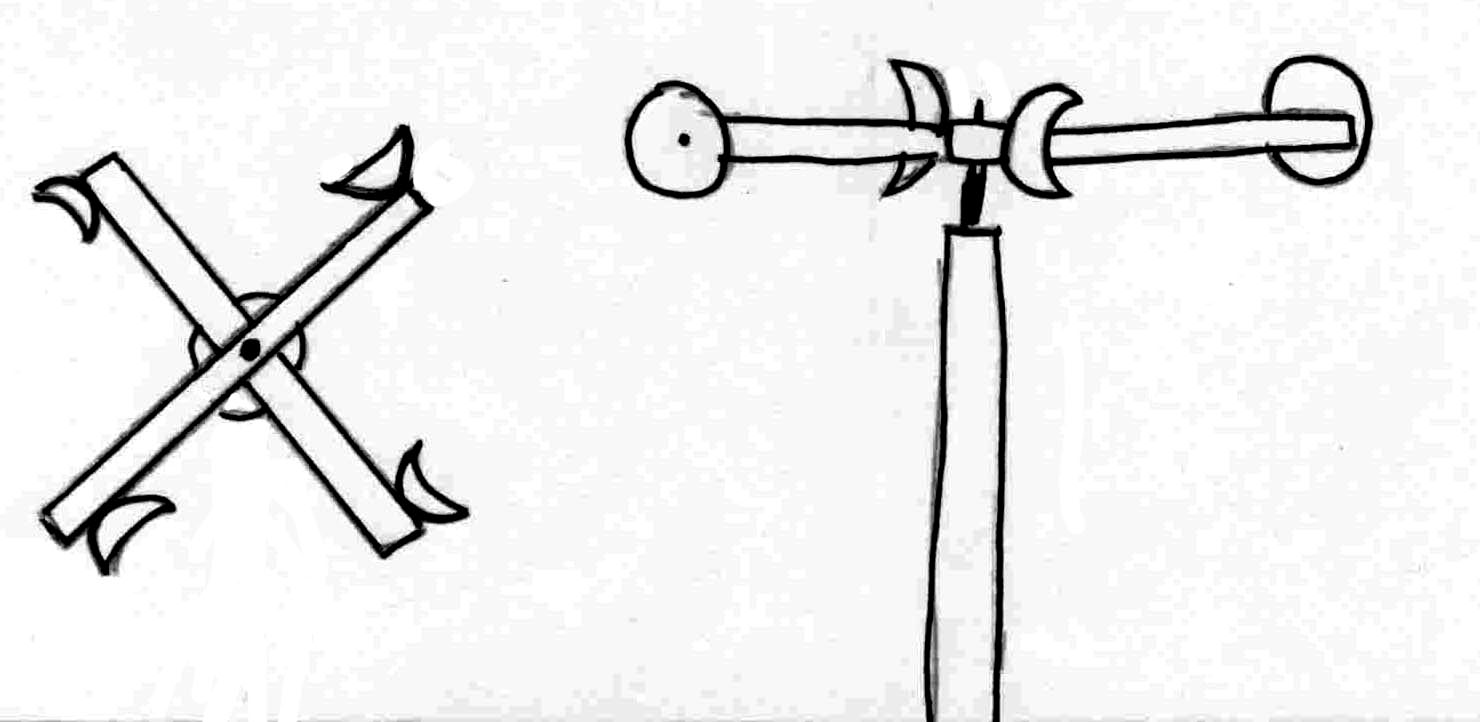
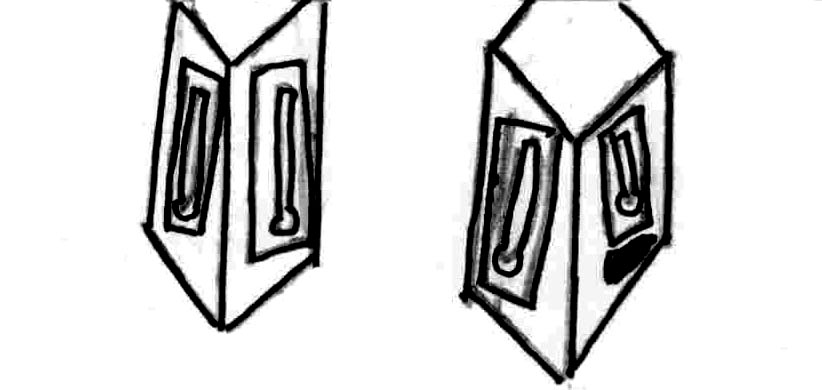
Materials:
1 stick about 1/2 meter
long
Cardboard, thin lightweight
plastic, or thin wood
Wire
Metal washers
A large nail
1 long thick pole.
glue
Drill a hole in the center of the stick.
Now drill a smaller hole one end of the stick, perpendicular to the
central hole.
Cut thin notches in both ends of the stick. The notches should be no
longer than 1 inch (2.5 cm) long, and sould be parallel to the central
hole.
Cut the cardboard into: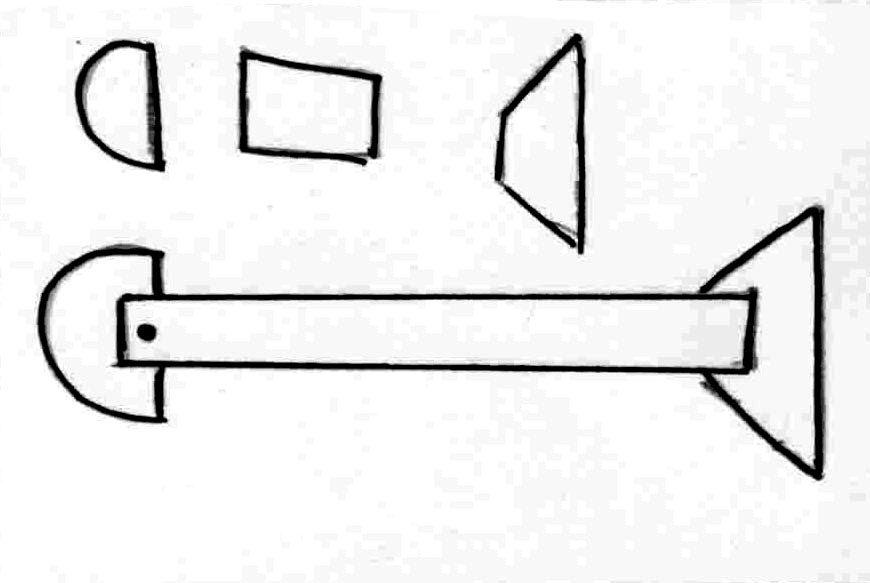
A semi-circle shape
A trapezoidal fish tail shape
about the same size as
the semi-circle
A smaller rectangle
Place the semi-circle in the notch with the drilled hole. Place the
trapezoid in the other notch. Secure the cards in place with glue.
Re-drill the hole in the end so that is passes through the card as well.
Run the wire through the hole in the end and allow enough to hang down
so that the ends extend past the semi-circle.
Attach the rectangle to the wire.
Place the nail through the hole in the vain, through the washers, and
into the end of the long pole.
You can calibrate this ananometer by marking the semicircle and correlating
the marks to the Beaufort scale.
Simple ananometer:
A rain gauge consists of a uniform container, a stand and a funnel to
catch the rain. The most difficult part about making a rain guage is marking
is precisely to so you can later measure the amount of the rainfall.
To calculate how the marks on the container need to be spaced, you
need to know the diameter of the mouth of the funnel (X), and the inner
diameter of the container (Y).
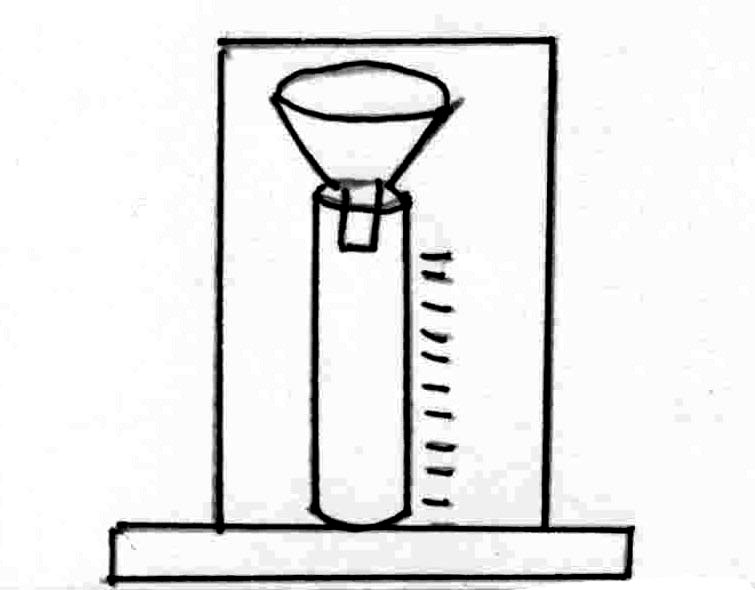
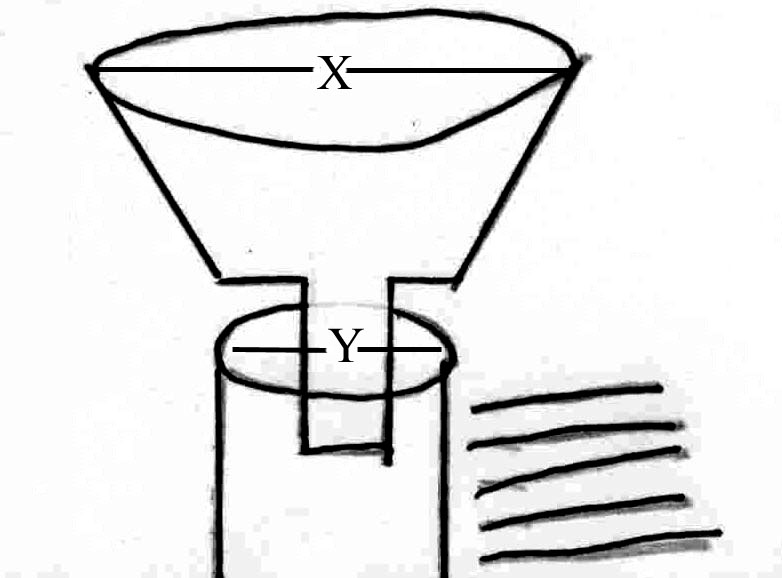
The ratio of collected rainfall to actual rainfall is equal to the square of the ratio of the funnel's diameter to the container's diameter. If the funnel has a 2 cm diameter, and the container has a 1 cm diameter, then:
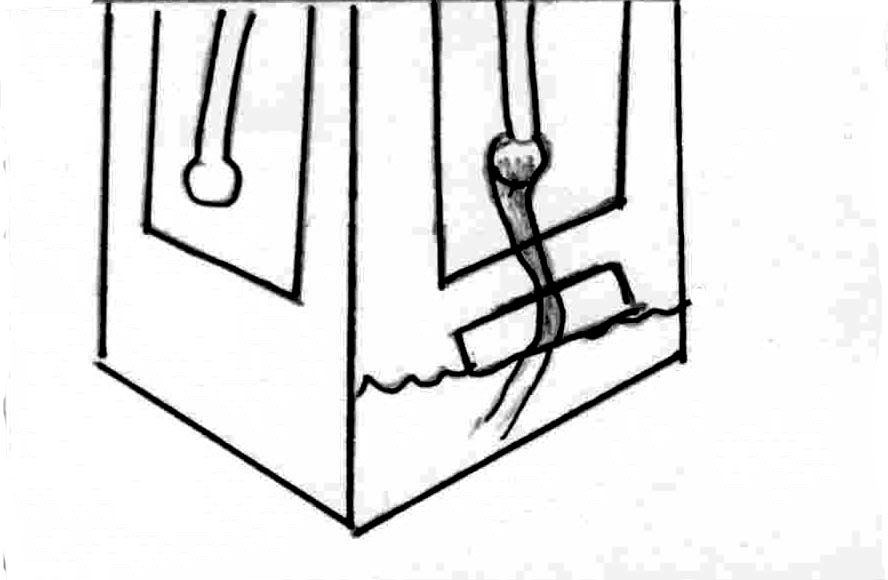
A wet-bulb hygrometer is a device that measures the
relative humidity using the difference in temperature created as one of
two thermometers is cooled by evaporating water.
Materials:
1 water-proof box (milk
carton or drink box)
2 thermometers
a shoelace or other wick-like
tubing
glue
Attach the thermometers onto the sides of the box.
Cut a small hole into the box just under one of the thermometers.
Slip one end of the wick/shoelace around the thermometer, and let the
rest of its length lie in the box though the hole.
Fill the bottom of the box with water, and make sure the wick/shoelace
is resting in the water.
Place the system in a well ventillated area.
Relative Humidity
As measured by a wet-bulb hygrometer
|
|
|
|
|
|
|
|
|
|
|
|
|
|
|
|
|
|
|
|
|
|
|
|
|
|
|
|
|
|
|
|
|
|
|
|
|
|
|
|
|
|
|
|
|
|
|
|
|
|
|
|
|
|
|
|
|
|
|
|
|
|
|
|
|
|
|
|
|
|
|
|
|
|
|
|
|
|
|
|
|
|
|
|
|
|
|
|
|
|
|
|
|
|
|
|
|
|
||
|
|
|
|
|
|
|
|||
|
|
|
|
|
|
|
|||
|
|
|
|
|
|
|
|||
|
|
|
|
|
|
||||
|
|
|
|
|
|
||||
|
|
|
|
|
|
||||
|
|
|
|
|
|||||
|
|
|
|
|