Simple Knots
and Lashings
Knowledge of basic
knots and lashings can be of enormous use. Each knot has its own purpose,
and a good lashings can often bind materials together better than nails.
Here are some of the simplest yet most useful knots and lashings.
Square
knot
The square knot is
used for connecting two ropes of the same size, for tying bundles together,
and even for tying bandages.
Two ends of a rope (or ends of different
ropes) are brought together. The right end is brought around and under
the left end. The same first end (it was on the right, but now it is on
the left) is brought back around and under the right end. Pull evenly on
the 4 rope pieces, and you have completed the square knot.

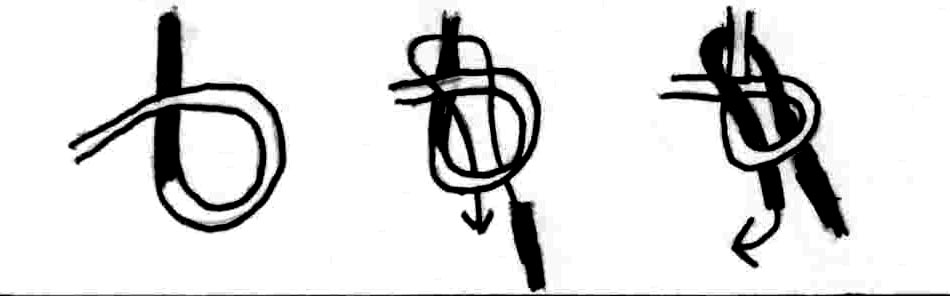
The
Bowline
The bowline is a
rescue knot. The loop formed in the bowline will not slip out, and can
be wrapped around objects, animals, or people without the fear of constriction
or strangulation.
Begin by making
a loop on the left hand portion of the rope. The end of the rope should
lie behind the loop and extend upwards.
The right hand end of the rope is
brought up through the loop from behind, wrapped around the extended left
hand end, and brought back down through the loop. The extended left end
and the two right ends are pulled tight.
The
Sheep Bend
The sheep bend is
another non-slip knot. It is used to connect two ropes of equal or different
thicknesses.
Begin by making
a U shaped loop with the left hand portion of rope. Take the right hand
portion of rope, bring it up through the bottom of the loop, and around
both ends of the left handed loop, forming a second loop with the right
handed end. The right end is then sent through the right ended loop, but
not through the left ended loop, and pulled tight.

Two
Half-Hitches
The two half-hitches
is a slip knot used when you need to tie a rope around a stake to form
an easily adjustable loop.
First, bring
the rope around a post, stake, etc. and bring the loose (right) end under
the extended (left) end. The loose end is wrapped one time around the extended
end on the inside of the loop, and then around the extended end on the
outside of the loop. Both wraps should be in the same direction (clockwise).
The loose end is then put between the two wraps (there will be a space
between two pieces of rope to feed them through) and pulled tight.

Taught
Line Hitch
The taught line hitch
is a slip knot similar to the two-half hitches, but forms a more secure
loop that can still be adjusted.
First, bring
the rope around a post, stake, etc. and bring the loose (right) end under
the extended (left) end. The loose end is wrapped one time around the extended
end on the inside of the loop. Now, the loose end is wrapped around the
extended end on the outside of the loop twice. All three should be in the
same direction (clockwise). The loose end is then put between the two wraps
on the outside of the loop (there will be a space between two pieces of
rope to feed them through) and pulled tight.

NOTE - Two taught line hitches can
be used to secure the ends of a sheep bend. This is an old navy trick to
make the sheep bend an invincible bingind knot.

Timber
Hitch
The timber hitch
is used to start some lashings and was originally used to tie rope around
heavey objects (logs) so they could be dragged behind a person.
Make a loop in
the rope near one of the ends. You should have one short end and one long
end to the loop. Now twist the loop 4-6 times. Wrap the long end around
a log, post, etc. and feed it through the eye of the twisted loop. Pull
is tight and you are finished.

Clove
Hitch
The clove hitch is
a simple knot for attaching a rope to a post. It is most often used to
start a Lashing.
Bring the loose
end of a rope around a post. Bring the loose and around the post again,
and wrap the end over the first wrap to form and X with the rope. Finish
by wrapping the rope around the post yet a gain, and feeding the loose
en underneath the center of the X.

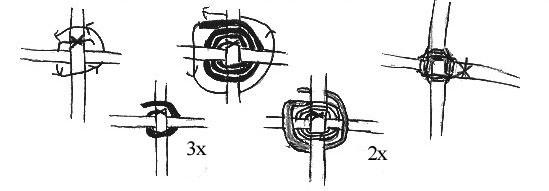
Square
Lashing
The square lashing
is used to bring two poles together to perpendicular to each other. If
pull tight enough, the structure becomes amazingly sturdy.
Cross two poles,
one on top of the other. Tie a clove hitch around the upper pole, close
to the intersection. Wrap the rope behind one end of the rear pole, over
one end of the upper pole, under the other side of the rear pole, and over
the other side of the upper pole. Repeat this wrap two more times, pulling
each wrap tight. Now, wrap the rope between the upper and lower poles
twice (this is called a "frap" and pulls the lashing tight). Wrap thrice
(3X) and frap twice. Finish with a clove hitch on the rear pole.
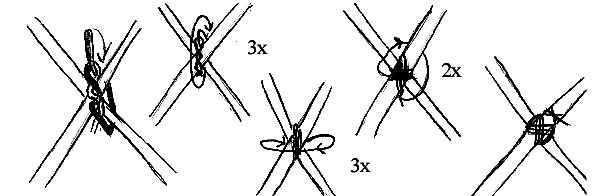
Diagonal
Lashing
This is a lashing
used to bind two poles together at an angle other than 90 degrees.
Begin by laying
the poles on top of each other. Tie a timber hitch around the center of
the intersection of the two poles. Wrap the rope vertically around the
intersection point three times. Pull tight on each wrap. Now, wrap the
rope horizontally around the intersection point three times. Pull tight
on each wrap. Finish by frapping the rope between the two poles twice,
and tying the lashing off with a clove hitch. You now have an adjustable
join that can be secured at any angle using square lashings at the end,
useful in such projects as making A-frames for determining land slope.
Tripod
Lashing
Tripods have a myriad
of uses. Here is a simple lashing to make one.
Place three poles
of equal length together, side-by-side. Tie a clove hitch around one od
the end poles at the top. Now, using a figure-8 like over-and-under wrap,
weave the rope around the poles 3 times. Pull tight on each wrap. Now,
frap between the first and second poles twice, then between the second
and third poles twice. Pull each frap tight. Finish with a clove hitch
on the pole on the opposite side.

Pole
Lashing
This lashing is used
to tie two poles together in such a way as to join them into one long pole.
To join the two poles, this lashing will need to be tied twice, once at
each point the two poles overlap.
Begin by laying
the two poles next to each other. Tie a clove hitch around one pole near
the top of the lower pole. Wrap the rope around the two poles 3-5 times,
pulling tight on each wrap. Now frap between the two poles twice, pulling
tight on each frap. Finish with a clove hitch on the opposite pole and
opposite side of the first clove hitch.

Home