Mud stoves are commonly used in various African countries. These stoves have several advantages over the local three stone open fire cooking method. Mud stoves are up to 30% more efficient in fuel usage. The stoves catch the heat and use convection currents to heat up the entire cooking pot so that food cooks faster. Also, since the fire is now enclosed, there is less of a chance of people falling into the cooking fore and getting injured.
Materials needed:
Mud mix:
4 parts pounded clay (from termite mounds is best, other clays work well)
1 part manure
1 part dried and chopped grass
1 cooking pot (the one to be used with the stove. The stove will be pot
specific)
3 stones to hold up the pot
Before building
the stove you need to mix the mud mix and allow it to ferment. The clay,
manure and grass are mixed to gether with water. Most volunteers find this
is best done by taking off your shoes and dancing/stomping in the mud with
your bare feet. After mixing the mud, you need to cover it and let it sit
for a week to allow for the mud to ferment. If this is done during the
dry season, the mud mix needs to be watered daily. When the week is over,
you can begin making the stove.
The stove should
be built where it is to be used, as you really can't move it afterwards,
unless you build it on top of a rice bag, and remove the rice bag after
the stove is fully dried.
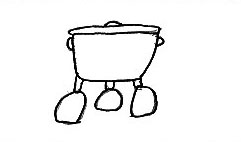
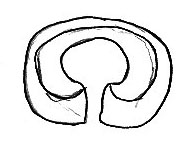
To begin construction, arrange the 3 stones as you would for normal cooking and set the pot on top of them. Make sure there is a space between the rocks facing the opening of the cooking structure. This space will serve as the front of the stove where the firewood will be fed.
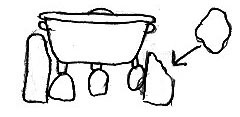
Next, begin building mud walls around the 3 stones. To do this, grab handfulls of the mud mix, dip them in water to make the mud easier to work with, and apply the clay to the stones and sculpt it around the pot. Leave the space open in the front to add the firewood. This is the space that should face the doorway of the cooking house. The walls should be about 4 inches thick, or the thickness of one fist.
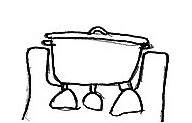
Continue building up the walls 3/4 of the way up the cooking pot, or about up to the handles. Keep a 1/2 inch (a finger's thickness) space between the walls of the stove and the edge of the cooking pot. Also, remember to keep these walls at least 4 inches thick.
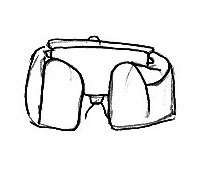
Smooth out the outer wall.
Make sure the
walls are at least 4 inches thick all around (there is often a tendency
to make the tops thin). Make sure the walls are the
same height all around the stove.
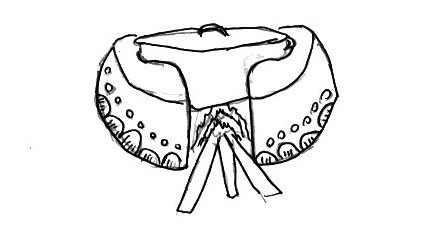
Also, some people like to dig a shallow pit in the bottom of the stove
to allow more space for the fire and ashes.
Next, remove the
cooking pot, and build up the inner walls so they are thick and smooth.
Replace the pot to make sure it
still fits and that there is still a 1/2 inch space between the pot and
stove.

Allow the stove to dry completely before you use it. In the dry season, it should dry for one week, in the wet season, it takes 1 month.
As mentioned before, you can make a portable stove by building it on a rice bag and removing the rice bag after the stove has fully dried. Also, there is no reason why you cannot decorate the stoces with rocks, shells, or sculpted figures.
