
Created September 2003 � �harang� - Sharang's Place
Please do not place or copy this tutorial without my permission,
you are more than welcome to link to it with a text link.
This tutorial is written for PSP7 and AS and assumes you have
a good working knowledge of the PSP tools.
Any resemblence to any other tutorial is purely coincidental.
Supplies Needed
Paint Shop Pro & Animation Shop
The Font I Used - Here - Baby Blocks.
My Zip File - Here - This contains the PSP file and the pattern fill.
The rag doll tube was created by the very talented Pat at
Rainbow Row Graphics and is used here with her very kind permission.
Thank you Pat! Please provide a link back to Pat's site when using her tubes.
1. Open the PSP file and the plaid pattern fill in your workspace.
Minimise the pattern fill for now.
The PSP file consists of 7 ragdoll layers and the white bckg layer.
Only ragdoll 1 and white bckg should be visible.
2. Click on white bckg layer to make it active.
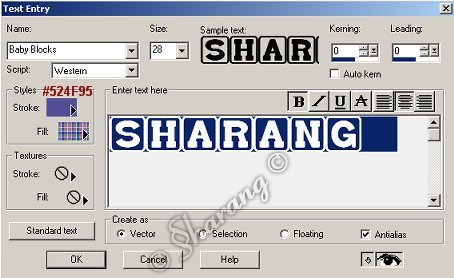
Set your foreground colour to #524F95.
Set your background to pattern and locate the plaid pattern fill
you minimised earlier. Scale = 100. Angle = 0.
Add your text in capitals using the following settings :
3. On your layer palette, click on the + sign at the side of your text layer.
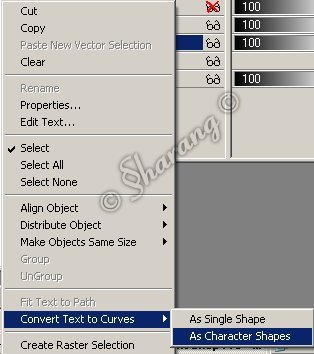
Right-click on your text and choose
'Convert Text To Curves > As Character Shapes' like this :
4. This puts each letter of your text on it's own vector layer.
Click on each the first letter's layer to make it active.
Position this letter where you'd like it to be.
Repeat this step with each of the other letter's.
You can build a tower with the bricks or anything that takes your fancy.
You need to leave a slight gap betwee the blocks though.
5. When you're happy with the placement of your bricks do
Layers > Convert To Raster Layer.
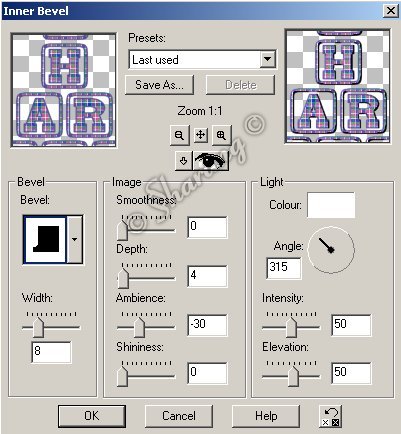
6. Effects > 3D Effects > Inner Bevel using these settings :
7. Click on your white bckg layer to make it active.
Layers > New Raster Layer.
Floodfill this new layer with white.
Turn off the visibility on your white bckg layer and your ragdoll 1 layer.
8. Click on your text layer to make it active.
Take your magic wand tool. Tolerance and Feather both set at 0.
Select the area outside your blocks.
Selections > Modify > Expand by 1.
Click on your new white layer to make it active.
Edit > Cut. Selections > Select None.
9. Layers > Merge > Merge Visible.
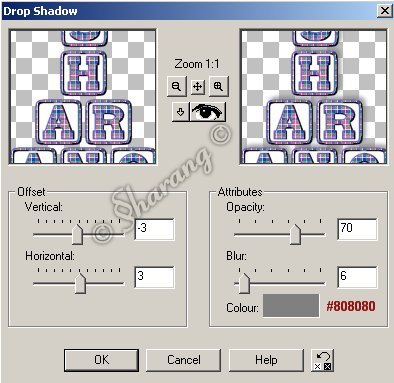
Effects > 3D Effects > Drop Shadow using these settings :
10. Click on your white bckg layer to make it active.
Layers > Merge > Merge Visible.
Layers > Duplicate 6 times, giving you a total of 7 background layers.
Re-name these layers bckg 1 to 7.
Turn off the visibility on all 7 of these layers.
11. Click on ragdoll 1 layer to make it active.
Effects > 3D Effects > Drop Shadow using the same settings as before.
Repeat this for all the other ragdoll layers.
Turn off the visibility on all 7 of these layers.
12. Click on ragdoll 1 layer and then on your bckg 1 layer to
make them both visible and the background active.
Layers > Merge > Merge Visible.
Turn the visibility off on this merged layer.
13. Repeat step 12 for each of the other layers.
Merge ragdoll 2 and bckg 2, ragdoll 3 and bckg 3 and so on.
14. You should now have 7 merged layers.
Make all of these layers visible and save in psp format.
15. Open your saved psp file in Animation Shop.
Edit > Select All.
Animation > Frame Properties of 30.
Click on frame 1 to make it active.
Animation > Frame Properties of 100.
16. Crop your animation and re-size to taste.
Run your animation and save as a GIF and you're done.
I hope you enjoyed doing this tutorial and that you like your new sig.

Homepage
Contents Page
Contact me
� Sharang's Place 2003
All rights reserved