
Created November 2003 � �harang� - Sharang's Place
Please do not place or copy this tutorial without my permission,
you are more than welcome to link to it with a text link.
This tutorial is written for PSP7 and AS and assumes you have
a good working knowledge of the PSP tools.
Any resemblence to any other tutorial is purely coincidental.
Supplies Needed
Paint Shop Pro & Animation Shop
The Font I Used - Here - Christmas Card
The PSP File - Here
The wonderful tube I've used in this tutorial was made
by the very talented Karen from Karen's Korner.
You can visit her awesome site Here.
Many thanks Karen for your very kind permission to use your tube.
1. Open the psp file in your workspace.
You'll see that it consists of 5 layers, 4 frames of
animation and 1 white background layer.
Frame 1 is visible and active. All other layers are not visible.
Shift and D to duplicate it and close the original.
2. Set your foreground colour to solid #800000.
Set your background colour to solid #C00000.
Using your text tool and the following settings add your text :

3. Position your text to where you'd like it to be.
Selections > Promote To Layer.
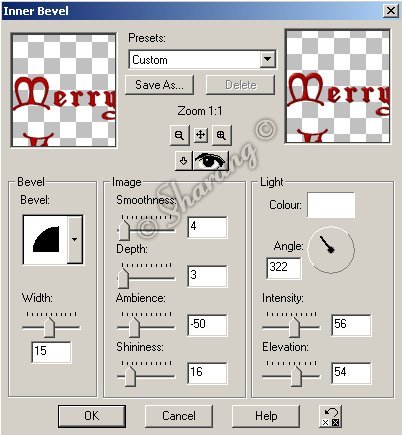
4. Effects > 3D Effects > Inner Bevel using these settings :
5. Add any accent tubes you'd like to this text layer.
I added some holly I copied from Mrs. Claus' hat.
6. Layers > Duplicate 3 times, giving you a total of 4 text layers.
Re-name these layers Text 1, 2, 3 and 4.
7. Turn the visibility off on Text 2, 3 and 4.
You should only have Text 1 and Frame 1 layers visible.
Layers > Merge > Merge Visible.
Re-name this merged layer Kiss 1 and turn the visibility off.
8. Click on Frame 2 and then on Text 2 to make them both
visible and Text 2 active.
Layers > Merge > Merge Visible.
Re-name this merged layer Kiss 2 and turn the visibility off.
9. Click on Frame 3 and then on Text 3 to make them both
visible and Text 3 active.
Layers > Merge > Merge Visible.
Re-name this merged layer Kiss 3 and turn the visibility off.
10. Click on Frame 4 and then on Text 4 to make them both
visible and Text 4 active.
Layers > Merge > Merge Visible.
Re-name this merged layer Kiss 4 and turn the visibility off.
11. Click on Kiss 1 to make it active.
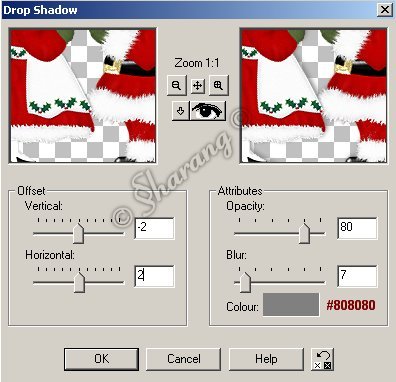
Effects > 3D Effects > Drop Shadow using these settings :
12. Click on Kiss 2 to make it active.
Effects > 3D Effects > Drop Shadow with the same settings.
13. Click on Kiss 3 to make it active.
Effects > 3D Effects > Drop Shadow with the same settings.
14. Click on Kiss 4 to make it active.
Effects > 3D Effects > Drop Shadow with the same settings.
15. Turn the visibility off on all the Kiss layers.
Click on White Bckg layer to make it visible and active.
Layers > Duplicate 3 times giving you a total of 4 background layers.
Turn the visibility off on all of your background layers.
16. Click on a White Bckg layer and then on Kiss 1 layer
to make them both visible and Kiss 1 layer active.
Layers > Merge > Merge Visible.
Re-name this merged layer Done 1 and turn the visibility off.
17. Click on a White Bckg layer and then on Kiss 2 layer
to make them both visible and Kiss 2 layer active.
Layers > Merge > Merge Visible.
Re-name this merged layer Done 2 and turn the visibility off.
18. Click on a White Bckg layer and then on Kiss 3 layer
to make them both visible and Kiss 3 layer active.
Layers > Merge > Merge Visible.
Re-name this merged layer Done 3 and turn the visibility off.
19. Click on a White Bckg layer and then on Kiss 4 layer
to make them both visible and Kiss 4 layer active.
Layers > Merge > Merge Visible.
Re-name this merged layer Done 4.
20. Turn the visibility back on on all of your layers,
they all need to be visible.
File > Save As Kissmas.psp.
21. Open Kissmas.psp in Animation Shop.
Edit > Select All.
Animation > Frame Properties > 50.
Click on your first frame to make it active.
Animation > Frame Properties > 150.
Run the animation and save as a GIF and you're done.
I hope you enjoyed doing this tutorial and that you like your new sig.

Homepage
Contents Page
Contact me
� Sharang's Place 2003
All rights reserved