
Created November 2003 � �harang� - Sharang's Place
Please do not place or copy this tutorial without my permission,
you are more than welcome to link to it with a text link.
This tutorial is written for PSP7 and AS and assumes you have
a good working knowledge of the PSP tools.
Any resemblence to any other tutorial is purely coincidental.
Supplies Needed
Paint Shop Pro & Animation Shop
A Doll - I made the doll I used at The Doll Palace HERE.
This has got to be one of the best dollmaker sites on the internet.
Many thanks go to The Doll Palace for allowing me to use the doll for this.
![Visit The Doll Palace [Where Cartoon Dolls Live]](http://ww2.thedollpalace.com/public/images/banner6_150x40/tdp_banner6_7.gif)
I've received many requests asking me to do a tutorial on how I
animate the things I usually put up as a PSP file for my tutorials.
I've also received several requests to do tutorials with dolls. How to
make a doll appear to be walking has come up a few times so I
decided to do a tutorial on that.
The basic method I use to animate the doll is the same I use when animating
anything. Obviously the more detailed the image, the more fiddly it becomes.
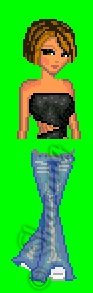
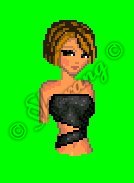
1. Make your doll and open it in PSP.
I chose to make my doll with short hair and no sleeves so
it's easier to see how to animate her.
Image > Canvas Size > 200 width and 200 height.
2. Layers > New Raster Layer. Name this new layer background.
Layers > Arrange > Send To bottom.
Floodfill this new layer with something vibrant so you can see what
you're doing, it gets fiddly...lol. I always choose #00FF00.
3. Click on your doll layer to make it active.
Using your magic wand click on any of the white background.
Hit delete on your keyboard.
4. Click on your selection tool and set it to rectangle, feather = 0.
Draw a retangle around your text at the bottom.
Click once inside your selection and then hit delete on your keyboard.
You should now have just your doll on your canvas.
Using your mover tool position your doll in the centre of your canvas.
5. Layers > Duplicate. Turn the visibility off on your original doll layer.
Zoom in several times so you can see what you're doing better.
Click on your eraser tool and set it as follows.
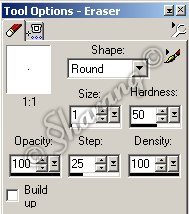
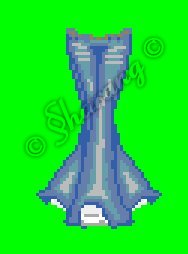
6. Erase the doll around the trousers till you have something like this.
7. Click on your selection tool again and draw a rectangle around the head and
body of the doll. Click once inside the selection and hit delete on your keyboard.
You should only have the trousers visible on this layer.
Re-name this layer Legs1.
You'll have a couple of pixels to fill in where the hand rested on the trousers.
Just use your paintbrush set at 1 and fill them in with a suitable colour.
8. Layers > Duplicate. Re-name this copy Legs2. Image > Mirror.
Using your mover tool position the trousers of Legs2 layer so that
the hips are over the hips of Legs1 layer, like this.
9. Turn the visibility off on Legs1 and Legs2 layers.
Click on your doll layer to make it visible and active.
Layers > Duplicate. Turn the visibility off on the original doll layer.
Using your eraser tool and selection tool as before you want to erase everything
but the arms on this layer until you have something that looks like this.
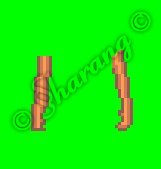
10. Re-name this layer Arms1.
Layers > Duplicate. Re-name this copy Arms2.
This is where it gets a bit fiddly...lol.
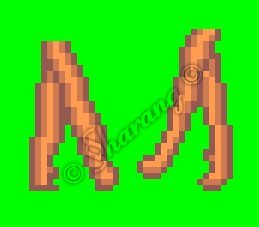
11. Use your selection tool as before and draw a rectangle around the
left arm of the doll, left as you're looking at it...not actual left...lol.
Click once inside the selection to float it.
Click on your deformation tool. Using the centre node turn the arm
anti-clockwise about 30 degrees.
Click on your arrow tool to complete the deformation.
Effects > Sharpen > Sharpen.
Using your mover tool position the still-selected arm so that
the top is touching the top of the arm on the layer below.
Selections > Select None.
12. Using your selection tool again draw a rectangle around the other arm.
Click once inside the selection to make it float.
Click on your deformation tool. Using the centre node turn the arm
clockwise about 30 degrees.
Click on your arrow tool to complete the deformation.
Effects > Sharpen > Sharpen.
Using your mover tool position the still-selected arm so that
the top is touching the top of the arm on the layer below.
Selections > Select None.
I must plead guilty to being a bit of a perfectionist and I don't care for the
blurred effect you get when using the deformation tool. So, I always tidy
the deformed sections up by using my paintbrush and eraser.
You should have something that looks like this.
13.Turn off the visibility on arms1 and arms 2 layers.
Click back on your original doll layer to make it visible and active.
Layers > Duplicate. Turn the visibility off on the original doll layer.
14. Using your eraser tool and selection tool as before you want to
remove the arms and trousers from this duplicated layer.
You should have something that looks like this.
15. Layers > Arrange > Bring To Top.
Re-name this layer Body1.
Layers > Duplicate. Re-name this layer Body2.
Turn the visibility off on Body1 and Body2 layers.
Click back on your original doll layer to make it visible and active.
Layers > Delete. Your Background layer should now be active.
Layers > Delete again.
You should now have 2 layers each of body, arms and legs.
16. Just one last fiddly bit now...lol.
Click on Arms1 layer to make it visible and active.
Re-name this layer Rightarm1.
Using your selection tool draw a rectangle around the left arm again.
Selections > Float. Selections > Promote To Layer.
Re-name this layer Leftarm1.
Selections > Select All. Selections > Float. Selections > Defloat.
Click Rightarm1 layer to make it active.
Hit delete on your keyboard.
Selections > Select None.
Turn off the visibility on these two layers.
17. Click on Arms2 layer to make it visible and active.
Re-name this layer Rightarm2.
Using your selection tool draw a rectangle aroung the left arm again.
Selections > Float. Selections > Promote To Layer.
Re-name this layer Leftarm2.
Selections > Select All. Selections > Float. Selections > Defloat.
Click Rightarm2 layer to make it active.
Hit delete on your keyboard.
Turn off the visibility on these two layers.
18. In your layer palette drag your layers until they're arranged like this.
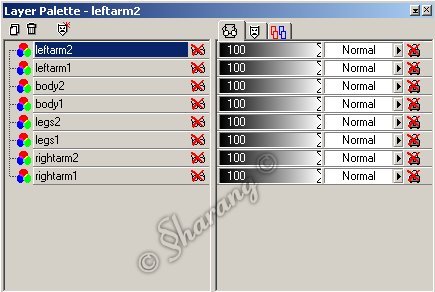
19. Click on Leftarm1, Body1, Legs1 and Rightarm1 layers.
Layers > Merge > Merge Visible.
Re-name this layer Doll1 and turn the visibility off.
20. Click on Leftarm2, Body2, Legs2 and Rightarm2 layers.
You may need to move the right arm in slightly with your mover tool.
Layers > Merge > Merge Visible.
Re-name this layer Doll2.
21. Click on Doll1 layer to make it visible again.
File > Save as Dollwalk.psp and open it in Animation Shop.
22. Edit > Select All.
Animation > Frame Properties > 65 - 70.
Run your animation and save as a GIF and you're done!
You can add your name, background and dropshadows to get
an effect like mine above.
I hope you enjoyed doing this tutorial and that you like your animation.

Homepage
Contents Page
Contact me
� Sharang's Place 2003
All rights reserved