|
CROCHET
LESSON #1
CROCHET
TERMINOLOGY:
ch=Chain
sc=Single Crochet
hd=Half Double Crochet
dc=Double Crochet
yo=Yarn Over
sl=Slip Stitch
This Lesson is to learn how to do the stitches needed in this project, so
Practice each one until you are comfortable doing it at a relaxed position.
Variations in design would be:
(some take both loops, some take the back loop and some take the front loop) I
personally prefer to take both loops because it makes a stronger project and
both sides of the work is the same like reversible.
Getting started:
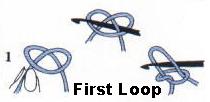
You have you first loop on the hook as shown above.; now:
Right Hand:
Hold the hook in the flat part of the hook using your middle finger and thumb
with the hook in the palm of your hand and the end of the hook needle resting at
the bottom of your pinky.
OR: Hold the hook between the right index finger and the thumb, as you would a
pencil.
Left Hand:
Take the yarn under your pinky, twist up and around to top of the yarn, then
slide hand allowing the yarn to rest on top of the index finger. The purpose of
this is to feed the yarn and keep the right tension as you crochet making the
stitches uniformly even ( kind of
like the pressure foot of a sewing machine). Now take your middle finger and
thumb and hold your project.
Now you are ready to start crocheting.
CHAIN STITCH: (CH)
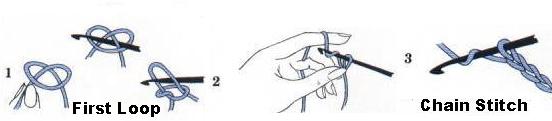
1. Start by making a slip knot (shown above) about 6 inches from the yarn/thread
end. Pull one end of the yarn to tighten the knot.
Yarn is in left hand as above and hook is in right
hand as above.
2. Take hook to the inside of yarn/thread, then up to the outside of yarn/thread
and draw towards you with yarn/thread on hook pulling through one loop on the
hook.
3. Continue doing this until you have the number of chains that the directions
say or until it is the length you desire. Once you have this conquered (Practice
makes perfect!!!!!), then turn and begin to SC (single crochet)
SINGLE CROCHET
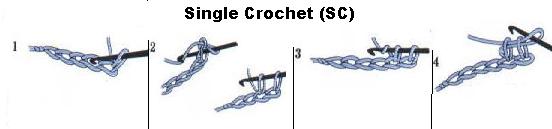
Single Crochet is just like the CH except you have 2 loops on hook ending up
with one:
1. *Take the hook and insert in the second stitch on the previous row, draw it
up onto the hook, (two loops remain on hook).
2. Take the hook to the inside of the yarn/thread,
then up to the outside of yarn/thread and pull towards you with yarn/thread on
hook pulling through both loops, Single Crochet Made..**
Repeat
* to ** to the end of the chain.
Turning your project for the next row:
Since you are SCing, at the end of the row, before you turn your project just
chain one (1), turn then skip one SC and SC in next SC and proceed to the end of
the row. PRACTICE MAKES PERFECT!!!!
DOUBLE CROCHET:
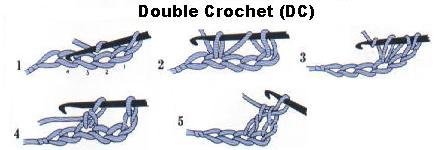
DC is just a matter of adding a loop on your hook with a Yarn Over: (when going
from a SC to a Double Crochet you will CH 3 then turn)
1. Before inserting your hook into a stitch from the previous row; *take the
yarn and loop around the hook once.
2. Insert hook in 4th stitch of previous row, pull
through (now you have three (3) loops on hook. YO, draw through 2 loops, YO,
draw through remaining loops leaving one loop on hook**. Repeat from * to **.
Since you are doing a DC and want to continue with the DC, at the end of the row
you will CH 3, then turn project, Skip one DC, DC in next DC on previous row.
(The chain 3 at the end of the row counts for one DC)
PRACTICE MAKES PERFECT!!!!
HALF DOUBLE CROCHET

A half double crochet is the same as a DC except you take through all 3 loops at
one time: This stitch adds character to the project. When switching to half
double stitches at the end of a project you will chain 2.
1. Insert hook into second stitch on previous row, YO hook, draw through (3
loops on hook)
2. Yarn over hook, draw though all 3 loops at one time. Half Double Made.
SLIP STITCH:
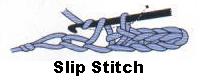
If you want to join with out adding a stitch you SL: Insert hook where you want
to join, YO and draw through both loops leaving one loop on hook.
TAKE NOTE:
THERE ARE NO KNOTS EVER IN CROCHETING!!!!!!!!!!!!!!!
NEVER!!!!!!!
To secure the end of a project without Knotting:
1. Merely cut you yarn/thread about 3 inches from loop that is on hook, YO and
draw through loop, tighten, then weave excess yarn thru project.
Now Practice these stitches until you feel relaxed and comfortable. You have
until the next issue where we will start the "Raised Rose Motif as shown in
Issue One.
AND GOOD LUCK...<<<<<<SMILES>>>>>>
Questions? REMEMBER: There is no such thing as a stupid question!!!!!
Please feel free to email me at:
Marge Calaway
[email protected]

|