Making a 13th Century Woman's Gown Using Rectangular Construction
Showing various methods, with commentary
By Lady Eulalia de Ravenfeld
(A big page with lots of pictures, sorry.)
Before we begin, I feel the need to warn you that I do not consider myself to be an expert at costuming or sewing. I do what I can, though. If your experience with these cuts has differed, and especially if I'm just doing something profoundly stupid, please email me at briwaf at gmail dot com.
First, some background: overwhelming evidence supports the conclusion that clothing across a broad spectrum of time periods and places was constructed using rectangles and triangular gores. This method is, sensibly enough, referred to as "rectangular construction." The resulting clothing is also sometimes called an "A-tunic" to distinguish it from its venerable SCA friend/relation the "T-tunic." Essentially, the idea behind all of this is that wide fabric is not that authentic, so we're trying to make do with narrower pieces put together to make wider pieces. You can find a great deal of information on the web about using this more period approach to make garb. Here are some of my favorite links, to get you started:
Cynthia Virtue's page on tunics and other garb 1100-1300. Great general introduction.
Cynthia Virtue's tunic construction worksheet. Turning the theory into practice.
Lady Muireann ingen Eoghain ua Maoil Mheaghna article, with research (Anglo Saxon / "early period").
There are many more. So why does the world need another page devoted to A-tunics? Mostly because I wanted to. I'd like to think, though, that I'm also presenting something at least sort of novel: I discuss pros and cons of various methods of actually making an A-tunic. For a long time now I've been working on making garb that is reasonably authentic for the late 13th century (particularly English), as that is my primary area of interest. My clothing has to meet several standards:
1) I must have some reasonable evidence that the cut I am using is period.
2) It should ideally look like the pictures from this period. Here are two examples of the look I'm going for:
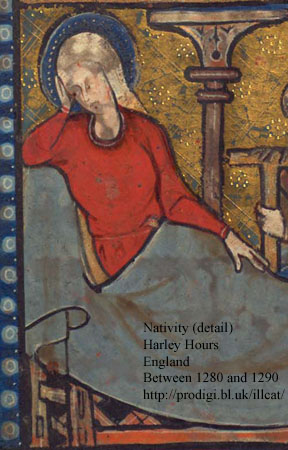
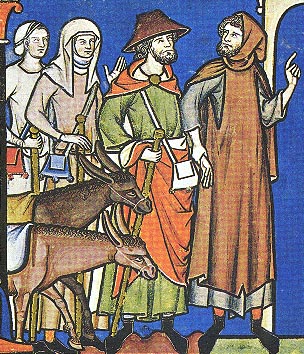
Notice that there is a sleekness to the lines of these dresses -- I believe there is even a suggestion of snugness around the chest. The sleeves are tight in the forearms and loose around the armpit (note especially the creasing around the armpits in both examples). Everything drapes very elegantly.
3) This is where I may have gotten myself into trouble: I want what I produce to look good on me. I am not skinny by any measure, which makes clothing harder in general. I want something that doesn't just look like a sack or a tent. I also expect a certain level of functionality and wearability from my clothing.
So, after having applied a few different methods to creating gowns from this period, I present to you my conclusions, with pictures.
Pros: Both were easy to make. T-tunics are still good starter garb to get you out of jeans and onto the field. The modern dress pattern is a likely first step for someone who already knows how to sew.
Cons: Not authentic, and both can look a little weird.

The dotted lines show that you can have your sleeves tapered if you want. Although authentic, my problem with this cut is that my chest is much bigger around than my shoulders. If my sleeves are attached to a rectangle that is wide enough to go around my chest, they aren't going to start at my shoulders, they're practically going to start at my elbows. This cut I think works well on men (wide shoulders) or on smaller women. It doesn't work on me. Also, while this voluminous look is prevalent throughout the period, if you look back at those first images on this page you'll see that it's not quite what I'm going for.
To make one, you need the following measurements: chest circumference divided by two (or shoulder to shoulder, if this is wider), upper arm circumference, shoulder to floor, shoulder to where you want the gores to start (where you want the garment to start flaring out), shoulder to wrist, and, if you want tapered sleeves, measure around your fist. The gores in the skirt and the gussets don't have to be measured exactly.
Pros: Definitely authentic, especially for earlier time periods / personas. With the right fabric, it will drape beautifully.
Cons: In my personal opinion, I think this style can be less flattering on larger figures, especially those of us with "the bosoms": see my comments on the sleeves-start-at-elbows phenomenon above.
Gowns like this look good on me, I think. I'm able to achieve a slightly less sack-like appearance than with a classic A-tunic construction. Everything drapes pretty well, and they look good from far away. But it doesn't hang like the pictures at the beginning of this article: all of the skirt's fullness is in the sides. If you go back to that picture above from the Mac Bible, look at the lower halves of everyone's clothing: everything falls in nice little folds all around, whereas gowns that rely exclusively on large side gores tend to have the folds concentrated on the sides. Also, I always defer to the research of others, and I'm pretty sure every serious costumer I've ever listened to or read the material of says that set-in sleeves were one of the major developments of the fourteenth century, putting them much later than what I am looking at. In fairness, the relatively slight curvature of these arm holes might represent a stepping-stone on the way to set-in sleeves, but I think in my case the curve has to be so extreme (again, bigger chest than shoulders) that I'm skeptical.
In order to make a gown like this, you need the following measurements: Shoulder to ankle (or shoulder to floor), shoulder to wrist, upper arm circumference, armpit to whereever you want the dress to start to flare out, shoulder to shoulder, and chest circumference divided by two. Add seam allowances to everything. The only important measurement for the gores is that they be long enough to go from the bottom of the hem to where you want the flare to start, usually a little above your hips. Cut out one long piece that is half of the chest circumference wide by twice your shoulder-to-ankle long (leave enough for a hem). On this piece, mark where you want your head to go (hopefully that means "the center"), and also make marks corresponding to your shoulder to shoulder measurement and half of your arm circumference (on each edge). Draw a curve from each shoulder to each armpit (arm circumference). For the sleeves, you'll need to match that curve. This is difficult for me and I feel like I've never gotten it quite right and as this section only exists to document some of my experiements I won't actually go into any more detail.
Pros: Looks good. Defendable if not really authentic -- if you are never going to enter a competition, if all you want is something that looks good and that there's some kind of evidence to support it so you can wave it at someone when they challenge you, this will work.
Cons: It can't really be authentic. It just can't. See the note above on folds and creases. Also, getting a curved connection between sleeve and garment is hard (if you're a little sewing-challenged, like I am) and if I wanted to make hard garb I wouldn't have picked this time period.
Modified A-tunic: Narrower main piece! The logical next step to solve the issues of 1) set-in sleeves aren't right and 2) sleeves-starting-at-elbows seems obvious to me now, but took me a long time to realize: make the main section of the garment as wide as my shoulders are, and add gores higher up (right under my armpits) to add enough fullness around my chest. Lo and behold, my lady found this site showing just such a method: Hefdharfru Vigdís Vestfirzka's underdress for Norse garb.
Also, go way back to those first couple of paragraphs, and recall what the point of rectangular construction is: make a wide shape from narrow fabric. The reality is, there may not have been fabric wide enough to go around me in the middle ages. Whether or not there were people as big around as I am is beside the point, for right now: if I had been a medieval person, as I am attempting to be, I would have had to figure out a way to make narrow widths of fabric go around me. The only way to do that is to put the gores under my arms / around my chest instead of using the width of the fabric to go around my chest.
This is quite simple, and there are actually two ways that you can do this. Vigdís' version is on the right side of the dress below, the alternative is on the left.
This works pretty well. I haven't done this in linen or wool yet, but I made a muslin mock-up for my lady and I liked how things were turning out. At her request, I was able to achieve a pretty good degree of non-sack-ness in the cut, with nice sleek lines and everything draping pretty well. There's still a lot of fullness around the armpit. While I was working on a mock-up of the same style for me, though, I had a breakthrough, which we will discuss next.
I won't go into full construction details since they are outlined very well (better than I could) at the page linked above.
Pros: (Likely to be) authentic, not too hard, looks pretty good.
Cons: I haven't seen actual documentation for this cut, but then again I haven't really looked, either. Otherwise I can't actually think of any cons. If you aren't careful you can still end up with a sack, I guess that's a con.

If you have no idea what I'm trying to show, here is a different image, this time showing all of the pieces, laid out on your rectangle of fabric:
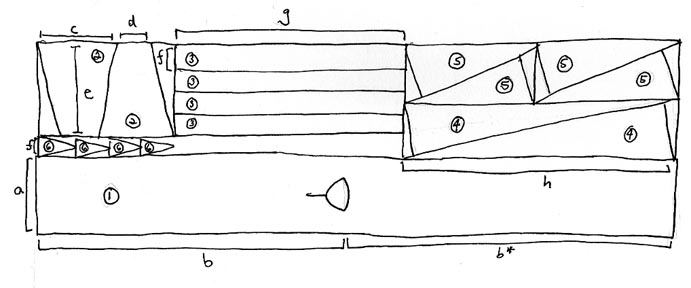
The pieces:
1) Main body
2) Sleeves
3) Rectangular side gores
4) Large triangular side gores
5) Small triangular side gores
6) Tiny triangular sleeve gores
If you count, you might notice that this has a total of ten gores. I swear this is purely coincidental.
Measurements (add seam and hem allowances!)
a) Shoulder to shoulder
b) Shoulder to floor (b*: if you want your dress longer in the back, this will differ from b, otherwise the same)
c) Arm circumference
d) Fist circumference
e) Shoulder to wrist
f) This is the difference between (a) multiplied by 2 and subtracted from your chest circumference, then divided by two
g) Armpit to floor (I measure this after I put the sleeves on main body piece)
h) From where you want the dress to start flaring out to the floor.
The length of the small triangular gores is not critical. They add fullness at the base of the skirt. Similarly, the length of those sleeve gores is not so important. Mine ended up being about 10" long.
How does everything go together?
Sew the sleeves to the body. Sew each sleeve gore to a short end of a rectangular gore. Sew each of the large triangular gores to one of the rectangular gores. Sew each small rectangular gore to the main body piece at the base. Sew each of the rectangular gores with triangular gore attached to the main body, making sure that each large triangle will end up in the middle of each side. Sew the other rectangular gore to the other side of the body. You should just be able to start at the ends of the sleeves now and sew up the sides with little trouble. Do the head opening and hem everything.
Pros: Drapes nicely, fits well. Because of the larger number of smaller gores, the skirt is somewhat more circle-like at the hem, which makes it hang better. It wastes an appallingly small amount of fabric. The measurements and actually sewing are not too complex (if I can do it, you can do it). Basically, it allows you to achieve a nice fit while still using all triangles and rectangles. Also, check out this surving garment: St Claire's gown. Although not identical, it follows a similar general construction, with gores extending from the hem to under the arm, and with additional gores on the sleeve. Overall, if you study the evidence of surviving medieval clothing (leaving aside for the moment some of the questions raised by the very survival of these garments), the general trend seems to be more seams than one would necessarily expect.
Cons: I can't prove it's period. I haven't found any evidence of surviving garments that looked quite like this. The best I can say is that it gives a similar silloutte to the pictures and uses the general techniques that we have accepted as accurate for this period. That's about as good as saying "I can't prove it's not period," though. I have pretty well spit in the face of any notion of keeping things simple. However, that may not make this inaccurate: after all, a T-tunic is simple.
For now, I'm going to say that this cut is the first I've found that meets all three of my criteria noted at the very start of this page, and it is at least conjecturally period enough for me.
Is there good evidence that either supports or refutes this design?
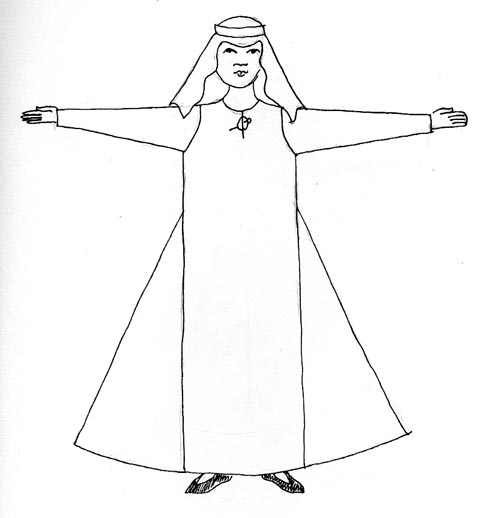
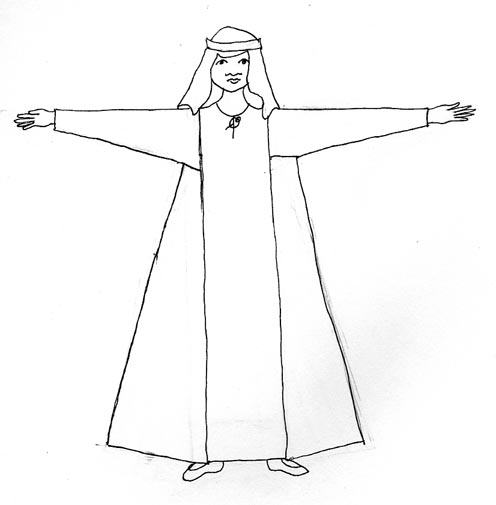
Ideally, I'd like to have pictures of me in all of these various constructions to compare against a wider range of period images. However, all of that fabric is beyond my budget. For now, here's a picture of me in the version with psudo-set-in sleeves (on the left) and in the final version (right):


I would be interested to read anyone's opinions on this topic, especially if you say "What's so clever about that? Such and so has been doing gowns that way for years." I'd be extra especially interested in hearing from anyone with really solid evidence to support one particular way of cutting gowns as being the most authentic for late thirteenth century England.
©Laurel Black 2007