Cardiopulmonary Resuscitation (CPR)
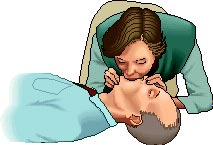 Cardiopulmonary
resuscitation (CPR) is an attempt to revive the heart and pulmonary
functions of a patient. Due to accidents, or illness the breathing or
heartbeats may be hampered. The brain can stand low oxygen for not more
than 4-8 minutes. After this, brain damage sets in & this is irreversible.
Isolated cases of full neurological recovery are documented when the body
has been in cold water. The children have more of respiratory causes
leading to gasping & needing CPR. While elders are more prone to cardiac
ischemia & infarcts which deranges the heart & respiration functions.
Cardiopulmonary
resuscitation (CPR) is an attempt to revive the heart and pulmonary
functions of a patient. Due to accidents, or illness the breathing or
heartbeats may be hampered. The brain can stand low oxygen for not more
than 4-8 minutes. After this, brain damage sets in & this is irreversible.
Isolated cases of full neurological recovery are documented when the body
has been in cold water. The children have more of respiratory causes
leading to gasping & needing CPR. While elders are more prone to cardiac
ischemia & infarcts which deranges the heart & respiration functions.
Every individual should know about CPR as early treatment guarantees
improved neurological outcome & survival. The CPR involves few steps,
which should be carried out tactfully and in order. These steps are the
ABC of CPR.
The
responsiveness of the person who has collapsed should be evaluated. You
should shake the body and ask whether "he or she" is ok?
Shout for help immediately
Turn the
patient over by rolling him over in one piece. While doing this, the
patients head & neck should be supported and place him in supine position.
A =
Airway
patency should be achieved and maintained. The cessation of
respiration is usually due to ensure airway patency; the person's head
should be tilted back by placing the left palm on the forehead. This
should be followed by "chin lift". In the latter, the rescuer should place
his / her right hand just over the angle of the mandible and lift it. The
soft tissue should not be compressed. This pulls the tongue forward &
relieves the obstruction.
B =
Breathing
should be looked for. The breathing is present if there is
chest rise & fall one can also feel for the exhaled air on the rescuer's
cheeks or hear the sound of expiration. If it is present, just maintain
the "head tilt & chin lift". But if it is absent you have to give "mouth
to mouth ventilation".
The exhaled air has at least 14-18 % oxygen & can be used for the hypoxic
victim. The rescuer should take a deep breath & exhale into the victim's
mouth. There should be an airtight seal made by the rescuer's mouth over
that of the victim. In case of a small child, the nose & mouth should be
covered. In this era of AIDS & HIV, refrain from mouth-to-mouth breathing
for strangers. In them one can use some barrier in between like a
univalvular mask or handkerchief. While breathing in, look for the chest
rise. 2 rescue breaths should be given. If there is no chest rise,
reposition the head & try again. If still no chest rise, suspect a foreign
body & check the mouth. Remove if visible. No blind sweeps are allowed. If
there is chest rise, continue for a minute & check for pulse.
C=
Circulation
- The presence of an adequate circulation
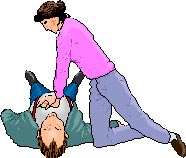
could be
gauged by the palpation of the pulse. In older children & adults, the
carotids are palpated. They are just lateral to the cricothyroids in the
neck. In children < 1 year, brachials are felt. Palpation is done in the
medial aspect at the middle of the upper arm.
If the pulses are felt, just continue rescue breaths at the frequency of
one per 3 seconds. If pulse is absent, start external cardiac massage. In
infants, 3 fingers are placed below the internipple line on the sternum.
The upper end finger is lifted & the compressions are given with the
remaining 2 fingers. The ratio should be 5 compressions: 1 breath. The
depth should be 1/2 inch. Continue till help comes or pulse returns. In
older children, place heel of left palm over lower one third of sternum &
give 1/2 - 1 inch deep compressions in the ratio of 5 compressions: 1
breath. Do not bend at elbow or rock. In adults, the site of compression
is same. But the heels of both hands are used; right over the left. Do not
double-cross. The depth of compressions is 1 - 1½ inches & ratio of
compressions to rescue breaths is 15:2.
Start rescue
breaths in water itself in case of a drowned victim.
If above steps are followed promptly, many a life would be saved with
almost complete neurological recovery.
Once the patient's breathing and heartbeats are reestablished, but the
victim is still unconscious, it is vital to reposition him or her in the
recovery position. To do this, follow the underlying steps:
1.Kneel
beside the patient, about 9 inches away at the level ofthe chest.
Turn the head towards you and tilt it back keeping the jaw forward in
the open airway position.
2.Place the
victim's nearest arm by the side. Place the hand ofthis upper
limb below the buttocks with the palm facing upwards. Bring the other
forearm over the front of the chest. Hold the other far leg and bring
it to cross the near leg.
3.Protecting
the victim's head with one hand, grasp thebuttocks
with the other hand and pull the victim towards you. The knees of the
victim would support him in this lateral position.
4.The
uppermost arm of the victim should be placed in a
comfortable position to support the upper body.
5.Bend the
upper leg at the knee so as to support the body of the victim.
6.The other
hand should be gradually removed from under thebody and
placed on the side. It should lie parallel to the body.
The advantage of this position is that it maintains the patency of the
airways. The tongue remains forward. The victim's vomitus will drain freely
and the risk of aspiration is abolished.
But fractures of the neck bones, long bones and the like if present can
prevent the patient to be put in this position. When the space is small, the
victim cannot be put in the recovery position.
======================================================================================
Send your
Medical Problems for Free Advise & Treatment
Feed Back
Sign Guestbook
 View Guestbook
=======================================================================================