Web Graphics
Lesson 1
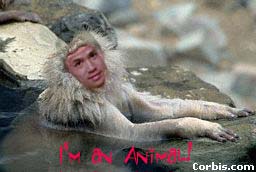
Purpose: students will be able to merge
two photos together using Adobe Photoshop and save it in the images folder.
- Netscape Communicator>open>go to Yahoo search engine>(animal
photos)>Yahoo animal photos>choose your animal
- right click image>save as>s: drive>it10>it10(your
class)(d or f)>your folder>web folder>images folder>file
name: animal.jpeg (no .gif images, please)>save
- windows explorer>open>s: drive>it10>it10(your class)(d
or f)>teacher folder>photos>find your photo>copy
- go to your own folder>open>web folder>open>images folder>open>paste>rename>yourname.jpeg...i.e.
kkim.jpeg
- Photoshopv.4>open
- kkim.jpeg>open
- image>image size>adjust width and height of image to the size
of your animal.jpeg face
- lasso tool>drag around kkim.jpeg>edit>copy
- animal.jpeg>open>edit>paste
- layer>free transform>rotate/stretch/skew
- click move tool>apply transformation>drag to fit
- layer>flatten image>OK
- text tool>I'm an animal!>choose own font and color>OK
- file>save as>file name: animal.jpg>s: drive>it10>it10(your
class)(d or f)>your folder>web folder>open>images folder>open>save
Lesson 2
Purpose: students will be able to create a body
background using Adobe Photoshop.
- file>new>100 pixels width by 100 pixels height
- filter>texture>texturzier>scaling: 100%, relief: 8%
- layer>new layer
- line tool>double click>opacity 100%, width: 2, anti-aliased on, arrowheads
at start (keep arrows to bottom and angled right so offset filter will work)
- select>select all
- filter>other>offset>horizontal: 80 pixel right, vertical: 20 pixel
down, undefined areas: wrap around
- layer>layer 1 options>opacity: 20% (this is done so not to interfere
with the opacity of the text)
- image>image size>72 pixels width by 72 pixels height
-
file>save as>file name: arrow.jpg>s:
drive>it10>it10(your class)(d or f)>your folder>web folder>open>images
folder>open>save
*to preview the tiled image: select>select all>edit>define pattern>new>300
pixels width by 300 pixels height>edit>fill pattern>opacity: 100%

Lesson 3
Purpose: students will be able to create a body border
with a drop shadow using Adobe Photoshop.
- file>new>640 pixels width by 200 pixels height
- view>show grid
- rectangular marquee>select 2 inches on the left side
- select>save selection>channel 4
- eyedropper tool>select color>fill color of your choice
- view>hide grid
- layer palette>pull down>duplicate channel>channel 5>click channel
5
- filter>blur>gaussian blur>radius: 15 pixels>click alt+right
arrow key (this will extend the drop shadow by 2 pixels)
- composite channel>load the selection>channel 5>load selection>add
to selection> channel 4>subtract from selection
- edit>fill>black>opacity: 80 %
- select all>edit>copy
- file>new>1024 pixels width by 70 pixels height
- edit>paste
- layer>flatten image>OK
- file>save as>file name: border.jpg>s: drive>it10>it10(your
class)(d or f)>your folder>web folder>open>images folder>open>save
*to preview the tiled image: select>select all>edit>define pattern>new>300
pixels width by 300 pixels height>edit>fill pattern>opacity: 100%

Lesson 4
Purpose: students will be able to create a body border
using Adobe Photoshop.
- file>new>640 pixels width by 200 height
- view>show ruler>snap to guide
- add vertical guides at 1 inch and 1 1/4 inches
- add five horizontal guides at 1/2 inch apart
- pen tool>draw path of hinge points (0,0) (0,1) (1/2,1 1/4) (1,1) (1 1/2,
1 1/4) (2,1)
- convert anchor point>click hinge point at (1/2,1 1/4) and drag down to
create a curve
- repeat at hinge point (1 1/2, 1 1/4)
- double click the work path in the paths palette>save path as a selection
- paths pop-up menu>fill>path>use foreground color
- view>hide ruler>hide guides
- paths pop-up menu>delete paths
- rectangular marquee>select one curve of the full width of the image (640
pixels)
- edit>copy
- file>new>1024 pixels width by 70 pixels height
- edit>paste
- file>export>gif89export>OK>file name: scallop.gif>s:
drive>it10>it10(your class)(d or f)>your folder>web folder>open>images
folder>open> save
*to preview the tiled image: select>select all>edit>define pattern>new>300
pixels width by 300 pixels height>edit>fill pattern>opacity: 100%
