
SeGuruCool
The Largest Independant Solid Edge Resource Outside UGS
|
SeGuruCool The Largest Independant Solid Edge Resource Outside UGS |
|
9 Mar 2005 Tushar Suradkar www.geocities.com/SeGuruCool  segurucool @ indiatimes.com segurucool @ indiatimes.com |
|
|
|
Part to Sheetmetal Begining V16, Solid Edge supports converting part to a sheetmetal object. This means you can start modeling in the Part environment and switch over to Sheetmetal and your model would behave as a sheetmetal object. This process has some obvious advantages which you learn in this short tutorial. Create a box and draft its two faces with an angle of 12 deg. Use bottom face as the Draft plane. | 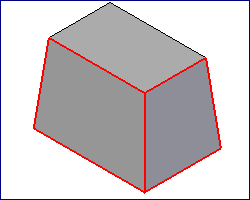 |
|
Hollow out the Part Make the tapered box hollow using the Thin Wall command and remove the bottom face. This makes the part look more like a sheetmetal. | 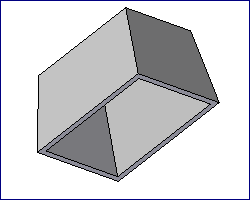 |
|
Switch to Sheetmetal Save the part and start new sheetmetal document. Select Insert > Part Copy and insert the hollow tapered part. Select the Rip Corner command and pick all 4 vertical edges as shown. | 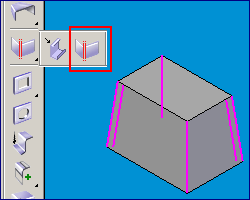 |
|
Convert to Sheetmetal The four edges will be ripped to create flanges. | 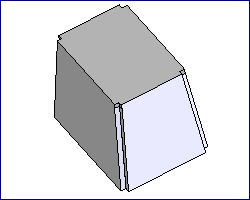 |
|
Sheetmetal Created Next, Select the Convert to Sheet Metal command nad select the top face and click Finish. Solid Edge will automatically apply bends as shown in figure. | 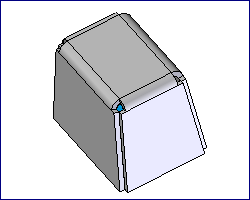 |
|
The Reason The reason to do all this stuff will be clear once you flatten the part. It would have been quite cumber some to model the drafted edges in sheetmetal directly. Looking at the inclined edges will reveal how it is beneficial to start as a Part and Convert it to Sheet Metal ! | 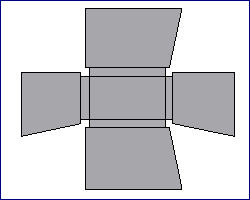 |
|
Tushar Suradkar segurucool @ indiatimes.com |
 Download FREE 6 chapters & source code