Total Beginner Guide to the
CANON EOS Rebel/1000*
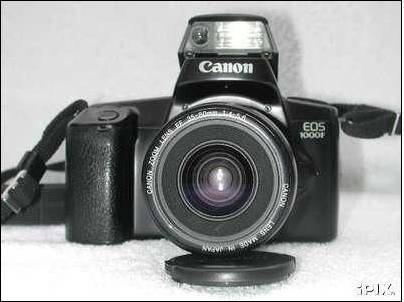
Table of Contents:
Winding, focusing and metering
modes.
The EOS Rebel/1000* and high-speed
infrared film.
Attaching manual-focus lenses or
telescopes (stop-down metering).
Some limitations of the EOS
Rebel/1000*.
Getting Started:
- Turn the camera off, if
it was on, by turning the left-hand dial (looking from the back of the
camera) to the red square marked L for “lock.”
- Make sure the camera has
a working battery installed. The battery cover is on the bottom, and the
battery goes into the camera terminal-end (metal contacts) first.
- Open the camera back.
The release catch to the camera back is on the left side of the camera
when viewed from the back.
- Take a fresh roll of
35mm film and slot it into the space on the left. The exposed bit of film
should protrude out to the right and the plastic cylindrical end should be
at the bottom.
- Pull the film tongue out
as far as the orange mark on the right side of the camera. Be extremely
careful not to poke the fragile shutter with your finger. (the shutter is
the black rectangle with the sort of Venetian-blind panels in the middle
of the camera)
- Close the camera back.
The camera will whir and wind for a half-minute or so.
- When it’s finished
prewinding, the total number of shots available on the film will be
displayed on the top screen, meaning it’s ready to go. If the flashing
circle icon appears on the panel on the top then the film did not load
correctly and you’ll probably have to open the camera back and line up the
film with the orange mark.
- Turn the left-hand dial
to the green rectangle. This is the beginner mode.
- Make sure the AF/MF
switch on the lens is set to AF, for auto focus. Remove the lens cap if
necessary.
- Look in the viewfinder
and push the shutter release button halfway down. Whatever is in the very
center of the viewfinder should snap into focus.
- If a green dot in the
viewfinder blinks it means your subject is not in focus. Try refocusing
again. You may need to find an object with a vertical line to focus on.
- If the lightning bolt
icon blinks in the viewfinder it means there isn’t enough light, so lift
up the flash at the top of the camera (if your camera comes with built-in
flash) to turn it on.
- Push the shutter all the
way to take the picture.
- Have fun!
More
in-depth information.
The
rest of this page contains more detailed information on how to use this camera.
Note that this document is not meant to be a general-purpose camera
manual. I’m going to assume you know the basics of how cameras work and what
standard terms (aperture priority, etc.) mean. If you want to learn more about
this sort of beginner information please consult some of the photo instruction
Web sites online.
Shutter release button.
The
button under your right index finger when you hold the camera is, of course,
the shutter release. Pushing it halfway will turn metering on, will lock AE and
also start auto focus if your lens isn’t set to M or MF mode. The round
in-focus dot lights up in the viewfinder when automatic focus is achieved or,
in manual focus mode, when the camera thinks you’re focused correctly. (note:
the in-focus dot will not illuminate if you’re using a lens that doesn’t
contain EOS-compatible electronics, such as an old M42 screw mount lens with an
EOS adapter. Such a lens also causes the aperture value to be displayed as 00.)
Pushing
the button all the way will take the photo. (Unless the subject isn’t in focus
and the lens is set to AF, in which case the camera will refuse.)
Manual focusing.
There
will be a switch on your camera’s lens marked AF/MF or AF/M on older lenses.
Turn this switch to MF or M and the camera will be in manual focus mode. Then
you turn the focusing ring on the lens to focus manually. Note that if your
lens is a Canon EOS lens with full-time manual focusing (FTM) then you can
adjust focus manually at any time that the auto focus motor isn’t actually
working.
A
handful of older EOS lenses lack this switch since they don’t support manual
focusing. If that’s the case (such lenses are usually marked with the letter A,
such as the EF 35-70mm f 3.5-4.5 A) you’re out of luck and can only use auto
focus, I’m afraid.
Main dial.
The small dial on the grip, under your right index finger and next to the shutter release button, is the main input dial. It’s used for adjusting various camera settings.
Command (mode) dial.
The
primary control knob on the camera, located on the left side of the top deck,
(looking from the back) and marked with a variety of letters and icons.
It
doesn’t have a locking mechanism, so it’s possible to power up the camera
accidentally by bumping the dial. But at the same time this camera isn’t
vulnerable to the breaking-command-dial problem experienced by the poorly
designed A2/5/Elan/100/10s command dials.
Lock mode (L).
The red L mode means “off” in Canon parlance. In this position there’s no risk of taking a photo accidentally.
“Image zone” (PIC) modes.
Clockwise
from the center lock position are the five PIC (image zone or PIC - programmed
image control) modes, each identified by a small icon. These are various beginner
modes that have different shooting assumptions built-in. Later EOS cameras
refer to them as “basic” modes.
Note
that the PIC modes aren’t designed to work properly with external flash units.
The only common PIC mode missing from this camera is “night” mode, which you
can approximate by shooting in Av mode with flash turned on.
- Full auto.
(green rectangle) This is the simplest point and grin mode, for people who
want to take snapshots without having to learn anything about the
operation of the camera. Turn your camera to this mode and snap away!
Full auto switches automatically between one-shot AF and AI servo modes, depending on whether the camera senses subject motion or not. It also uses single-frame wind with evaluative metering. Full auto mode is similar to Program AE mode, but you can’t adjust exposure compensation in this mode, nor can you use partial metering or multiple exposures. - Portrait mode. (woman’s profile) For taking head and shoulders photos of people
- even men.
One-shot AF, continuous wind, evaluative metering. Attempts to set the lens aperture as wide as reasonable in order to blur the background and set the foreground figure off from the ground. If you have a zoom lens try to set it to a long focal length (eg: if you have a 28-90 shoot at 90mm) to maximize the blur. Also, longer focal lengths tend to be used for more flattering portrait shots. - Landscape mode. (mountain with cloud) For taking photos of
landscapes.
One-shot AF, single frame wind, evaluative metering. Attempts to set the aperture as small as reasonable for wide depth of field. I believe the built-in flash will not fire in this mode. - Close-up mode. (flower) For taking close-up photos of things. Requires a lens
capable of closeup photography, obviously.
One-shot AF, single frame wind, partial metering. - Sports mode. (running figure) For fast-moving subjects.
AI servo AF, continuous wind, evaluative metering. Attempts to keep the shutter speed as high as reasonable. I believe the built-in flash will not fire in this mode.
Winding, focusing and metering modes.
The camera has a number of winding, focusing and metering modes mentioned above. Here’s what they mean.
- Single-frame wind.
In this mode the camera takes one photo only for each push of the shutter release, even if you keep the shutter button held down. - Continuous wind.
In this mode the camera keeps snapping pictures at 1 frame per second as long as the shutter button is held down. And as long as you’ve got film. - One-shot AF (auto focus).
In this mode the camera locks in on your subject and doesn’t refocus once you’ve achieved focus. It won’t take a picture unless you’re in focus or unless you’re in manual mode. - AI (“artificial intelligence”) servo mode.
In this mode the camera tries to keep refocusing the lens as you track your subject. The camera’s computer isn’t that fast, however, so this doesn’t work all that well. Still, the camera only shoots 1 frame a second, so you can’t really expect to use it for sports photography and the like, anyhow. You need to spend the big bucks for a big fast camera for that type of thing. - Evaluative metering.
The camera’s default metering mode. It looks at the three metering zones and applies various algorithms to guess a likely exposure setting. This works OK for basic photography, though the meter can be fooled by extreme metering conditions - such as a person backlit with a bright light. Nikon call their equivalent of this mode “matrix metering.” - Partial metering.
The optional partial metering mode looks only at the 9.5% circle around the focus point - the area outlined in the viewfinder. This is the only one of these modes which can be engaged directly by a control if you want to turn it on. - Center-weighted average metering.
A metering mode popular in the 1970s. This mode meters from the entire frame area, averaged out. And it gives greater importance to the central area. The camera uses this mode in manual metering by default - you can’t use evaluative.
“Creative zone” modes.
Counter-clockwise
from the center lock position are the five “creative zone” modes - P, Tv, Av, M
and DEP. These modes afford varying degrees of control over your camera’s
settings, unlike the PIC (icon) modes, which are meant for rank beginners.
Actually, I suppose the SF and timer modes are also kind of in the creative
zone.
Program
AE (auto-exposure) mode (P).
Turn
the command dial to P. The camera will automatically select shutter and
aperture settings according to its built-in basic program. Program AE mode uses
continuous wind and also evaluative metering unless you push the partial
metering button.
Unlike
the green mode you can program shift by turning the main dial and adjust the
exposure compensation by turning shift-main dial. (see below)
If
the camera’s maximum shutter speed (1/1000 sec for the Rebel/EOS 1000/1000 QD
and 1/2000 sec for the Rebel II/S II/EOS 1000N/1000FN/1000S-QD/1000S-QDP) and
the value of the minimum aperture of the lens flash in the viewfinder then
there’s too much light. Either use slower film or put a neutral-density filter
in front of the lens. If a shutter speed of 30 seconds and the value of the
maximum aperture of the lens flash in the viewfinder then there isn’t enough.
Use faster film, flash or bulb mode.
Adjusting
program AE (program shift, exposure compensation).
The
camera lets you adjust certain metering options in program mode.
Program
shifting means you can alter the shutter speed and aperture value together
whilst retaining the same exposure value. You can do this in Program AE and DEP
modes by turning the main dial. For example, 1/90 second at f 4.0 is the same
exposure value as 1/30 second at f 6.7, since both settings let the same amount
of light hit the film. However the settings result in different photos being
taken because of the differences in shutter speed and aperture (depth of
field). Note that you can also program shift in DEP mode.
Exposure
compensation means you can set the exposure setting to be more or less than
what the camera thinks you need. For example, if you’re shooting a snow scene
you might want to apply a +1 stop exposure compensation setting. To do this in
AE Program mode you shift-rotate the main dial. The top-deck LCD and viewfinder
scales will indicate the amount of compensation that you’re applying by
shifting the black rectangle on the scale.
Shutter
priority AE mode (Tv).
In
this AE mode you set the shutter speed (time) and the camera automatically sets
an appropriate lens aperture for you, based on the selected metering mode -
evaluative (default) or partial.
Turn
the command dial to Tv, which stands for “Time value”. (Nikon more sensibly
refer to shutter priority as S mode.) Turn the main dial to adjust the shutter
speed setting and shift-main dial to adjust exposure compensation. The camera
flashes the aperture value if you’re out of range. (ie: if you haven’t got
enough light it’ll flash the maximum aperture of the lens, and if you’ve got
too much it’ll flash the minimum aperture of the lens.)
You
can’t go into bulb mode here - the maximum time value is 30 seconds. For bulb
you need manual mode. The shutter values are expressed as fractions of a second
unless the " symbol appears, in which case the value is expressed as a
second. Thus 125 means the shutter speed is 1/125 of a second whereas 1"5
means the shutter speed is 1.5 seconds.
Aperture
priority AE mode (Av).
In
this AE mode you set the lens aperture and the camera automatically sets an
appropriate shutter speed for you, based on the selected metering mode -
evaluative (default) or partial.
Turn
the command dial to Av (for Aperture value). Turn the main dial to adjust the
aperture setting and shift-main dial to adjust exposure compensation. The
camera flashes the shutter speed value if you’re out of range. (ie: if you
haven’t got enough light it’ll flash 30" and if you’ve got too much light
it’ll flash 1000 or 2000, whichever is the maximum shutter speed for your
particular model)
You
can choose any aperture value that falls within the aperture range of the lens
you happen to have installed. The wide-open aperture varies a lot from lens to lens
- f/1.4, 1.8 and 2.8 are typical valuues for fast lens and 3.5, 4.5 and
5.6 are typical for slower zoom or telephoto lenses. The largest aperture value
is usually printed on the lens itself, and is sometimes an aperture range on
zoom lenses which do not have constant apertures - eg: f/3.5-5.6. The
smallest aperture value on a 35mm lens is usually f/22.
Metered
Manual mode (M).
In
this mode you set both the lens aperture and the shutter speed manually. The
camera will assist you by telling you whether it thinks you have the correct
metering based on the selected metering mode - center-weighted averaging
(default) or partial.
Turning
the command dial to M lets you shoot in metered manual. How the camera behaves
in this mode depends on which camera you have.
The
older 1000/Rebel viewfinders display a simulated needle match mode. This sort
of animated graphic tells you if your picture is likely to be underexposed,
overexposed or exposed correctly. (correct exposure is obviously when the
moving rectangle appears in the middle of the scale)
However,
the Rebel II/S II cameras the camera will display little + and - arrows telling
you whether your picture is correctly exposed, overexposed or underexposed.
Minus means that the image is underexposed and that the camera needs more
light; plus means that the image is overexposed and the camera means less
light. Both plus and minus means that the camera thinks the exposure is
correct. This is not as useful, since the arrows don’t tell you how far you’re
under or over. This step backwards in functionality between the version numbers
was apparently done for patent licensing reasons.
Either
way, use the main dial to change the shutter speed and shift-main dial to
change the aperture. You can also go into bulb (long time exposure) mode - it’s
the “buLb” setting that’s one step past 30 seconds. However, since the camera
lacks any provision for remote shutter release it isn’t a very useful feature
unless you rig up a homemade mechanical lever to keep the button pressed during
long exposures. Bulb mode means the shutter stays open for as long as you keep
the shutter release button pressed. Apparently the name comes from the olden
days of mechanical shutter releases, when you’d have a rubber ball-shaped bulb
that you’d squeeze to trigger and hold the shutter.
I
understand the camera switches to center-weighted averaging metering mode when
you go into manual mode, which is annoying, since you can’t specify evaluative
if you happen to prefer that. You can always go into partial by pressing and
holding the awkward partial metering button.
Depth
of field AE mode (DEP).
DEP
is short for “depth of field AE mode.” Not to be confused with depth of field
preview (which these cameras lack), DEP is a function that help you set the
correct depth of focus field for your photos. Basically it tries to keep
everything between two user-selected points in focus.
Select
DEP mode. Then auto focus on a foreground item you want within your desired
depth of field by selecting the subject and pressing the shutter halfway. “dEP
1” will appear in the viewfinder. Then recompose the image and auto focus on a
background item by selecting the subject and pressing the shutter halfway. “dEP
2” will appear in the viewfinder. Finally, compose the final image in the viewfinder
and press the shutter release halfway again. The camera will then calculate the
necessary aperture setting and shutter speed to keep both items, and everything
in between, in focus. Press the shutter release all the way to take the photo.
Of
course, this all works only if the lighting conditions are OK for your selected
depth of field. If there isn’t enough light then the slowest shutter speed (30
seconds) and the maximum aperture value of the lens will flash. If there’s too
much light then the fastest shutter speed (1/1000 sec or 1/2000 sec, depending
on your camera model) and the smallest aperture value of the lens will flash.
And if the aperture value flashes then you can’t set the desired depth of field
and need to move further away from the subject or set a wider setting on a zoom
lens.
DEP
mode is program shiftable (main dial) and uses single-frame wind. To cancel DEP
mode just turn the command dial to something else. Note that you mustn’t adjust
zoom settings on zoom lenses between setting dEP 1 and dEP 2, as you’ll throw
everything out of whack. Likewise you can’t use flash in DEP mode - if you do
the camera will revert to basic program AE mode.
For more information about DEP mode have a look at Vadim Makarov’s page on the subject. Or, if you’re interested in learning more about the complex math that underlies this camera mode, check out section 9.27 of the old EOS FAQ - “What is ‘depth of field’ and how does the ‘Depth-of-Field’ mode work?”
ISO.
This
command dial setting lets you override the automatic DX ISO film speed settings
and set your own. Turn the dial to ISO and use the main dial to adjust the film
speed manually, from 6 to 6400 ISO. Since the 1000N/Rebel II lacks flash
compensation you may want to do this from time to time.
Most
film cartridges these days have their film speed printed on them in a form that
cameras can decode automatically. There should be a pattern of squares (exposed
metal or black paint) printed on the side of the film canister. This is the DX
code, read electrically by metal contacts within the camera. However, some film
cartridges may lack DX coding. Infrared film, for example, doesn’t have a DX
speed setting since metering IR film is so wacky. Hand loaded film will of
course lack DX codes unless you put little stickers on yourself. And it’s
conceivable, I suppose, that old film from a less than mainstream firm in some
mythical and remote country might lack DX codes.
Self-timer.
This
command dial setting, which looks like a clock, is the self-timer mode. Turn
the dial to this setting and press the shutter release. The camera will start
beeping or playing a tune (see below) and will take a photo about 10 seconds
later.
Note
that the timer mode is the same as P mode with the 10-second timer. There’s no
way to operate the camera in, say, Av mode with a timer - something of a
limitation. There’s also no way to change the time value.
Note
one detail. Normally when you take a photo you’re looking through the
viewfinder and your face is therefore covering it. However, in self-timer mode
the viewfinder is left uncovered and stray light can enter the camera, possibly
throwing off the internal light meter. So when using the timer it’s wise to
cover the viewfinder with something. Some camera straps include a plastic cover
on one end that can be used to cover the viewfinder. Or you could put a gray or
black plastic film canister cap over it if you have one around - they fit
nicely. The one time this isn’t necessary is M mode since you’re setting both
aperture and shutter speed manually.
Self-timer tunes.
One
of the amazingly useful features of the 1000N/Rebel II is the ability to play
charming little tunes, out of key, during self-timer operation. It was such a
useful selling point, in fact, that Canon never continued the feature to any
other EOS camera. Note that the original Rebel/Rebel S/EOS 1000/1000 QD lacks
the ability to play self-timer tunes; a terrible tragedy.
To
set the self-timer tunes turn the command dial to the speaker/musical note
setting. Then rotate the (index finger) main dial until the number in the top
deck LCD changes. (you may need to try moving either direction) 1 is a plain
beep and settings 2 through 4 are various tunes by Vivaldi (Four Seasons -
Spring), Bach (Minuet) and Beethoven (Turkish March).
As
far as I could tell the Rebel II does not have the ability to disable beeps or
tunes altogether, though apparently the 1000N and 1000FN have a 0 setting which
does just that. In addition, the 1000N/1000FN have the optional ability to beep
when focus is achieved, whereas the Rebel II does not. The 0 setting also
disables focus beeps.
Soft focus.
The
SF mode is for “soft focus.” The original Rebel/Rebel S/EOS 1000/1000 QD lacks
this feature - only the Rebel II and EOS 1000N/etc cameras have it.
In
this mode the camera takes two photos on the same frame, one a split second
after the other. It defocuses the lens for the second shot, thereby rendering a
softish blurry look to the photo. Obviously you have to have the lens in AF
(auto focus) mode for this feature to work. The defocusing distance depends on
the focusing distance. As with the self-timer the SF mode is the same as
Program AE mode when it comes to metering. And like the self-timer tunes, this
SF feature was only ever included with this camera, I believe.
Soft
focus actually has two settings - 1 and 2, adjustable by the main dial.1 is
blurry (“weak”) and 2 is very blurry (“strong”).
Main dial shift.
The
unmarked left-hand rear button (oval) is a shift function for the main dial. In
P, Av, Tv and DEP modes, this oval button allows for control of exposure
compensation. In M mode, the dial controls shutter speed, with the oval
button-controlling aperture.
By
holding the main dial shift button down you emulate a rear control dial on more
advanced cameras, albeit at the cost of strain to your right thumb, since the
button requires a moderate amount of pressure and is awkwardly positioned.
Partial metering button.
The unmarked round rear button on the right engages
partial metering. You have to press and hold this button, and a * symbol will
appear in the finder. You can’t use partial metering in the green full auto
mode or any of the PIC (icon) modes. (except the close-up PIC mode, which
always uses partial metering and doesn’t give you a choice.)
If you don’t hold the button down the camera
defaults back to three-zone evaluative metering mode. The one exception is
metered manual mode - see above.
Flash.
If
your camera has a built-in flash (F and S models) then you can activate it by
simply lifting it up. None of these cameras has a motorized popup flash housing
- if the camera thinks you need flash it’ll flash a lightning-bolt flash icon
at you. The flash does not charge up until you lift it up, saving batteries.
The internal flash uses TTL flash metering only, though the camera supports
both TTL and A-TTL with external shoe-mounted Speedlite flash units. Flash sync
(X-sync) in program mode is 1/90 sec, but fill flash is possible in Av, Tv and
M modes. The flash does not zoom and covers the field of view of a 35mm lens.
To close the flash just push it down manually. Note that you can’t use the
built-in flash when an external flash (or anything else for that matter) is
mounted in the flash hot shoe.
The
flash-equipped cameras had a patterned red auto focus assist light in the flash
housing. (a feature sadly missing from the newer Rebel 2000/EOS 300 and Elan
7/EOS 30/EOS 7 cameras) This LED illuminates to help AF work in low light.
Since
the flash is mounted on top of the camera in-line with the lens axis it suffers
from two problems. First, it’s not high enough to clear a lot of lens hoods and
large lenses (resulting in a dark semi-circular flash shadow at the bottom of
the picture) and you can get serious redeye in people pictures, caused by the
light from the flash striking the retina of the subjects’ eyes and reflecting
straight back to the lens.
To
deal with redeye the 1000FN and the Rebel S II have a bright white red-eye
reduction lamp inside the housing next to the flashbulb. (the original 1000F
and Rebel S cameras lack a redeye reduction lamp, apparently) The flash output
on these cameras is also a bit higher than the other models - GN 14 versus GN
12.
The redeye reduction lamp illuminates when you’re in full auto (green box), self-timer or portrait mode for as long as you hold down the shutter release button halfway. So instead of pictures of evil satanic red-eyed friends and relatives you can take photos of them looking dazed and blank after staring at a blinding white light for a few seconds. You can’t activate the redeye reduction lamp in any other mode, but if you want to use it you can always start in full auto mode, engage the redeye lamp, and then immediately switch to the mode you really want to use and take a photo right away.
Understanding
how EOS cameras use flash photography is pretty confusing. It’d take a whole
other document to explain. And so that is, in fact, what I’ve done. Please
consult my Canon EOS Flash Photography
article for more information.
Multiple exposure.
Pushing
the two rear buttons together simultaneously sets the multiple exposure count
(1 to 9). This allows you to take multiple photos without winding to the next
frame, thereby creating very ugly pictures. Or for taking a photo of someone
superimposed over another background, like a Victorian ghost picture. You can’t
shoot multiple exposures in the green full auto mode, the soft focus mode or
any of the PIC (icon) modes. And if you want to take particularly ugly pictures
you can shoot more than 9 exposures if you insist - just reset the counter when
it reaches 2 each time.
It’s
usually necessary to decrease the exposure value of each exposure when shooting
multiple exposures. The manual suggests -1 stop compensation when shooting 2
exposures, -1.5 for 3 and -2 for 4, as a general rule of thumb.
Mid-roll rewind.
Mid
roll rewind is a bit of a chore since the camera lacks a mid-roll rewind
button.
1)
Turn the command dial to ISO mode.
2) Remove the lens (or at least unlock it on the EF bayonet).
3) Push the rear buttons together simultaneously. The camera will rewind.
4) Replace or relock the lens.
Film prewind.
Like
most of Canon’s low-end consumer cameras these models prewind the film; a
feature sometimes called “safety prewind” in Canon literature. In other words,
rather than shooting from 1 to 24 or 36 and then rewinding they unspool the
whole roll of film, then shoot in reverse.
This
is actually a clever feature, since it means if you open the camera back
accidentally you’ll only ruin a couple frames of exposed film plus the
unexposed film - the bulk of the exposed frames will already have been wound
back safely into the film canister. However, if you want to use this camera as
a backup body for a higher-level EOS camera you might find this difference
problematic. Particularly if you want to transfer a partially used roll of film
from one body to the other.
If
you do accidentally open the camera back when the film cartridge isn’t fully
wound back in you apparently need to remove the cartridge from the camera,
close it up again and press the shutter release. If you don’t do this I’m told
that the camera will remain in a confused state and will try to rewind
subsequent rolls of film.
Batteries.
These
cameras use one 2CR5 lithium battery, and they display the battery level on the
top-deck LCD whenever the camera is turned on. The battery indicator has three
settings - full, half full (or half empty) and empty. If the battery indicator
flashes then either the battery is exhausted or the camera has experienced a
malfunction.
Most
Canon EOS cameras use 2CR5s, though some of the newer models annoyingly use two
CR123As instead, which can be a hassle if you have two bodies and you’re out in
the field and thus need to carry two types of batteries. Complaining note -
it’s a drag that Canon’s designers decided to do this, since CR123A batteries
offer no increased power advantages or anything over 2CR5s - they presumably
made this change just because a pair of CR123As takes up slightly less room
than a 2CR5, since the latter batteries have plastic housings. On top of this,
a pair of CR123As usually costs more than a single 2CR5.
Though I should point out that there is one way in which CR123As are definitely superior - they’re safer. 2CR5 batteries have both contacts at the same end, whereas with CR123As the contacts are at opposite ends. I once had a 2CR5 in my coat pocket, and the end happened to touch the foil wrapper of a roll of mints. The battery shorted out and got hot. Very, very hot. Luckily I noticed it before my coat caught on fire, but it was still an unpleasant experience. So. Note to the wise - keep all 2CR5 batteries wrapped up so they can’t short out. Lithium batteries have a very high energy density, and the risk of fire is quite real.
The EOS Rebel/1000* and high-speed infrared film.
These
cameras use a sprocket drive mechanism and do not, in fact, fog Kodak HIE
infrared film. I’ve tried it in the Rebel S II. However, the cameras have
cutout notches in their pressure plates, which can lead to some shadowing on
the final photo - a different problem from fogging.
There
is considerable incorrect information about this on the Web - every list I’ve
seen online of which cameras fog infrared film wrongly states that the
1000N/Rebel II will fog high-speed IR film. For more information have a look at
my EOS and IR Web page.
Attaching manual-focus lenses or telescopes (stop-down metering).
For
an extensive article on how to do
this go to this link. Note that the EOS 1000*/Rebel use the old method for
stop-down metering.
Some limitations of the EOS Rebel/1000*.
Before
I begin this section I should reiterate that these cameras were designed and
marketed as beginners’ cameras. They weren’t meant to be advanced amateur or
professional cameras. So I don’t have any real quibbles with Canon’s decisions
to omit features in this regard. If you want a fancier camera then you have to
go and buy a fancier and more expensive camera.
However,
I offer this list of limitations - which may be of interest if you plan on
using one of these cameras as a backup to a more advanced system, or if you
find yourself doing more advanced photography.
- Only one auto focus sensor, and it isn’t a cross-configuration one. The AF sensor can only focus on vertical lines.
- Only 3 zones for evaluative metering. You can only use center-averaged metering in manual mode, and partial mode is only 9.5% and requires you to hold a button down.
- There is no rear command dial, like all the Rebel series cameras. The rear shift button is awkward and requires a fair bit of pressure. Most beginners won’t miss this dial, but its omission could be a nuisance if you do a lot of bracketing.
- The camera has a plastic lens mount, like all the Rebel series cameras. If you change lenses only occasionally that shouldn’t be a problem, as the mount is quite strong. However, if you change lenses constantly you may find the mount wearing down a bit faster than a metal mount would.
- The self-timer works only in Program AE mode. You can’t set a custom shutter speed and aperture setting or use flash at any speed other than 1/90 sec when using the self-timer.
- Film advance mechanism only runs at about 1 frame per second.
- There is no form of remote shutter release. No cable releases; no infrared remote controls. Unless you open up the camera and solder your own extension cable on, that is. The EOS 500/Rebel X was the first Rebel-class camera with a socket for a remote shutter release.
- In manual mode the camera switches to center-weighted averaging. You can use partial metering, but you can’t use evaluative metering in manual. You also can’t switch to center-weighted averaging in any other mode
- There were no optional battery-containing grips sold for this model. Just the GR-70 grip (also for the Elan/100), which was simply a lump of rubber with a hand grip. If this is a problem and you’re feeling adventuresome, however, you could try Julian Loke’s BP-50 hardware modification.
- Noticeably long mirror blackout period. (the length of time the viewfinder remains dark after a picture is taken, owing to the speed at which the mirror flips back down again.) This is only really an issue in rapid-fire photography, like sports, and even then it’s not really an issue with these cameras, which can’t shoot anywhere near as quickly as a pro camera.
- There’s no auto-exposure bracketing, mirror prefire or lockup, depth of field preview, second-curtain flash sync, custom function option or flash exposure compensation.
- The shutter release button seems very sensitive and it’s easy to trigger the shutter accidentally while you’re trying to use the shift button to bracket exposures.
- Obviously there’s no E-TTL or FP flash or any other technology invented since the camera was released.
Accessories and whatnot.
Naturally
the Rebel/1000* cameras can use all the various add-on components of the EOS
system in general - flashes and lenses. Here are few extra accessories you
could buy for it.
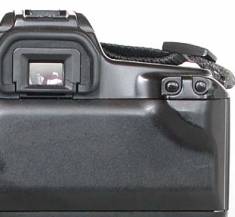
Eyecup
Eb. This
one shipped with the camera originally but is still available as an accessory.
I find it doesn’t work very well with glasses.
Grip
extension GR-70. This is a lumpy wedge-shaped piece of rubber with a wrist strap that
also fits the Elan/100. It fastens to the bottom of the camera via the tripod
mount, and a small pin fits in the hole in the bottom of the base plate to
prevent rotation. It makes the camera grip bigger for people with meatier
hands, but is otherwise useless. It blocks the tripod mount, it does not
contain batteries, it lacks secondary shutter releases or other controls, it
does not contain a built-in mini tripod and it prevents you from attaching a
flash bracket.
Dioptric
adjustment lens E. The cameras lack a built-in dioptric adjustment feature to accommodate
people who require glasses but don’t like wearing glasses when they look
through viewfinders. The solution is either to grit your teeth and wear glasses
when you use the camera or attach a diopter to the camera - basically a
rectangular magnifying glass that fits around the viewfinder bracket. Canon
sell 10 different types of diopters and each requires the Rubber Frame Eb to
fit.
Angle
finder C.
Expensive, but allows you to look through the viewfinder from above. Handy for
macro shots or shooting close to the ground.
Canon
Professional Strap 1. This is actually made by Domke and co-branded with Canon. I list it
here because I’ve found it’s a pretty darn good deal for the price - it’s got
the Domke Gripper anti-slip material on the strap, it doesn’t have CANON EOS
printed on it in gigantic letters like the amateur straps usually do, it has
metal swivels on the end and so doesn’t get tangled up. It’s available in green
and black, though oddly B&H sell the green one at a far lower price. The one
thing it lacks is a viewfinder cover for timer exposures.
About the EOS Rebel/1000* cameras.
These
cameras were a line of very popular low-end consumer SLR cameras sold by Canon
in the early 1990s. They were marketed under the manly, tough and virile trade name
“Rebel” in the US and Canada, and under the series name “EOS 1000” in the rest
of the world.
They all featured extremely lightweight curved black all-plastic body construction, fully computerized automation and a reduced feature set aimed at beginners. They were the low-end of Canon’s SLR lineup and were also the last consumer EOS cameras to use pentaprisms - the next generation used cheaper, lighter and dimmer hollow mirrors instead.
These are Canon’s official Canon Museum pages on the cameras:
http://www.canon.com/camera-museum/camera/1987-1991/data/1990_eos1000_qd.html
http://www.canon.com/camera-museum/camera/1992-1996/data/1992_eos1000s_qd.html
Differences between the various models.
Although
this document was written originally for the Rebel S II camera most of the
information here also applies to the other models as well. Here are the
differences between them.
EOS
1000
Introduced in 1990 and the first of the new low-cost line. This was the
worldwide name, used everywhere except North America and Japan. No built-in
flash.
EOS
1000F
The EOS 1000 with a built-in flash.
EOS
1000F QD
The EOS 1000 with both a flash and a quartz date printing back.
EOS
Rebel
The version of the EOS 1000 sold in Canada and the USA. No built-in flash.
EOS
Rebel S
The EOS Rebel with a built-in flash. (God knows why the “S” designation on a
bunch of EOS cameras was used to mean “equipped with a built-in flash” by Canon
USA instead of “F”)
EOS
Rebel S Quartz Date
The EOS Rebel with both a flash and a quartz date-printing back.
EOS
1000 QD
The EOS 1000 sold in Japan, which featured both built-in flash and a quartz
date-printing back.
EOS
1000N
A largely improved version of the EOS 1000, introduced in 1992. This was the
worldwide name, used everywhere except North America and Japan. No built-in
flash.
It was basically identical to the original EOS 1000 except that it featured a
slightly higher top shutter speed (1/2000 sec versus 1/1000), faster auto
focus, a soft focus function, tune-playing during self-timer mode, the ability
to turn off the in-focus beep and supposedly a slightly quieter film transport
mechanism.
There was one area in which the earlier model was superior, however. The
Rebel/1000 featured a digital match-needle for metered manual mode, whereas the
later Rebel II/1000N cameras featured simplistic +/- metering symbols.
EOS
1000FN
The EOS 1000N with a built-in flash. In addition to the added features of the
1000N, the 1000FN also had a red-eye reduction lamp and an improved guide
number - 14 versus 12 for the 1000F.
EOS
1000FN QD
The EOS 1000N with both flash and a quartz date-printing back.
EOS
Rebel II
The version of the EOS 1000 sold in Canada and the USA. No built-in flash.
EOS
Rebel S II
The Rebel II with a built-in flash, and the version I owned - hence the name of
this document. I don’t know if a quartz date version was ever sold in North
America. Like the 1000FN, the Rebel S II had red-eye reduction and a guide
number of 14 compared to 12 for the Rebel S.
EOS
1000S QD
The EOS 1000N with built-in flash and quartz date-printing back, sold only in
Japan.
EOS
1000S QDP
The EOS 1000N with built-in flash, quartz date-printing back and user-settable
panorama mask, and sold only in Japan. (a mode that fakes a panorama view by
masking out the top and bottom of the negative)
Dating your camera and lenses
Next
to the serial number, Canon cameras have a second characterization. This one is
displayed in the Film chamber (there where you put the film) and will tell you the
manufacturing date of the camera. This characterization is made up out of
letters and numbers and looks like this:
O 02 0 5 F =
1974 or 2000, February
J 4 1 7 = 1969 or
1995, April
Year Month Internal
Code place
of manufacturing (optional)
The
last letter gives you the place of manufacture, but often this one is left out.
The two last numbers is an internal Canon code. The first number(s) will give
you the month, the first letter the year of manufacture and can be found in the
table below:
A B C D E F G H I
1960 1961 1962 1963 1964 1965 1966 1967 1968
1986 1987 1988 1989 1990 1991 1992 1993 1994
J K L M N O P P Q
1969 1970 1971 1972 1973 1974 1975 1975 1976
1995 1996 1997 1998 1999 2000 2001 2001 …
R S T U V W X X Z
1977 1978 1979 1980 1981 1982 1983 1984 1985
Same
sort of code also can be found on some of the Canon-lenses.
Links
The best link for the Canon EOS series:
Minolta manuals: