My
Mod Chip Install....
Mod chip tutorial
Links to other Sega Saturn mod chip tutorials
Credits
Disclaimer
Here's how I installed a Lik-Sang mod chip on my 64 pin model 2 Sega Saturn (with some notes for 32 pin Saturns)
This chip only works with Saturns that have a 21 pin ribbon cable, not a 20 pin cable....
This chip works fine (for me at least) using the 'no blue wire mod'.
One funky thing is that I have to open & close the CD drive lid when it's at the CD player screen (or 2nd menu on my PAR) to get it to recognise game discs (new & backups) so I thought my mod chip didn't work at first...
Some people report that the Lik-Sang chip does not work on their 64 pin Saturns (with or without the PC TRAP) at all & that the Gamegizmo chip does.... maybe I got lucky, or maybe they didn't try the open & close lid trick that I have to do.....
The Lik-Sang chip I got does not seem to work on my model 2 Saturn with a PC TRAP board on the ribbon cable... either in the 0014 or the 0019 jumper setting, but it might be a problem with my Saturn or mod chip, so another Lik-Sang chip may work fine. I've heard that the Gamegizmo mod chips (using the 'no blue wire mod') will work on a Saturn with a PC TRAP, but have not tried it myself.
NOTE: the blue & red wires are opposite on some mod chips, on this chip the blue wire is the signal, the red wire is +5V, on some chips the blue wire is +5V and the red wire is the signal (so always check that you're soldering the correct wire).
I'm going to assume you can figure out how to get the case off your Saturn (hint: the screws are on the bottom), always unplug everything before opening the case...
The 0019/0014 solder points are for different model Saturn lenses (at least according to the Lik-Sang mod chip instructions) and should be set to 0014 for older model Saturn lenses and 0019 for newer ones. I'm honestly not sure how to determine which Saturn you've got, but I didn't need to solder there... if you do, remove all the solder from the 0014 & middle points & solder the 0019 & middle points together.

here's what it would look like in the other position.

The signal
wire (you may be able to skip using the signal wire if you try the 'no blue wire mod'), on my Saturn it goes to
pin 8 (64 pin chip), on some Saturns it goes to pin 14 (32 pin chip, not
shown).

The power
wire (happens to be red on my mod chip) goes to +5V lead on the board....(which
is usually the 2nd from the top lead) it's labeled on some boards, so it's
easy to find.

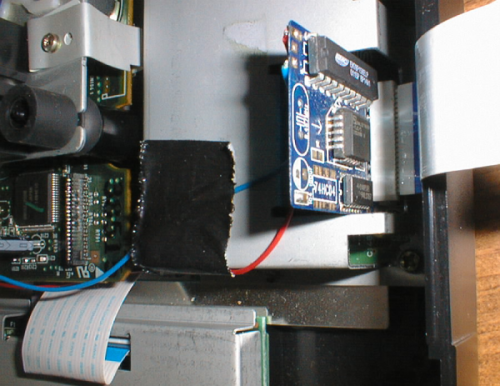
So here
is the mod chip ready to be installed in the Saturn (on 32 pin Saturns the
chip faces the other way & the ribbon cable does not have a 180 degree
twist).
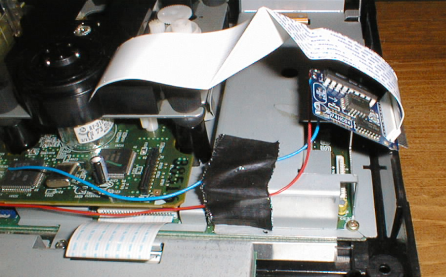
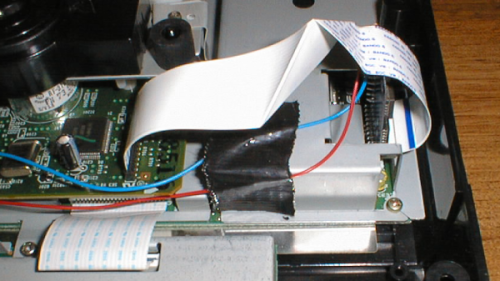
now it's
time to re-attach the ribbon cable
That's
it, it's time to put the case back together & test it....
As I mentioned earlier, when I got my mod chip installed I didn't think it worked... it booted up the the CD player numerous times & didn't detect anything as a game disc... by luck I opened & closed the CD lid (while at the CD player menu screen, with a game disc already in the drive from before turning on the power) & it detected my game.... that's how mine works.... (and yes I've checked all the solder points & tried changing the 0014 / 0019 jumper)...
When I use it with a PAR, I open & close the CD lid at the 2nd PAR menu, wait a few seconds & then start the game & it loads fine.....
Other mod chip install tutorials....
Modding a model 2 with a PC TRAP (I think he's using a Gamegizmo chip) http://www.mikeg2.freeserve.co.uk/satmod/
21 pin Saturn mod - 32 & 64 pin chip http://www.videogamecompany.com/SS21pinins.htm
21 pin Saturn mod - 32 pin chip http://www.gamegizmo.com/index.php?sID=6&dID=49
21 pin Saturn mod - 32 pin chip http://image.lik-sang.com/content/ssmod/saturn-mod.htm
21 pin Saturn mod - 32 & 64 pin chip http://saturn.bloodflowers.org/html/satmodstep1.html
Written in 2002 by BvP (and I took all the awful pics too).