| |
Finished Size:
Body: Height - 11", Width - 10"
Gusset: 2" at top, 3 1/2" at widest point
Straps: Length - 26", Width - 1 1/4")
|
Gauge:
12 sc across = 3"
Rows 1 - 8 = 2"
Since it's a bag, if the gauge is off, it's not a tragedy.
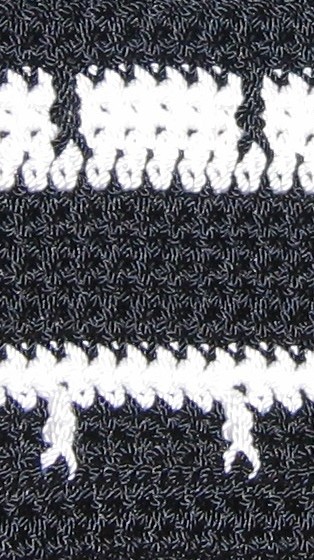
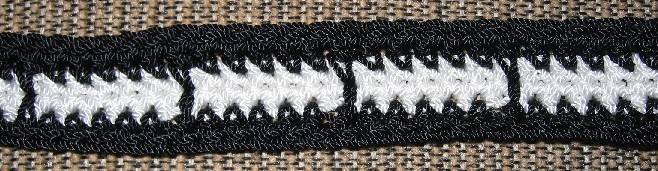
Rows 1-18 of the bag -------->
|
|
Notes:
(1) ch3 counts as dc throughout
(2) Leave long enough ends to securely weave in, but nylon is tricky. If you don't weave in right away by the time you are done, the ends will have
started to fray. So either weave in RIGHT AWAY (ha!) or dab some fabric glue, or melt the ends to guard against this problem. In either case, when you have
finshed weaving in, the sneaky, slippery nylon cord will still want to ease its way out, so use hot glue on the ends, and sort of smoosh it into the end and
the fabric of the bag to secure it. Or you can melt it, using a candle or some more technologically advanced means (at your own risk).
|
Special Stitches:
Front Post Treble (FPtr):
YO twice, insert hook into stitch around the post of the stitch indicated in the pattern (inserting hook from the front to the back and out to the front)
YO, draw yarn back around post (4 loops on hook), YO, draw through 2 loops (3 loops on hook), YO, draw through 2 loops (2 loops left), YO, draw through last
2 loops.
|

Front Post Treble
|
Long SC:
insert hook where indicated in pattern, in row below current row, YO draw loop through, pull up long enough to reach level of current row, YO and pull
through.
|
PATTERN
BODY:
Make 2 pieces
With MC, ch 90
Row 1:
sc in 2nd ch from hook, and in each remaining ch to end (89 sts).
Rows
2 - 3: ch 1, turn sc in each remaining stitch to end.
Row 4: ch 3, dc in 2nd st, and in each remaining st to end.
Row 5 - 6: ch 1, turn, sc in each st to end. At end of Row 6, change to CC (On last st on Row 6, do not pull through last 2 loops with MC, drop
MC, lay CC over hook, and pull through the 2 loops. Do not cut MC, you will pick up the MC again from this side).
Row 7: [the Right Side (RS) of the piece is now facing you] working with CC, ch 3, skip first st, dc in each of next 4 st, FPtr around post of 6th
dc in Row 4 below, *sk 1 st, sc in each of next 5 st, FPtr in 6th dc from last FPtr in Row 4* Repeat from * to * 14 more times, sk 1 st, sc in each st to
end.
Row
8: ch 1, turn, sc in each stitch to end, change to MC at end, picking up the yarn from the end of Row 6, FASTEN OFF CC.
Rows
9 - 15: with MC, ch 1, sc in each st to end. At end of Row 15, change to CC, FASTEN OFF MC.
Row
16: with CC, ch 3, turn, dc in 2nd st and each remaining st to end.
Rows
17 - 18: ch 1, turn, sc in each st to end, changing to MC in last st, FASTEN OFF CC.
Row
19: with MC, repeat Row 7.
Rows
20 - 21: ch 1, sc in each stitch to end. Fasten off.
Weave in ends.
ASSEMBLY PART I:
Join both body pieces at the top of Row 18 - either using the mattress stitch for an invisible join (learn how to do it here) or slipstich with the right sides facing, or handstitching, as you like.
GUSSET:
Make 2 pieces
Note: This piece is worked in rounds around the length of the chain, do not join at end of round, but mark the last stitch with scrap yarn, and move the
marker up each round.
For this piece, in the round, I like to crochet into one side loop of the chain (i.e. one part of the "V"), on the first side, then when I am going
around the other side of the chain, I crochet into the other side loop (the other side of the "V"). This way is much easier to crochet into the chain, PLUS
you don't get the holey look in the middle of your piece - instead you have the third strand of the chain filling up (at least partially) the middle area.
For me, it makes for a better look.
With MC, ch 30
Round
1: 3 sc in 2nd ch from hook, sc to end, working around the other side of the length of ch, 2 more sc in last ch, sc in the other side of each
remaining 27 ch (62 st).
Round
2: 3 sc in next st (corner made), sc in next st, 3 sc in next st (corner), sc in next 27 st, 2 sc in each of next 3 st, sc in eac st to end (69 st).
Round
3: sc in next st, 3 sc in next st, sc in each of next 3 st, 3 sc in next st, sc in next 10 st, hdc in next 10 st, dc in next 7 st, 2 dc in next st,
dc in next st, 2 dc in each of next 2 st, dc in nxt st, 2 dc in next st, dc in next 7 st, hdc in next 10 st, sc in next 9 sc (77 st).
Round
4: sc in next 2 st, 3 sc in next st, sc in next 5 st, 3 sc in next st, sc in next 31 st, 2 sc in next st, sc in next 2 st, joint sc made over last st
and next st, sc in same st, sc in next st, 2 sc in next st, sc in each st to end (84 st).
Round
5: sc in next 3 st, 3 sc n next st, sc in next 7 st, 3 sc in next st, sc in next 33 st, *2 sc in next st, sc in next 2 st*, repeat from * to * once,
2 sc in next st, sc in each st to end,(91 st) join to first st of round.
Fasten off.
|
ASSEMBLY PART II:
Find middle stitch in one side of body, and in bottom of gusset, and stitch the body to the gusset, making sure these middle
stitches are together.
You should be left with four stitches extra on the body on each side of the gusset, at the top of the bag. Fold these over and
stitch to top of gusset, matching stitch for stitch. The space remaining will allow for the zipper. Repeat for other gusset piece on other side of body.
|  |
SIDE POCKETS:
Make 2 pieces
Note: This piece is worked in rounds around the length of the chain, do not join at end of round, but mark the last stitch with scrap yarn, and move the
marker up each round.
With MC, ch 11
Round
1: 3 sc in 2nd ch from hook, sc in each of next 8 ch, 3 sc in end ch, working around other side of ch, sc ineach of remaining 8 ch.
Round 2: 3 sc in ext st, sc in next st, 3 sc in next st, sc in each
of next 8 st, 2 sc in each of neaxt 3 st, sc in each of next 8 st.
Round 3: sc in ext st, 3 sc in next st, sc ineach of next 3 st, 3 sc
in next st, hdc in each of next 2 st, dc in each of next 7 st, 2dc in next st, dc in next st, 2 dc in each of next 2 st, dc in next st, 2 dc in next st, dc
in each of next 7 st, hdc in next st.
Round 4: hdc in next st, sc in next st, 3 sc in next st, sc in next
5 st, 3 sc in next st, sc in next 12 st, 2 sc in next st, sc in next 2 st, joint sc in previous st and next, sc in same st as last st, sc in next st, 2 sc in
next st, sc in next 10 st.
Round 5: sc in next 3 st, 3 sc in next st, sc in next 7 st, 3 sc in
next st, sc in next 14 st, 2 sc in next st, sc in each of next 2 st, 2 sc in next st, sc in each of next 2 st, 2 sc in next st, sc in next 11 st, join to
first st of round, FO.
ASSEMBLY PART III:
Match middle stitch of curved end of pocket with middle stitch of bottom of Gusset and attach pocket to Body of bag, leaving top pf pocket unattached. Repeat for 2nd pocket on other side of bag.
|
STRAP:
Make 2
Note: This piece is worked in rounds around both sides of the chain.
With CC, ch 86
Round 1: sc in 2nd ch from hook, sc to end, working around the other
side of the length of the chain, 2 more sc in last ch, sc on the other side of each remaining ch, extra sc in last ch (so that there are 3 sc in each end
ch) change to MC on last st. FO CC.
Round 2: With MC, 3 sc in next st, *sc into each of next 5 st, skip
next st, (long sc into space under skipped st in the round below, sc into each of next 5 sc) 13 times, 3 sc in next st, sc in next st*, repeat from * to *
once, join with ss to first sc of round, FO.
Weave in ends. |  |
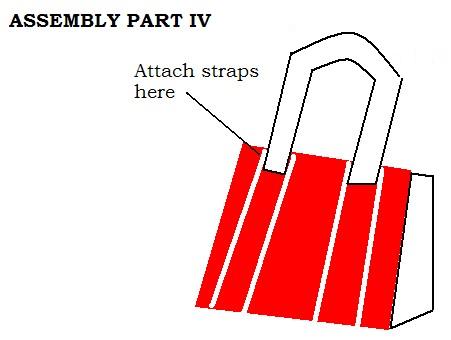
ASSEMBLY PART IV:
Attach one strap to the outside of one side of the bag as shown in the diagram and then repeat for other strap on the other side of the bag. Attach the ends of the strap
as shown in the picture, between rows 8 and 15 of the body about 4 stitches from the edge of the bag part. Do not attach the strap to the end part of the
body, which forms the top of the bag. |
 |
FINAL ASSEMBLY:
Here's where you have to make a lining for the bag, with a zipper at the top. It shouldn't be too difficult if you know how to sew, remembering that the
inside of the lining is really the right side, so make sure all seams etc are on the outside of the lining, which will be hidden inside the bag. Simple I
know, but sometimes I need the reminder.
Lay out your bag flat, and take the measurements for the lining, with the width taking into consideration not only the width of the body, but half the width
of the Gusset. You are essentially making a simple rectangular lining, fold in half stitch up the sides, attach the zipper to the top, sew the lining into the
bag, and VOILA! Finished bag.
I would also stitch the zipper to the bag itself, through the lining, for extra reinforcement. Make the lining a little bigger than the dimensions of the bag, so that the seams of the lining are not carrying the weight of the contents.
Pattern Note: This pattern is written using US terms i.e.:
US |
UK |
ss |
ss |
sc |
dc |
hdc |
htr |
dc |
tr |
tr |
dbltr |
COPYRIGHT SEPTEMBER 2005 SAFIYA ALI
Please Note: As always, I have tried very hard to explain what I have done, but I may not have been successful :)
Email me if you have tried this pattern and if you have any suggestions or comments.
|

 to this page.