| FlyfishingPA.com |
|
|
|
|
|
The Fly Fishing Loop is sponsored by flydepot.com [ Home Waters | Next | Random | List | Search ] |

|

|
|
|
|
| In the first edition of the Beginners Series, I discussed the basic tools necessary to tie your own flies. With this article, I will add the materials that will give you the right start. I have put together a list of materials that once complete, you will be able to sit down and tie many effective patterns. This list would also be a good source to use if your are thinking about purchasing materials as a gift to the new tier. I want to stress that although there are ready made kits out there, those kits are usually poorly put together with cheap tools and second rate materials that are of little or no use to the flytier. Purchasing quality materials separately is a little more expensive, but well worth your money in the long run. This is a rundown of the basic materials, in no particular order: Hooks: This is going to be your most expensive purchase, averaging 7-8 dollar per hundred. I suggest trying out different hooks to see which brand you like. I personally use Mustad for most of my tying. Other quality brands include Tiemco, Dai-Riki, and Daichii. Whatever brand you choose you will need the following: Dry Fly Hooks--Sizes 10-20 Nymph Hooks--Sizes 14-20 Streamer Hooks--Sizes 8-12 Scud Hooks--Sizes 14-16 Hackle: This is going to be your second most expensive purchase, and actually might end up to be more money initially than hooks, but a quality neck can tie many hundreds of flies, so you won�t be replacing as often. I suggest purchasing the highest quality necks you can afford. I say neck because a quality neck will have the full range of sizes to match your hook purchase. Saddles usually only have one or two sizes and are great for replacing a certain size range once you start to run low on your necks. Some manufacturers also offer 1/2 necks that allow you to get two different colors at the price of one neck. This is a good idea for the budget shopper. There are many different hackle names out there but I personally find Whiting to be the best. They offer the highest usable feather count of any hackle producer out there. Other brands include Keogh, Metz, and Collins. Whatever brand you choose, I suggest purchasing the following colors: Grizzly, Medium Dun, Medium Ginger, Cream and Black. Thread: Thread should be your next purchase. For the beginner, I would suggest purchasing Uni-Thread 6/0. I find this an easy to use all-purpose thread. Other brands include Danville�s, Orvis, Ultra, and Gudebrod. The basic colors you will need are Black, Olive, Cream, Dun, Rusty Brown, Brown and Orange. As you become more experienced you will need to add threads of different diameter, but your basic colors will remain constant. Dubbing: Looking at a wall of dubbing packets can be very intimidating to say the least. If you want to take some of the pain out of selecting the right dubbing, purchase pre-filled dubbing dispensers. They are not only easy to use, but are labeled to assist you at the bench. I personally recommend the ones put together by Waspi. Waspi puts together two different dry fly dubbing dispensers. I would suggest those along with a dispenser of coarse dubbing for nymphs. Feathers: There are many different types of feathers you will purchase as you advance into the sport, but the basic feathers to get you started are as follows: Pheasant Tail--Essential for the pheasant tail nymph Peacock Herl--A must, many patterns call for this material Marabou--Olive, Black and Brown are three popular colors Mallard Flank--Many uses, can be substituted for Wood Duck Flank Hen Neck Feathers--Dun and Grizzly are good colors, dry fly wings and soft hackles Hair: The beginning flytier will find hair work difficult and frustrating. I suggest getting the basic skills down before attempting to work with hair. Still you should include some in your basic kit, as eventually you will want to experiment Coastal Deer Hair--Bleached, Natural and Gray. Most caddis patterns call for this Calf Body Hair--White, great for parachute posts and hair wings. Squirrel Tail--Gray, Fox and Red, down wings on streamer patterns. Yarn: There are different types of yarn made available to the flytier, but only a few types need to be included in the beginner kit Antron--All-purpose material, spinner wings, trailing shucks and dubbing are some of it's uses Chenille--Olive, Black and Brown, body material for WoolyBuggers GloBug Yarn--The yarn for egg patterns Floss: Floss is a material that can frustrate the beginner. Still many patterns call for this material so it is a technique that you should learn. Red, Yellow and Black are good colors to get you started. Uses include Streamer bodies and the body material for many Western Style flies. Wire: Wire is used in many patterns to add weight. It is also used as a ribbing to produce a segmented look to a fly. In some cases it may even be used to add some flash to a pattern. However it is used it should be included in the basic kit. Copper Wire--ribbing and the main material in the Brassie Tinsel--Flat and round, ribbing and body material Lead--used as an underbody to add weight to a fly, mainly used in streamers and nymphs Beads: Bead head patterns are very popular, and are also very effective. A good variety of beads should be included in the beginner kit. Gold, Silver and Black are the most popular colors. Head Cement: Head Cement should round out your purchases. Head cement should be applied to all your flies, especially if you�re just learning to whip finish. One drop of head cement to your thread wraps will make your flies much more durable. I suggest a good water based head cement. That is a rundown of the materials I would include in a basic fly tying kit. As your skills advance you will want to add to this collection. Until then, these purchases will provide you with many hours of enjoyment behind the bench. Now that we have the basic tools and materials collected, we will next look at the five basic tying techniques you will need to learn. These techniques will allow you to tie virtually any fly out there. |
| Copyright � 2001 Warren Albert |
| Materials That Matter By Warren Albert |
 |
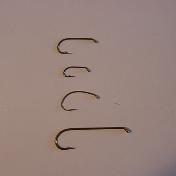 |
| Dry Fly Nymph Scud Streamer |
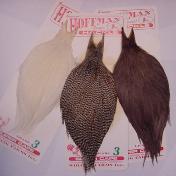 |
| From L-R, Cream, Grizzly, Dun |
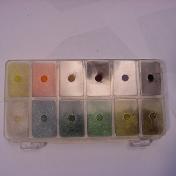 |
| Pre-Filled Dubbing Dispenser |
 |
| Peacock |
| Mallard |
| Pheasant |
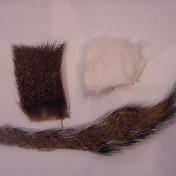 |
| Coastal Deer |
| Calf Body Hair |
| Squirrel Tail |