Now that you have all those cool drawings, wouldn't it be great if you animate them? Well, if you still have the timeline minimized, it is time to restore it, because we're about to use it.
When you watch a cartoon on tv, you aren't really seeing those strange characters moving around on thier own. What you are actually watching is a series of still drawings, one right after the other, changing so fast that it looks like motion is happening. Each still picture is known as a frame. In animation there are keyframes and tweens. This is true for both cell animation, shown on tv and movies, and computer animation. The difference between cell and computer animation is that you need only create the keyframes, because the computer can create the tweens for you.
Now that you are ready to animate, lets take a look at the timeline.
![]() |
In this picture, there is only one layer, however you can add more layers with the
button (bottom left corner). You can change the name of the layer by
double-clicking the name & retyping it. You can change the order of layers as well, simply by
clicking on the layer, and dragging it where you want it. Objects will appear over or under objects
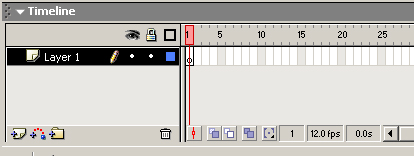
on other layers.The red line that high-lights the number area and goes down over all the layers below it is the playhead. It is used to show that frame on the stage. In the picture, it is shown on frame 1. The rows of rectangles are where you will deal with the frames. In the picture, a blank keyframe is shown, which means nothing is on the stage. By default, there is always a blank keyframe on frame 1, when you start a new project. You can insert them further along in the timeline by right-clicking on a frame and choosing insert blank keyframe. |
![]() | This picture shows a keyframe and frames that have no motion (bottom) and keyframes with tween motion (top). When you want an object to show in multiple frames, you right-click next to the keyframe and select insert frame. From there you can drag it to as many frames as you want. |
There are a couple of ways to preview your work. One way is to simply click Enter on your keyboard and watch the animation. The other way, you may need for future reference, is to goto Control and select Test Movie, which will create a Flash movie file for you. The second method is better for when you have codes and buttons you want to test.
Now that know how to create animations, you'll probably want to use it for a project, or maybe just show it off. Well first you need to decide how you want people to view it. Simply saving your project isn't enough. Do you want it to be viewed on the internet? Are you going to keep it on disk/s where you can carry it around or distribute to people who may not have Flash player installed on thier computers?
In any case, here is what you need to do:Recreate the animation shown and output it to an animated gif file.
Hint: Use layers!

"Flash For Beginners" was created by Rachel Bliss for
the purpose of course design and shall not be redistributed/edited without consent.
Flash is a product of Macromedia.