Recovering My Coronet Seats
Hopefully, this page will give the viewer the confidence to try and install seats covers themselves instead of paying 400.00 plus for installation. I purchased the seat covers and front Bucket Seat foam from Legendary Auto Interiors. The foam and covers were a perfect fit. I had never installed seat apoulstry before, but decided the only way to learn is try try it out. If the first seat turns out terrible, I'll just stop and re-order one seat instead of two. These are the steps I followed to recover the bucket seat backs. I am still working on the rear seat and bucket seat bottoms. The bucket seat frames were really dirty and rusty, so my dad is bead blasting the crud away. Here are the steps that I took to recover my seats… Remember, I'm no expert, but am posting this information hoping it may help others.
|
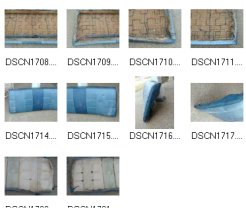
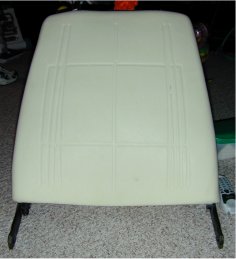
Step 1. The first step is to take many, many, many pictures of your seats before you take them apart. If you have a digital camera, there is not reason not to take picture of every square inch of the seats. The pictures will come in handy when you start re-assembly your seats. Especially pay attention to the position of the hog rings and where the factory attached the hog rings to the seat frame. |
|
|
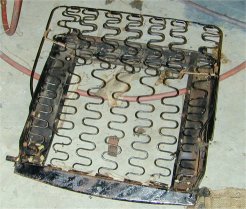
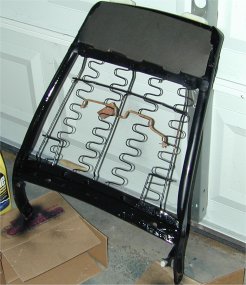
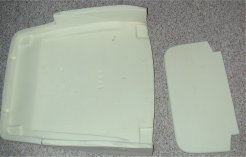
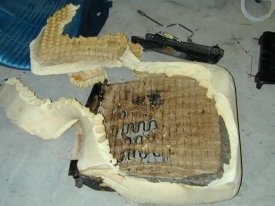
Step 2. First, I dissassembled the rear seat backs. I started by taking out the two screws holding on the fiberboard seat backing. Next, I used a cutting wheel to remove the hog rings. You can also get a pair of hog ring cutters to do the same job. After taking off the cover, cut the muslin cloth that connects the foam to the seat frame. You can now remove the foam. The burlap cloth under the seat foam contains the listing wires. These may look insignificant, but failure to put these back will allow the seat frame spring to cut into you foam. Follow this same process for the seat bottom. Here are my seat frames after performing the previous steps. Step 2a. The next step is to clean the seat frames. If your seat frames aren't rusty, you can simply clean them with soap/water and repaint if necessary. If you seat frames are cracked, you will need to have them repaired before trying to do anything else. |
|
|
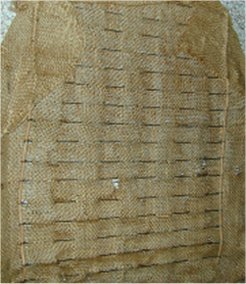
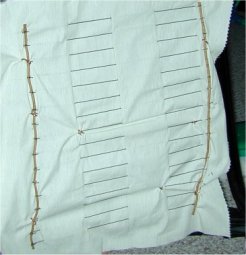
Step 3. Next, I took a piece of muslin cloth and traced the burlap cloth containing the metal listing wires. I drew a grid on the muslin so I could even space the wires. My seat backs contained 16 wires I evenly spaced them along the cardboard wires on each side. NOTICE…. I got lazy and only alternated over/under the musling 4 times. The original was interleaved in the burlap 8 times. I have no idea if this makes a difference. You may want to check with a professional. However, I will tell you that I paid over 400.00 to have my GTS Dart seat covers and foam installed. The "Professionals" simlply put a sheet of muslin over the burlap. So, By deductive reasoning… If the factory interleaved the wires in the burlap 8 times, the "Professional" installers interleaved it 0 times, the 4 times is a perfect average. |
|
|
Step 4. If you've purchased new seat foam, you will need to do this step, otherwise you can ignore it. For my coronet, the seat foam backs come in two pieces. You will need to glue these together using a 3M spray adhesive. WARNING… Use an adhesive that is compatible with foam or you will melt your seat foam. If in doubt, spray a small amount on your original foam and see what happens. You will also need to glue the muslin strips to the seat foam. These strips allow you to mount the seat foam to the frame. Legendary Auto Interiors sends an instruction sheet with the foam kit that does an excellent job of explaining what to do. The link to their seat foam instructions is HERE. |
|
|
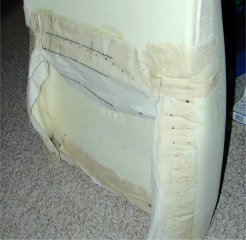
Step 5. Now, I attached the muslin cloth containing the wires and the seat foam to the seat. If you have headrests on your seats, you will need to cut out the holes for the head rests bezels. The seat foam from legendary has an indentation for the headrest post, but my original foam had a square cut out for the whole bezel, so I cut out a square in my replacement foam. |
|
|
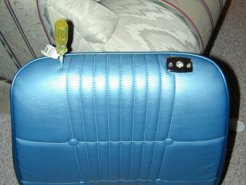
Step 6. Now for the fun part. Pull, Pull, and Pull. I really can't write down my method of putting on the seat cover, because I didn't have a method. I tried to keep the seat cover straight and used the back of the seat cover as a center line. You can see in the first picture that I had slack in the cover where the fiberboard back plate goes. Most of this slack went away when I installed the seat back. I was also unable to get the distance between the fiberboard seat back and the cover exactly the same on both sides. I tried for a while and decided I better stop before I make things worse. The second pictures shows how I made the holes for the head rest. |
|
|
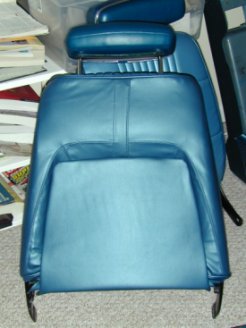
Completed Seat Back Here is my completed seat back. There are a few slight wrinkles in the front, but I have no idea how to get them out. When summer comes, I'm going to set it out in the sun and see if that will help. Anyway, the wrinkles don't bother me considering the 400+ dollars I'm saving by doing it myself. (plus it's fun to work on). |
|
If you have any suggestions on putting seat covers on, let me know.
Questions or Comments? email me at
[email protected]