 |
| Individual Track Links |
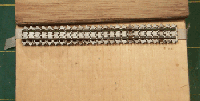
| These are the steps I use to assemble track links. I generally use the ones supplied by the kit. So I don't know about the after maket ones. Hope this helps. 1) Assemble the whole kit as per instruction. However, do not cement the drive sprocket and the return idler to the hull.(allow them to spin). You may have to leave off some parts to assemble the tracks. For example, you may have to leave the skirts off for one. 2) Paint them, remove, and clean all the track parts. Count the tracks and set them aside. 3) Place the hull on it's side. Put the drive sprocket and idler on. Remember, no glue. 4) Cut a piece of masking tape so that it is about half the width of the tracks. Place the tape sticky side up and tape it down on the ends (Figure 1). Assemble a track run by placing the track up against the straight edge so you don't get the banana look. You need only to complete 1/3 of the run. Apply cement in the links and let set for 30 seconds. I use weldon #3. 5) Pick up the track run carefully. Roll the links through the drive sprocket and then glue the tracks to the sprocket and road wheels. (Figure 2.) Complete the track by glueing the two other sections in a similar method. (Figure 3.) 6) While the glue is setting up, you can add sag to the tracks now. Do this by pushing down on the links for short time where you want the sag. The tape should hold the links in place. The whole secret is the masking tape. 6) Do the same for the other side. Let them dry overnight. 7) Weather them however you choose. Have Fun! |
|
| Figure 1. |
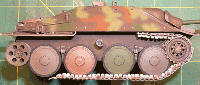 |
| Figure 2. |
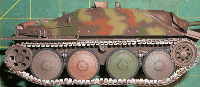 |
| Figure 3. |