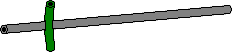
The single handed boffer sword is the most common of all medium impact implements in the ROC. It has taken on many design improvements throughout the Order's history. This verson is exccepted by the Knight's Marshall of the Earldom of IronWood.
Tools Needed:
|
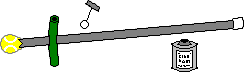
- 3/4 inch gray schedule 40 PVC piping
- 2 PVC caps
- A tennis ball
- 7 inch length of rubber hose
- 2 three foot lengths of 3/8 inch pipe insulation foam
- A roll of any color duct tape
- A second contrasting color tape used for edging
- Grip tape
- PVC Glue
- Rubber Cement Glue
Step 1.
Cut your gray schedule 40 PVC pipe to 3 feet, this is a pretty average sword length. Make sure you use gray schedule 40 PVC piping it's allot stronger than the white PVC piping.

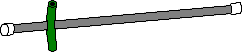
Cut your rubber hose to a length of 7 inches, then cut a 2 inch slit lengthwise in the center of the hose this will be the quillions of your sword. The rubber hose is stronger and more durable than quillions made of foam in times past. The rubber hose also lends a more accurate and authentic look to the quillions.

Insert your 3 foot length of PVC into the 2 inch slot of your hose and give yourself a 6 inch hilt from the end of your PVC pipe to the quillions.
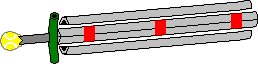
Glue your PVC caps on both ends. DO NOT! insert anything into the PVC pipe and then cap it off (i.e. a dowel rod), LEAVE IT HOLLOW INSIDE! PVC is flexible and it needs to be to absorb impact, that is why we don't use foam padded wood or rebar these materials are too rigid for medium impact combat.
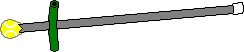
Cut a 2 inch by 2 inch incision into your tennis ball. This shall serve as the swords pommel.
Insert the hilt end into the incision you made to the tennis ball, make sure the flaps stick out.
Generously apply a layer of rubber cement glue on the "blade" of the sword. This will prevent the foam from slipping off the PVC during combat.
Slide the foam down around the PVC to the quillions.

Wrap a few pieces of duct tape around the foam to help it adhere to the PVC while it's drying.

Now trim the foam down so that you have about 3 inches of foam protruding past the tip of the PVC pipe, then fill the tip with excess foam to make the tip a little more solid.

Cut your next piece of 3 foot foam insulation in half lengthwise so that you have two halves. Trim theses two halves down about three inches shorter than the foam core currently on the sword, this will give the blade a tapering effect.

Tape the two halves on either side of the quillions so as to appear to have a "flat blade" silhouette. This technique serves a multitude of solutions. It gives the sword more padding where it's needed (on the blade); As well it gives it more of a sword shape as apposed to the cylindrical versions of the past.

Step 13.
Now put a fresh layer of duct tape on the entire sword. Nowadays there are a number of brightly colored rolls of duct tape to decorate ones' sword. In the Middle Ages knights and squires alike decorated their equipment with their livery colors to personalize it and to add to the pageantry of the Tournament. The outer duct tape layer should not pre-compress any part of the padding. (Just a personal note here; taping the sword lengthwise as apposed to spiraled I've found is more astatically pleasing to the eye.)

Step 14.
Put the finishing touches on your sword by taping the hilt with grip tape, and indacate the blade by taping a strip of alternate color tape along the "edge" as well as tape the point to indicate a thrusting tip and your boffer sword is complete and ready to use.

|
|
Standard Disclaimer