Project Sailyak
An inexpensive Mainstream kayak modified with a fully operational homemade sail and rigging
I enjoy kayaking here in the Florida panhandle. After 2 years of paddling in the miles of open water of the sound along the Gulf Coast, I started toying with the idea of adding a sail to the kayak. After some trial and error I came up with a working outfit that is rather simple and inexpensive. It did involve the use of power tools, plastic heating and welding, epoxy, and a lot of engineering.
This is a quick write up, and I'm afraid I did not keep notes or drawings of this project, designing, bulding and changing as I went along. I've never sailed before starting this project, getting all my information from others and just "diving in" so to speak. It was all part of the fun. All of the parts and modifications were built to fit my kayak, my height, and the vehicle to transport with. Many of the parts were made from items that I had lying around, found or had locally available which you might not find elsewhere as easily and you may have to use your imagination.
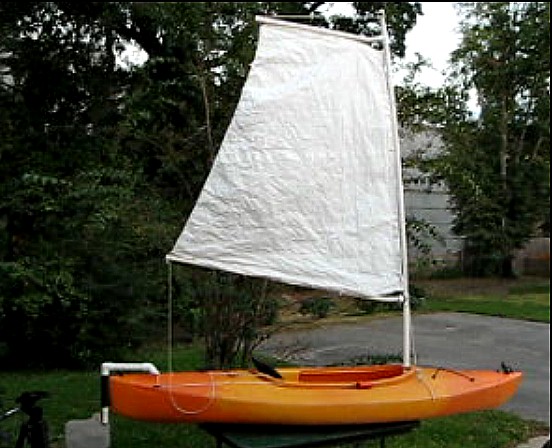
The kayak featured is an inexpensive Mainstream brand sit-inside kayak. Just over 10 feet long. Cost was $320 in 2005. These kayaks are made of molded semi-rigid polyethylene plastic.
Before getting into the design, here are some of the problems that were realized after completion.
No outriggers, relying on body weight and position and adjusting the sail to balance. In winds over 12-15mph I find myself needing to sit up and on the edge of the kayak to keep from heeling over. But at this wind speed the waves are whitecapping or nearly so and the bow will be busting through the waves and splashing into the kayak and on me. What I do at this point.. go home. So an outrigger wouldn't improve much if the kayak fills up with water.
In a 15mph wind the mast is taking much force and flexing heavily, losing power and approaching breakage. In the demonstration video winds vary from about 5-10 mph. 10 mph is about right for best operation and about 7mph forward speed can be obtained in beam reach position, and slightly faster in broad reach. Downwind sailing is also fast but the kayak becomes rather difficult to handle in stronger winds and the mast flexes forward.
Trying to adjust body weight in the limited seat space often results in an awkward leaning position that can get a little uncomfortable over time.
The simple rudder design only allows for only partial travel of about 30 degrees. A different rudder or design may improve steering control. What I have does work, is simple, and can complete a tack in a good wind without needing to paddle but it certainly cannot turn on a dime.
The rigid aluminum centerboard and rudder epoxied to PVC will break off if run aground hard or striking objects in the water. I've repaired these parts several times now and recently had to replace the centerboard which was lost.
But for me this is accepted as a safety feature. Better the centerboard breaks off instead of the welded mount.
The vertical mast is in two pieces. This design was used due to the limited space inside my vehicle. The main mast section is 7.5 feet long made from reinforced 1" high pressure PVC with a center wood reinforcement which is a broom/rake handle. The entire assembly pivots on a base section that is a 2' 2" piece of 1 1/4" high pressure PVC making a total mast height of just under 10 feet. The lower boom is 5' 3" and fits into a reinforced PVC T fitting on the mast. A slight bend in the boom was made so to clear my head by heating with a heat gun. The sail is made from a heavy poly boat tarp, folded in half, and was cut to fit. Open ends fastened with weatherproof polyethylene tape and attached to the mast and boom with string ties. A rope from the top of the mast supports the sail, knotted through the ends of both booms, and also is your sail control through a tie down behind the seat.
Glue, including epoxy does not adhere well to polyethylene so attachments requiring strength need to be welded. A plastic welder was purchased online. I bought a low wattage model for $40 and if I was going to do it again would have chose a higher powered unit. Some of the weldings required more heat so a heat gun was used to melt both surfaces and then stick them together. Reinforced by running one or more weld beads with the iron. The plastic weld iron came with only a few feet of weld rod. It was not enough and all was exhausted before the mast mount was completed so I bought a large spool of natural color rod online from another company. It came slightly larger diameter and did not fit the tip of the welder so I had to drill that out the next size larger.
Parts welded are the 1 1/4 black polyethylene pipe rudder mount, the mounts for the mast base, the paddle mounts on the side, and the riser made from 1 1/4 orange polyethylene pipe that secures the centerboard. Also the rudder control handle is made from pieces of polyethylene pipe, heat shaped and fitted to slide along under the rim and modified by shaping, and welding on material for better grip. After softening the plastic in the oven at 300 degrees, it was shaped by hand using heavy gloves.

Rudder control handle made from a piece of heat shaped polyethylene pipe attaches to the rope linkage.
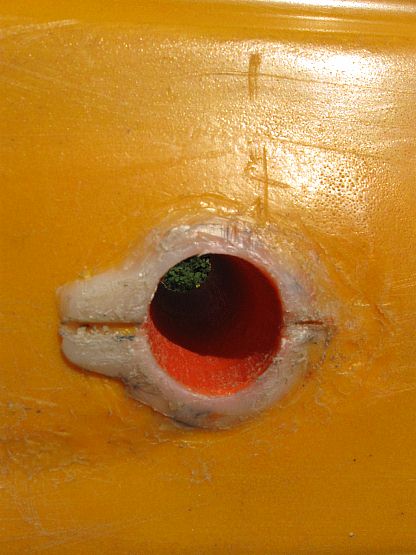
The rudder control linkage includes a rope that completely circles the kayak opening under the rim, which keeps it in place and out of reach. Feeds through two eyelets purchased from a local boating supply store. The rudder assembly is made from 1" PVC pipe, heavy sheet aluminum and fittings. 1" high pressure pipe fits through 1 1/4" pipe perfectly. The rudder mount is 1 1/4" polyethylene black pipe welded onto the kayak. All available from the local hardware store.
Rudder assemby, 1" PVC pipe construction, easily attached or removed. The mount is 1 1/4" polyethylene irrigation pipe welded to the kayak.
I would have used the orange polyethylene pipe for all 1 1/4" fittings if I had it available at the time. This was acquired later, a section was found washed up on the beach after hurricane Dennis in the summer of 2005 and found to be superior to the black pipe. It's heavier, more rigid, welds better and is almost the same color as my kayak. Later I learned that this is commercial grade electrical conduit that is used by the utilities that bury lines.
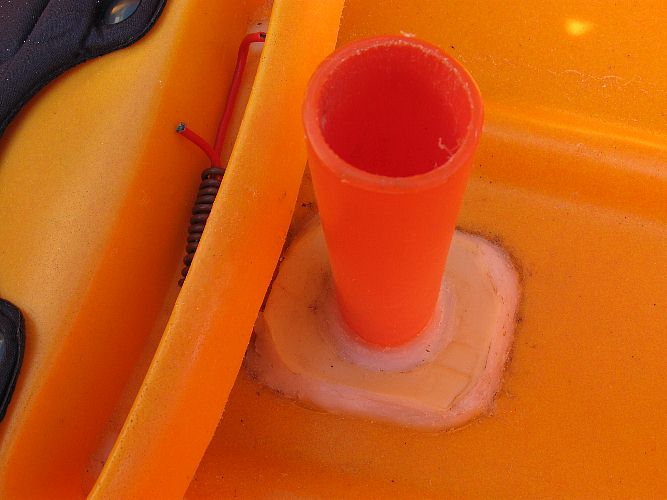
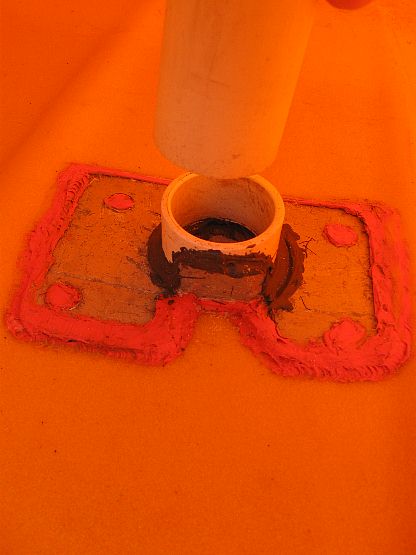
Centerboard mount made from heavy 1 1/4" polyethylene conduit with welded reinforcement. The centerboard is inserted through the bottom and secured with a simple wire pin.
Bottom of centerboard mount.
The centerboard mount construction needs to be strong, accidental impacts from inside the kayak are possible. It must be higher than the water level with a loaded kayak. I triple welded the inside mount using square pieces of polyethylene scrap cut from a garden sprayer that was also found washed up on shore after the hurricane. Luck again that it was nearly the same color, composition and density as the kayak so it welded nicely. Two pieces were used. Heated and flattened, and all was heated up and welded strong with multiple beads. Welding the side facing the kayak seat was very difficult and presents a weak spot. Extra welding was done on the bottom of the kayak which also includes a notch to fit the centerboard.
Paddle mounts are made from 1 1/4" black polyethylene pipe. Heat shaped to grip the paddle snug. The flexibility of the black polyethylene pipe is an advantage here.
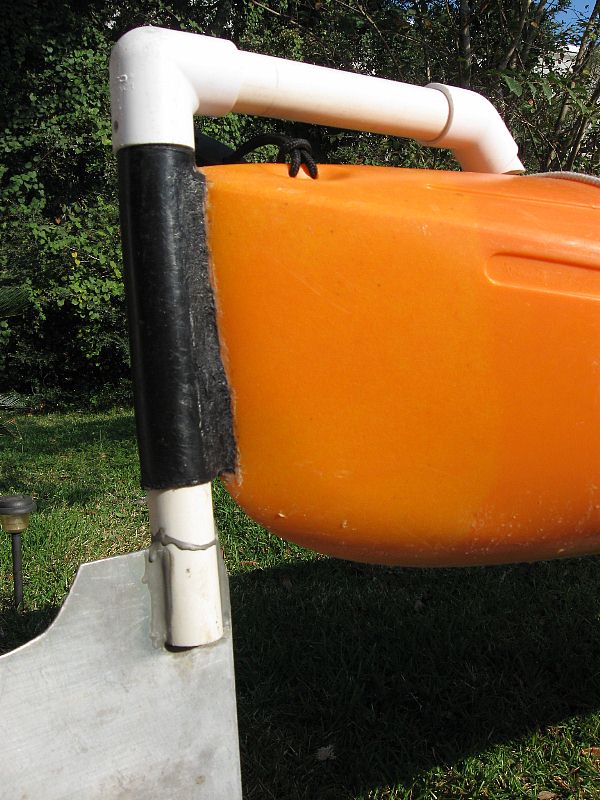
The mast base is a half of a 1 1/4" PVC coupling epoxied to an aluminum plate secured to the kayak by heating it to the plastic melt temperature, pushing it down and reinforced with orange weld rod that came with the welding iron. This may be overkill but it should never break loose. A small piece of the orange polyethylene pipe welded to the kayak would have been easier. But was not available at the time this was designed. PVC cannot be welded to polyethylene and epoxy does not adhere well to polyethylene.
The lower mast is a 2' 2" section of high pressure 1 1/4" PVC. It simply slips into the top mount and down into the lower mount.
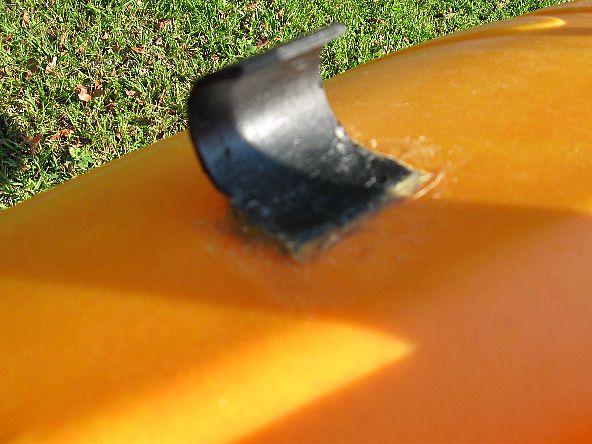
The top fitting needs to be extra strong. It endures most of the force of the wind. I used a piece of aluminum T bar I had lying around, bent to fit, heated up along with the plastic that it was to fit into and carefully pushed in and melted into place. More plastic was welded over this and reinforced. Heavy plastic coated wire was wrapped over the bracket to make a snug fit. If I was to do this again or needed to redo it, I would make both mounts out of the heavy orange polyethylene pipe and weld them with reinforcements similar to the current centerboard mount.
the 7+ foot main mast section is made of 1" high pressure PVC with a wooden broom handle reinforcement through the center. If I was to redo this, which I plan to, I would find a more rigid material. Probably aluminum pipe. Although this is very expensive. Even with heavy duty 450psi PVC pipe with a solid wood center, the mast still gives quite a bit in a good wind.
A PVC "T" fitting attaches the boom. Assembly and dissasembly is simply by pushing / pulling the PVC parts together. As mentioned before, I modified the boom with a slight curve upward to clear my head. The T fitting broke once in a strong wind gust. I replaced it with another and added an outer ring of the next size PVC and epoxy for reinforcement. Still.. this broke too but is still functioning as is. Metal fittings here would be better.
A shorter boom at the top of the mast allows for more sail area up high. This part also is simply attached with a PVC T fitting. The top of the mast includes a slip ring fabricated from a piece of 1 1/4" polyethylene pipe and a homemade eyelet welded on. This provides mast support. A quick release clip attaches to the front of the kayak. The entire top mast, boom, and sail can rotate 360 degrees either way from this support.
video
Comments, suggestions, questions, welcome.
Email 