Throwing Pottery on a wheel is the most challenging form of pottery making and the most fun. You can spend countless enjoyable hours at this hobby.and produce beautiful pieces of art.

Prices on ready-made Pottery Wheels can run several hundred dollars, which makes them too expensive for a hobby. But this wheel can be made for about $200.

The wheel shown is kicked powered which is best for a beginner.  But if you're reluctant to spend that much energy,we show a method of electrically powering the wheel.

The first step is to gather the material. Besides the lumber, screws and bolts you'll need a couple of heavy bearings and a steel shaft.  The bearings usually can be purchased where power tools are sold.  This includes some larger mail order houses.  The shaft is just a length of cold-rolled steel rod. 

For the potter's wheel shown I just went to a machine shop, told them the size and length shaft I needed, and then went to Grainger for the bearings to fit this shaft..

You also can buy "kits" for a potter's wheel as well as individual parts such as the "head" (throwing wheel) made of metal.
(usually aluminum) Should you use a metal head, get it before you select the shaft and bearings to make sure all the parts match.

Cut the 4 x 4's to length and start assembling the frame. (Fig.3) Do this
on a level surface and keep the corner posts plumb and square to the cross braces.  Lag screws and washers are used to join the frame.  Stagger the screws to avoid splitting the wood and drill clearance and pilot holes for them.

The two crosspieces under the seat
(Fig. 3) are ripped at an 80-degree angle to create a slope. (A completely horizontal seat will create pressure on the back of your leg when you kick the wheel.)

The inside 2 x 4 brace is located flush with the top of the 4 x 4 corner posts.  While the outside brace under the seat is positioned to have the upper edge ¾ in. above the posts.

Note: The bottom side braces extend past the 4 x 4 corner posts and over the ends of the front and back braces.  The upper side braces are shorter and the ends are flush with the front surfaces of the front
posts.  Attach the plywood seat with the wood screws, countersinking the heads so they can be covered over with wood putty.  You want the surface of the seat smooth and snag free.

Cut the splash pan from marine or exterior grade plywood.  Screw it to the top cross braces, but allow a space of ¾ in. at the back and both sides, so the side and back pans are flush with the outside of these members.  The back and side pans are held in place with wood screws.

With the frame assembled, fit the shaft and bearings in place. (Fig 1)  Cut a hardwood 2 x 4 to fit between the side splash aprons and find the center. Position a pillow block bearing on this center and bolt it in place.

Locate the bearing and block on the frame assembly with the center of the bearing 3 ½ in. from the front edge of the splash pan.  Drill a 1-in. hole through the pan below the bearing hole.  Drop a plumb line down through the hole from the center of the bearing to locate the bottom bearing.  Be sure your assembly is square and level.  Cut the 4 x 4 cross-piece (14), notch it to fit over the lower side braces and mark the spot where the plumb line contacts it.

                   Material List
1.    Front posts 4" x 4" x 30" 2 required
2.    Back posts 4" x 4" x 29" 2 required
3.    Front and back braces 2" x 4" x 36"
       5 Required
4.    Bottom side braces 2" x 4" x 37 ½"
       2 required
5.    Top side braces 2" x 4" x 36"
       2 required
6.    Splash pan ¾" Plywood 20 ¾ " x 36"
       1 required
7.    Side splash aprons ¾" Plywood
       9" x 20 ¾" 2 required
8.    Back splash apron ¾" Plywood 9" x  39"
       1 required
9.    Seat ¾" Plywood 9 ½" x 39"
       1 required
10.  Top bearing support Hardwood
       2" x 4" x 36" 1 required
11.  Throwing wheel (Fig. 1) ¾" Plywood x 14"
      diameter 1 required
12.  Throwing Wheel Support (Fig. 1)
       hardwood 2" x 3" diameter    
       1 required
13.  Flywheel support ¾" Plywood x 29" diameter
       1 required
 

PLANS DOWNLOAD

Click Links Below to download
Leach Style Treadle Wheel Plans
or the Kick Wheel Plans shown above.

Zipped Images

Zipped PDF File
“Adobe Acrobat”

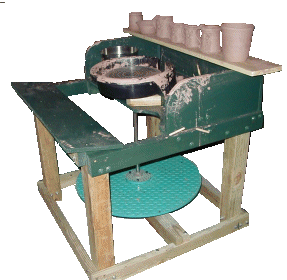
A Few Construction Images of my wheel.  This might help to clear up a few questions.

Throwing Head
Flange Bearing
Pillow Block Bearing

My Wheel

Click on different locations of this image to see  “Close-Ups”
I changed the concrete flywheel to a  diamond plate flywheel and had the  center collar (top and bottom) machined at a local machine shop.  The Diamond Plate ran me $125.00

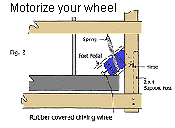
Remove the plumb bob and replace it with the shaft.  Make sure the shaft spins easily when positioned on the mark. If it does, remove the shaft and fasten the bottom bearing to the
4 x 4. Replace the shaft through the two bearings and again check to make sure it rotates freely. If it does, clamp the 4 x 4 brace in place. Drill the clearance holes and bolt the brace to the lower side brace.

Now comes the tricky part of casting the flywheel. Cut a disk of ¾" plywood 29" in diameter and drill a 1" hole at the exact center. Grind or file the inside of the ¾" pipe flange so that it slides easily over the 1"shaft. Fit the shaft in the upper bearing and lock it with the set screw so that the lower end is about 6" above the lower bearing.  Attach the pipe flange over the hole in the plywood disk using 3" wood screws and allowing them to project up through the plywood disk. Drive the
other 3" screws about 1 " in from the edge of the disk all the way around the circumference spaced about ten inches apart. These will
help hold the concrete.

Now fit the plywood and the flange on the shaft, then the bearing collar and flange. Loosen the upper bearing collar and drop the
assembly into the flange support. Lock the upper and lower collar then pull up

the plywood disk with it's pipe flange and drop it out of the way. Tape the bottom bearing with masking tape then smear the top of the bearing collar and about 3" of the shaft with epoxy glue. Also smear glue on the underside of the pipe flange and drop the flange down against the collar. Use a square to be sure the disk flange flywheel support is square with the shaft.  Then prop the disk in place and let the epoxy glue set overnight.

For the concrete form you can fold a 6" width of tar paper double to be 3" or you can use sheet metal or even dampened hardboard. Tack on the tar paper or other material to the disk. Then bind it with a ring of wire. Mix the 90 lb. sack of concrete with twice it's volume of sand plus water and gently pour it into the "wheel mold"

Level the concrete. When it starts to set, then give it a broom finish. This rough surface assures a "grip" for your feet. Or a drive motor.

The least expensive motor drive is to fit a small rubber tired wheel on the motor shaft. With the motor pivoted and spring mounted. Fig.4 so it must be pressed down to contact the flywheel. Light pressure allows the motor to slip somewhat. So the speed is slow. Firm pressure maintains full contact and the
speed is higher. Alternately, a rubber tired drive wheel can be kept in constant contact. With the motor speed varied by an electronic speed control. For either setup it probably will be necessary to kick the wheel to start it. As smaller motors will not be able to overcome the inertia of the heavy flywheel.

14.  Flywheel support 4" x 4" x 39" 1 required
15.  Pillow-block 1" Inside diameter
       1 required
16.  Flange or thrust bearing (Fig. 1)
       1" Inside diameter   1 required
17.  28" Steel rod (cold rolled)
        1" Diameter rod 1 required
18.  Pipe flange ¾" Female pipe thread
       1 required

 
                   Miscellaneous

19.  3/8" x 6" Bolts (24) required
20.  3/8" x 6" Lag screws (16) required
21.  Epoxy Glue
22.  No. 10 x 1 ½" Wood screws
       (1 dozen required)
23.  No. 10 x 3" wood screws
       (1 dozen required)
24.  One 90lb. Sack of cement
25.  Couple of bags of sand
26.  Building paper (tar paper)
27.  Roofing nails

Third Party Software needed to open and  read downloaded Plans

View Plans “Below”
if you already have
Adobe Acrobat Reader

View Plans HERE


A brief  history about the plans.

I have been meaning to build this wheel since I was in my high school art class and working for Peter Petrie the owner of Middle Earth Pottery. I'm 43 now so you do the math. (grin) I even had the original plans out of the 1973 May-June issue or "WorkBench Magazine" but I lost them long ago.  So imagine my surprise when I went to the Internet looking for something similar and coming across the same set.   After all these years I see this wheel is still popular, but the copies of copies of copies have become very hard to read.  I'm not sure who the original author was, and I hope he doesn't mind.  But I took the liberty of cleaning up the plans a little.  And here you go!  What would be fun is to see some of the wheels that have actually been made with this set of plans. If anyone is interested in passing on a few pictures I'll get them up on this page


[ Sign my GuestBook ] - [ Read my GuestBook ]
[ GuestBook by TheGuestBook.com ]


Hosted by www.Geocities.ws

1