![]()
![]()
![]()
![]()
To launch the RTG 2.0 translator, select RTG from within the MakeGame window and click Go.
To support the multitude of game systems available in the marketplace, and the relatively non-standardized PC game development systems, Alias|Wavefront provides the RTG and AnimRTG ASCII file format converters.
RTG is a generic ASCII (user-friendly) file format suitable for use in 3D game authoring environments.
AnimRTG is a generic ASCII file format containing animation samples for all geometric or dag node level objects in the scene.
Previously, Alias|Wavefront provided an RTG and AnimRTG translators that were based solely on the OpenModel API (application programmers interface). The last such provided version was version 1.8. Alias|Wavefront is continuing to supply RTG 1.8 as an OpenModel converter, but now also supplies the RTG 2.0 converter as well.
RTG 2.0 is built on top of the same API that the rest of Alias|Wavefront's direct platform translators are built on. This API, called Dt, supplies an interface layer between the OpenModel/OpenAlias API and the converter itself, and is far more oriented toward data transfer for interactive media than OpenModel/OpenAlias. As a side benefit, the Dt API provides significant functionality to the programmer, such as built-in conversion of projective textures to parametric textures (via texture coordinates). All translators based on the Dt API receive this functionality transparently.
In creating RTG 2.0, some aspects of the original RTG and AnimRTG file formats were modified.
All future development of RTG for PowerAnimator and other Alias|Wavefront products will be based on RTG 2.0. RTG 1.8 continues to be shipped with PowerAnimator, but is shipped solely to allow current workflows to continue. It is recommended that all users of RTG regard RTG 2.0 as the future of the file format.
Though RTG 2.0, RTG and AnimRTG are not standard formats (such as they exist) recognized by any of the console makers, it has been written in such a way that any programmer, whether using SGI machines, PCs, or Macs, can parse and use its output. A simple parser for RTG should take a programmer only a matter of hours to create.
Since RTG and RTG 2.0 are very similar, the new features of RTG 2.0 are documented in the following section as they are encountered.
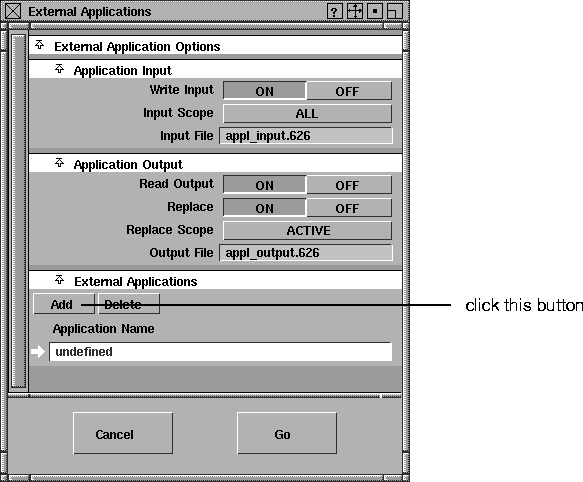
The RTG converter converts wire files of polygonal data to an ASCII file. Instructions are included on how you can set the RTG converter up as an external application. The RTG 2.0 converter is launched from the MakeGame plug-in. Launching RTG opens the following window.
The RTG format supports the following features:
· Triangles and/or Quads with Degenerate Quads output as triangles.
· Option to specify Vertex Orientation (Clockwise or Counter-Clockwise). (RTG 1.8 only)
· Option to specify Quads in a triangle-strip fashion. (RTG 1.8 only)
· Generate a texture per polygon with appropriate pre-distorting.
· Generate a texture per shader for use with vertex texture coordinates.
Note that RTG 2.0 simply provides a texture file reference per group of polygons sharing a texture.
· Choice for UNIX or DOS newline (carriage-return/line-feed).
· Byte oriented pixel data for textures, to avoid byte ordering problems when bringing data to other file systems.
In order to use the RTG format, you must write a (very) simple program to read the RTG file. A sample reader program is provided.
Tip: RTG is a good solution when you do not want to make the leap to use OpenAlias or OpenModel. The program to read an RTG file is very simple, and can be created on any platform (such as a PC).
rtgAnim is designed to be used in conjunction with the rtg format translator. It provides the following functionality:
The RTG 2.0, RTG and AnimRTG formats are written as OpenModel applications and will be updated periodically. Updates to RTG 2.0 will be distributed on an ongoing basis. RTG 2.0 is based on the Dt API. The source code to the Dt API is shipped in the $ALIAS_LOCATION/ODS/Games/source area.
In addition, the source code for all three translators is included so that you can extend the formats as you need.
This covers how to install and set up the RTG 1.8 converter to launch as an external application from PowerAnimator. Also included are notes on using the converter and important things to keep in mind regarding this release of this software.
To run the RTG 2.0 converter, you need simply install the MakeGame plug-in, see Installing Game Direct Translators on page 1. RTG 2 is one of the output file formats available from the MakeGame plug-in.
For details about the Real Time Games Format see the FORMAT text file.
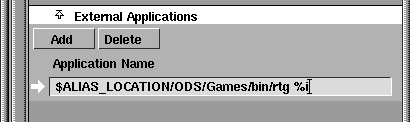
This document assumes that the Alias software has been installed appropriately. The RTG and AnimRTG software is installed by default into the $ALIAS_LOCATION/ODS/Games/bin directory.
Create some polygonal geometry with texture maps in Alias, then:
Tip: Make sure that the Path for Output is set to the directory where you want to put the output files, and that the Output Prefix is set to what you want to prefix the output filenames with.
A forward slash is automatically added to the end of the path before being concatenated with the output prefix. You do not have to include it to the end of the path specification.
in the Output File Prefix option section. This will generate the following files in the Path for Output directory:
The 1 in the test1 prefix created is the frame number, and in this case only frame 1 is generated. A sequence of frames can be specified in the options, which will generate a set of rtg/bin files per frame. The frame number is appended to the specified Output File Prefix when naming files.
The .rtg file created contains geometry data, hierarchy information (if specified), and a texture table (if any textures were generated). This file is an ASCII text file.
The .bin file created is a binary file containing an ASCII text header (which is NOT NULL terminated) along with an RGBA byte-oriented dump of pixel data for all textures generated for its corresponding .rtg file.
Close the xterm window by double-clicking on the close icon in the top left corner of the window.
Once processing is complete, the output rtg/bin files can be found in the directory that was specified in the Path for Output option. The path, along with the file prefix, is also displayed in the xterm window (it appears on the line starting with Finished generating).
This is the directory path, where the output files are created. The path you specify does not have to end with the forward slash character, /, but it can be added without any adverse effects.
For RTG 2.0, this option is located in the PATHS section of the MakeGame option box.
This is the label that the generated rtg/bin files will be prefixed with, along with an appended frame number.
Specifies what kind of polygonal geometry is desired:
Only triangles are output to the .rtg file. Quads are processed and output as two triangles. Polygons with less than 3 or greater than 4 vertices are NOT processed.
Only quadrangles (4 vertices) are output to the .rtg file. Triangles are processed and output as degenerate quads. Polygons with less than 3 or greater than 4 vertices are NOT processed.
Triangles and quads are output to the .rtg file. Polygons with less than 3, or greater than 4 vertices are NOT processed.
Triangles and quads are output to the .rtg file and any degenerate quads (quad with 2 vertices in the same position such that it looks like a triangle) will be output as a triangle.
All polygons, with any number of sides, are output to the .rtg file.
If Texture per Polygon is selected as the Texture Mode (see the following), and a polygon is processed with less than 3 or more than 4 vertices, a texture may be generated but it will most likely be quite useless.
If set OFF, vertex normals are not generated on output. If set ON, a vertex NORMAL list is generated for each object, and each polygon entry for the object contains a vertex normal index list.
If set to OFF, vertex colors are not generated on output. If set to ON, a vertex COLOR list is generated for each object. This color list should be indexed in the same way as the vertex list.
If set OFF, vertex texture coordinates are not generated on output. If set ON, a vertex TEXCOORD list is generated for each object, and each polygon entry for the object contains a vertex texture coordinate index list.
If set OFF, polygon Normals are omitted from polygon data lines. If set ON, a polygon Normal entry is included on each polygon data line. The Normal entry starts with an N tag and is specified in nX nY nZ order.
Specifies whether to use a Clockwise (Left Hand Rule) or a Counter-Clockwise (Right Hand Rule) vertex orientation system. This orientation determines which side of a polygon is considered as a front face.
This option only takes effect when the geometry mode is Quads Only, Tris & Quads, or Tri/Quad Degen. If it is ON in one of these modes, then any quads output as quads have their vertices specified in a triangle strip form.
Tip: This can be used, for example, to bring geometry into a GL or OpenGL program that makes use of triangle strips. Using triangle strip can eliminate problems that arise from non-coplanar quads.
This lets you apply a scale on vertex coordinates in case your wire file model is too small (or too large) for your games world space coordinate system. This option only takes effect when NO hierarchy is being output.
RTG 1.8 only: Hierarchy output uses object space coordinates (not world space) and applying a scale adversely affects transforms applied to object space vertices.
For RTG 2.0, this option is located in the MakeGame option box.
These are texture X and Y resolutions for all textures created in one converter session launch. The maximum value for each is 256.
These options are used to specify at what level to generate textures:
No textures are generated and the color is assigned to the polygon.
A texture is generated for each polygon.
A texture is generated for each shader that is assigned to output polygonal data.
Specifies whether or not to look for texture resolutions encoded in shader or polyset names. If the name is not encoded, the default texture X and Y resolutions above are used. If Texture Mode is set to Shader per Polygon and this option is set to Use Polyset Name, the resolution will be decoded from the first polyset name encountered.
The converter ignores these texture resolution values if the texture resolution is encoded in the Shaders/Polysets name (within Alias) AND if the Encoded Tex Res option is set to anything other than NONE.
To edit a shader's name in Alias:
where x64 would mean an X resolution of 64 pixels, and y128 would mean a Y resolution of 128 pixels for the texture.
A texture is created from a shader only if:
If a polygon is assigned to a shader that is just a color, then NO texture is created or referenced and a single RGB color is generated in that polygon's entry in the POLYGON_LIST.
A texture is created for a polygon if its shader is NOT just a color (it has texture or other mappings applied to it). The texture is pre-distorted for irregular shape quads as well as triangles. For triangles, the last vertex is repeated in order to generate a quad texture swatch. If only a color is assigned to the polygons shader, a single RGB color is generated in that polygon's entry in the POLYGON_LIST.
If set to ON and Texture Mode is not Color Only, all generated textures have prelighted pixel values based on a fixed light source.
Currently this does not use lighting from within Alias but simply uses a predetermined lighting model.
Note that this feature exists in RTG 1.8 only. For RTG 2.0, it is recommended that you use the PowerAnimator prelighting feature in version 8, and apply those effects to your texture maps in the manner required for your destination platform.
This option specifies what component level constitutes a single object (one VERTEX_LIST and one POLYGON_LIST generated for each object). Each Polyset found can be an object, each Top Level Dagnode found, with polysets, can be an object, or the entire file processed can be one object of polygonal data.
Hierarchy information can only be generated at the Polyset as Object level using the Polyset w/ Hierarchy selection of this option. All other options will not generate hierarchy.
When hierarchy is output using the Polyset w/ Hierarchy selection, object space coordinates are used for vertex position. All other selections of this option use world space coordinates for vertex position.
This option specifies the level of hierarchy data that is output. You can specify to output the Tree Only, the Tree w/ Xforms, or the Tree w/ Xforms & Pivots.
This control is set via the MakeGame option box for RTG 2.0. The RTG option box allows you to specify whether hierarchy is output at all, and if so, whether pivot information is output at each node.
If pivot information it not output at each node, then the pivot transformation is combined with the rest of the transform
If the Prec option is 0, values are output as integers and the original floating point values are multiplied by the corresponding Int Conv value to bring things into a more appropriate integer space.
If the Prec option is greater than 0 (the maximum is 10), this is the number of decimal places to output a floating point value with. In this case, the Int Conv option is ignored (and actually set to 1.0 during run-time).
There are Prec and Int Conv options for vertex Position values, vertex/polygon Normal values, vertex Texture Coordinate values, as well as Hierarchy transform and pivot values.
If set ON, index counters are included in all lists. Index counters start at 0 for the first entry of a list and increment by 1 for each entry in the list. Each of these counters is the first entry of each list entry, if specified to be included on output. If set OFF, these index counters are omitted from output.
This option specifies what newline character to use in the .rtg file generated. The UNIX `\n character or the DOS carriage-return/linefeed pair can be specified.
The following describes one method you can use to put together a transform matrix for a leaf node. This has not been tested and verified as yet, but hopefully it will provide a starting point to putting together world (or global) transformations.
One way to get started is to build a tree (dynamically allocated, two-way linked list) as you read in the hierarchy list. At each node you can build a local transform matrix with the transformation data in the hierarchy list. After you have built your tree you can traverse it, and at each leaf node you encounter, you can traverse up the tree and apply the transform matrices cumulatively as you go up. This gives you the total transform on a leaf node.
At each node, you need to build a transform matrix from the transform data at that level in the hierarchy list. The following is the order of operations to apply the data to build the matrix:
local matrix = [9] * [8] * [7] * [6] * [5] * [4] * [3] * [2] * [1]
For a leaf node, the World transform is obtained by applying the local transforms cumulatively as you go up the tree to the top level.
For example, if node A is a parent of node B, which is a parent of node C, the global (or world) transformation of C is the matrix product [C] * [B] * [A], where [C], [B] and [A] are local transformations at each node.
That should provide you with global (or world) transform matrices for each leaf node.
Tip: If you have OpenModel API, you can obtain the global matrices yourself quite easily.
The following describes the Alias|Wavefront Real Time Games Format (v1.0). Running the wire2rtg converter generates an ASCII text .rtg file, and possibly a .bin file (if textures have been assigned to polygonal geometry in PowerAnimator). The .rtg file contains polygonal data with possible hierarchy information and possible texture table data. The .bin file contains a byte oriented RGBA pixel dump of all textures generated for its corresponding .rtg file.
The .rtg file contains various tags including title tags, to denote sections of data, and descriptor tags, which are used for visual reference and can be ignored when parsing the file.
The polygonal data (hereafter referred to as P-data) file begins with a number of header lines (currently there are 3 header lines).
These header lines contain general information for the file. So far, only the title, version, and date information header lines are generated.
All header lines begin with tags starting with HEADER_. The following is an example of these lines:
HEADER_TITLE Alias|Wavefront Real Time Games Output HEADER_VERSION v1.0
HEADER_DATE Tue Aug 15 21:58:15 1995 (RTG 1.8 only)
Counters for the P-data file appear after the header lines. Currently there is only one counter. This is for the number of objects that exist in the file. All counter info lines will begin with tags starting with NUMBER_OF_. For example:
If there are any flags for the P-data file, they appear after the counter information. These indicate whether or not a particular item(s) will be found in the file.
For example, the flag info line OUTPUT_HIERARCHY on indicates that a hierarchy tree will be found in the file. This version contains flags for:
Indicates if a NORMAL list for vertex normals is included in this file or not.
Indicates if a COLOR list for vertex colors is included in the file or not.
Indicates if a TEXCOORD list for vertex texture coordinates is included in this file or not.
Indicates if Normals for each polygon will be output on a polygon data line or not.
Indicates if a hierarchy tree is included in this file or not.
Indicates if materials are included in this file.
Indicates if animation data is included in this file.
Indicates whether or not index counters (sort of like line numbers for each list - starting at 0) are included in this file.
This is an example of a Flags info section:
The Selections Info section follows the Flag info section. It contains various modes that had been selected when this file was generated.
Currently there is only one selection line:TEXTURE_MODE. Valid modes (modes that are currently supported) are color, per_shader, or per_polygon.
If color mode is indicated, only RGB color assignments are made to polygons and no textures are generated for this file.
If per_shader is indicated, a texture for each used shader is assigned to polygons, with texture coordinates needed for proper texture mapping.
If per_polygon is indicated, a correctly pre-distorted texture swatch is generated for each polygon, with texture coordinates being pretty much meaningless as these textures effectively map directly to the corners of each polygon.
The material list contains a list of all materials used in the model. The MATERIAL_LIST line contains a count of the number of materials. Each material is named and has an index which is used in the OBJECTS section to reference the materials. The following is an example:
AMBIENT 0.000000 0.585938 0.996094
DIFFUSE 0.000000 0.468750 0.796875
SPECULAR 0.000000 0.000000 0.000000
EMMISION 0.000000 0.000000 0.000000
FILENAME color file /usr/u/psantan/user_data/demo/pix/small.rgb
AMBIENT 0.000000 0.585938 0.996094
DIFFUSE 0.000000 0.468750 0.796875
SPECULAR 0.000000 0.000000 0.000000
EMMISION 0.000000 0.000000 0.000000
This is the location in RTG 2.0 that enables you to find texture maps.
A Hierarchy list only exists in the file if the OUTPUT_HIERARCHY flag is set ON. Otherwise, parsing should continue with the OBJECT Data as described in the following.
The first line of a hierarchy list begins with the tag HIERARCHY_LIST. There are three tags that follow this on the first line.
The first of these is the Info Level Tag. This tag can be H (Hierarchy only), HX (Hierarchy with Xforms), or HXP (Hierarchy with Xforms and Pivots.
A count for the number of top level dag nodes in the hierarchy list, and a descriptor tag top_level that can be read and ignored follows the Info Level Tag.
After the first line, the hierarchy is output with node lines, and possibly transform lines and pivot lines.
[level] [node_type] [node_name] where level is an integer number indicating hierarchy level. A top dag node is at level 0.
The node_type is either G (Group) or P (polygonal) Data.
The node_name is a string name used to individually identify a node.
If Hierarchy List is selected, transforms with or without pivots can be output for each node line of the hierarchy. Transform lines are (x,y,z) triplets, one for each of translate, rotate and scale. Pivot lines are (x,y,z) triplets, one for each of scale and rotate.
An example of hierarchy list output without transforms or pivots:
The same example of hierarchy list output but with transforms and no pivots:
The same example of hierarchy list output but with both transforms and pivots:
HIERARCHY_LIST HXP 2 top_level
The hierarchy list ends with the tag END_HIERARCHY_LIST to indicate the end of hierarchy processing.
There are a number of Object sections, one for each object in the file, as indicated by the NUMBER_OF_OBJECTS info line.
An Object section begins with an object start line. This line starts with an OBJECT_START tag and is followed by the name of the object and counter tags. Each counter tag has a letter prefix (to denote what the counter is for) with a number (how many items of that type there are) appended to it.
The letter v is for vertices, n for vertex normals, t for texture coordinates, and p for polygons. These counters are in the order of :
OBJECT_START sphere v26 n45 t45 p32 indicates that the object sphere contains a VERTEX list of 26 vertex positions, a NORMAL list of 45 vertex normal values, a TEXCOORD list of 45 texture (u,v) coordinate values, and a POLYGON list of 32 polygon data entries.
If the OUTPUT_VERT_NORMS flag is off (meaning the output of vertex normals has been omitted) then the n counter, (n45 in the above example), is omitted from the object start line.
Also, if the OUTPUT_TEX_COORDS flag is off (meaning the output of texture coordinates has been omitted) then the t counter, (t45 in the above example), is omitted from the object start line.
The USES_MATERIAL tag indicates which material (if materials are being output) is used for this object. It is followed by the index of the material and the name:
The VERTEX list follows the OBJECT_START line. It begins with a line containing the VERTEX tag along with a coordinate space tag. This second tag is either local or world to indicate whether the position of the vertex is output in local (object) space or in world space. A list of vertex positions specified in X Y Z order (one vertex position per line) follows. If the SHOW_INDEX_COUNTERS flag is on, each vertex line is prefixed with an index number starting at 0 and incrementing by one for each vertex line in the list.
The vertex COLOR list follows the VERTEX list. It begins with a line containing the COLOR tag. A list of the vertex color values then follows .
The vertex NORMAL list follows the VERTEX list. It begins with a line containing the NORMAL tag. A list of vertex normal values specified in X Y Z order (one vertex normal per line) then follows.
If the SHOW_INDEX_COUNTERS flag is on, each vertex normal line is prefixed with an index number starting at 0 and incrementing by one for each vertex normal in the list.
If the OUTPUT_VERT_NORMS flag is off (meaning the output of vertex normals has been omitted), a NORMAL list will not be found after the VERTEX list.
The following list is the texture coordinate (TEXCOORD) list. It begins with a line containing the TEXCOORD tag. A list of vertex texture coordinate (u,v) values specified in U V order (one texture coordinate pair per line) then follows. If the SHOW_INDEX_COUNTERS flag is on, each line is prefixed with an index number starting at 0 and incrementing by one for each line in the list.
If the OUTPUT_TEX_COORDS flag is off (meaning the output of vertex texture coordinates has been omitted) then a TEXCOORD list will not be found here.
The next list within an object section is the polygon list for that object. This begins with a line containing only the POLYGON list tag. A list of polygon data lines (one line/entry for each polygon in the object) then follows containing the following data:
· n [norm_indices] (omitted if OUTPUT_VERT_NORMS is off)
· t [texcrd_indices] (omitted if OUTPUT_TEX_COORDS is off )
· N [polygon_normal] (omitted if OUTPUT_POLY_NORMS is off )
(RTG 1.8 only) A polygon will only have either the texture_index OR an rgb_color assignment. The tags v, n, t, N, T, and C exist to identify the data that follows them. These are omitted from the output if their corresponding data is also omitted.
The object data ends with a line containing the OBJECT_END and the name of the object as it appeared on the object start line.
The texture table starts with a line containing the TEXTURE_TABLE tag along with the name of the associated texture file (.bin), an entry count, the entries descriptor tag, the header descriptor tag, the number of bytes in the header of the .bin file, and finally the bytes descriptor tag.
Following the first line are the texture entries. Each texture entry line is of the format:
[index] [pixel_format] [X_res] [Y_res] [source_shader] [byte_size] where:
The texture table ends with a line containing the END_TEXTURE_TABLE and the name of the associated texture file (.bin) as it appeared on the texture table start line.
The index counter on each entry is omitted if the SHOW_INDEX_COUNTERS flag is off.
The following is an example of the TEXTURE_TABLE format:
TEXTURE_TABLE wackyB1.bin 3 entries (header: 82 bytes) 0 RGBA 32 32 Shader#2 4096 1 RGBA 32 32 Shader 4096 2 RGBA 32 32 Shader#4 4096 END_TEXTURE_TABLE wackyB1.bin
The following is an example of the TEXTURE_TABLE format using the encoded texture resolutions option on shader names:
TEXTURE_TABLE wackyB1.bin 3 entries (header: 82 bytes)
The header of the texture file contains a text title, a version tag, and time and date creation information. This header string is NOT null terminated.
Use the header byte count found in the texture table start line to determine how many bytes to read to clear the header. The version tag is preceded by a ver descriptor tag and the time and date info is preceded by a date descriptor tag .
Tip: The header should be parsed to get the version tag and the date in order to verify the texture file against the P-data file.
After the header, any textures generated for the corresponding polygonal data file is dumped pixel by pixel into this file. Each pixel is separated into 4 bytes one for each of R, G, B and A, and written out to this file in that order. Values for each of RGB and A range from 0 to 255. Pixel values are output starting from the bottom-left (texture coord 0,0) and are output moving left to right and bottom to top.
RTG 2.0 differs from previous versions of RTG in that it is capable of creating a single file that contains both model and animation data. The RTG 2.0 animation data starts with the tag ANIMATION_LIST, and ends with END_ANIMATION_LIST. Between those two are a sequence of FRAME records and within each frame record is a list of all of the objects that are animated and what their transforms are.
The format of the transformation data is as per the hierarchy section. The following is an example of a three frame animation of two objects.
ANIMATION_LIST
FRAME 1
OBJECT sphere#2
tran: -2.000000 6.000000 0.000000
rot: 0.000000 0.000000 0.000000
scal: 1.000000 1.000000 1.000000
sPiv: -2.000000 6.000000 0.000000
rPiv: -2.000000 6.000000 0.000000
OBJECT sphere
tran: -2.000000 -4.000000 0.000000
rot: 0.000000 0.000000 0.000000
scal: 1.125168 1.125168 1.125168
sPiv: -2.000000 -4.000000 0.000000
rPiv: -2.000000 -4.000000 0.000000
FRAME 2
OBJECT sphere#2
tran: -2.000000 6.000000 0.000000
rot: 3.827586 0.000000 0.000000
scal: 1.000000 1.000000 1.000000
sPiv: -2.000000 6.000000 0.000000
rPiv: -2.000000 6.000000 0.000000
OBJECT sphere
tran: -2.000000 -4.000000 0.000000
rot: 0.000000 0.000000 0.000000
scal: 1.250335 1.250335 1.250335
sPiv: -2.000000 -4.000000 0.000000
rPiv: -2.000000 -4.000000 0.000000
FRAME 3
OBJECT sphere#2
tran: -2.000000 6.000000 0.000000
rot: 7.655172 0.000000 0.000000
scal: 1.000000 1.000000 1.000000
sPiv: -2.000000 6.000000 0.000000
rPiv: -2.000000 6.000000 0.000000
OBJECT sphere
tran: -2.000000 -4.000000 0.000000
rot: 0.000000 0.000000 0.000000
scal: 1.375503 1.375503 1.375503
sPiv: -2.000000 -4.000000 0.000000
rPiv: -2.000000 -4.000000 0.000000
END_ANIMATION_LIST
Retrieves a wire file and outputs an animation stream for each animated parameter in the dag group structures or on polyset vertices.
The rtgAnim utility reads an animated Alias wire file and creates a stream of data for any animated piece of the model (transformations, animated vertices, or world space paths for clustered vertices).
It does this by creating a file for each animated node in the dag. The contents of the file look like this:
0001.0: X_Rotate 1.58 Y_Rotate 0.928 Z_Rotate 0.972
0003.0: X_Rotate 4.74 Y_Rotate 2.784 Z_Rotate 2.916
0005.0: X_Rotate 7.9 Y_Rotate 4.64 Z_Rotate 4.86
0007.0: X_Rotate 11.06 Y_Rotate 6.496 Z_Rotate 6.804
0009.0: X_Rotate 14.22 Y_Rotate 8.352 Z_Rotate 8.748
The above output is for a node called node#24, and the file will be called xxx_node#24 (you can specify what xxx is). It is a sampling from frame 1 through 9, by twos. Since only the rotations are animated in the model, only they are output.
For animated polyset vertices, a file is created for each animated vertex. For example, the file called polyset#1_5 is for the fifth vertex in polyset 1.
For polysets animated with clusters, the world positions per vertex per frame are output, since it is difficult to do anything in object space with clusters.
This command line utility can be found in $ALIAS_LOCATION/ODS/Games/bin directory.
source ~/.cshrc.
The following are the command line input parameters for the rtgAnim utility:
rtgAnim -i <inputfile> -o <outputfile> [-l] [-s <startframe>] [-e <endframe>] [-b <byframe>] [-y] [-z] Where:
The AnimRTG file format is created by using the rtgAnim command from the Unix command line, or installing it as an "External App" into your Alias application (see your Alias documentation for further details).
The application includes the following options:
rtgAnim -i <inputfile> -o <outputfile> [-s <startframe>] [-e <endframe>] [-b <byframe>] [-y] [-z]
This program retrieves a wire file and outputs an animation stream for each animated parameter in the dag group structures or on polyset vertices.
rtgAnim has been designed to ease the task of obtaining point-sampled animation information from Alias wire files for use in real time game applications.
rtgAnim is designed to be used in conjunction with the rtg format translator. It provides the following functionality:
If a wire file contains an object called sphere#1 which is animated from frame 1 to 30, the command
rtgAnim -i wirefile -o output -s 1 -e 30
creates a file called output_sphere#1 that contains the animation data. The file might look something like this:
0001.0: X_Translate -0.806515 Y_Translate 0
0002.0: X_Translate -0.457943 Y_Translate 1
0003.0: X_Translate -0.10937 Y_Translate 2
...
The first column is the frame for the line. The rest of the columns describe the fields being animated, and the values at the frame.
For cluster animation, the fields are in world coodinates. For all other types of animation (including keyframed vertices), the coordinates are in object space.
Copyright © 1997, Alias|Wavefront, a Silicon Graphics Company. All rights reserved.