 |
|
|
|
|
|
|
|
|
|
|
|
|
|
|
|
|
|
|
|
|
|
|
|
|
|
|
|
|
|
|
|
|
|
|
|
|
|
|
|
|
<<HOME>> |
|
|
<<BACK |
|
|
|
|
|
|
Adding an extra fuel injector |
|
|
|
Part I: the fuel hardware |
|
|
|
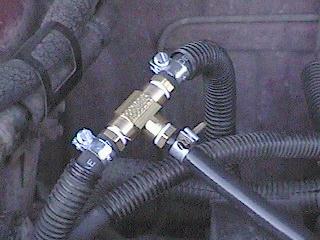
The first thing you'll need to do is make a custom brass tee to send some fuel over to the injector.Go to a local hardware store and buy a tee with three 1/4" threaded fittings, plus two 5/16" barbs and one 3/16" barb. Put some Teflon tape on the threads and screw it together nice and tight. (Be sure to put the right barbs in the right place!) Once together it is installed in the fuel hose, which feeds your fuel rail--it's the hose that is 5/16" in size. Be sure to use clamps which are in good condition; you don't want any leaks. |
|
|
|
Now we install the injector itself. This is simply a run-of-the-mill cold start injector out of a junkyard Saab; it differs from normal injectors in that it doesn't pulse--it's either flowing constantly (on) or not at all (off). This is the style of injector you must use. Normal "pulsing" injectors will not supply a constant fuel flow and the resulting sporadic fuel delivery will cause detonation and *probably* destroy your engine. |
|
|
|
In your metal intercooler pipe, drill a hole that is barely larger than the injector's nozzle--six inches in front of the throttle body is ideal. Temporarily put the injector in place, use its flange to mark where the screw holes go, then remove the injector and drill those holes. Once the holes are ready and the pipe has been thoroughly cleaned of metal shavings, place a half-inch piece of 5/16" fuel hose over the tip of the injector and install it permanently--the small piece of hose will compress and conform to the shape of the pipe making an airtight seal. Sheet metal screws will do the job perfectly; You may even want to go so far as to add a very small dab of RTV for these screws to ensure a good seal but this is overkill so long as you don't drill holes, which are too big for the screws. Now that the injector is mounted, plumb in the fuel hose from the 3/16" barb of the brass tee. |
|
|
|
 |
|
 |
|
|
|
 |
|
 |
|
|
|
Part II: the pneumatic hardware |
|
|
|
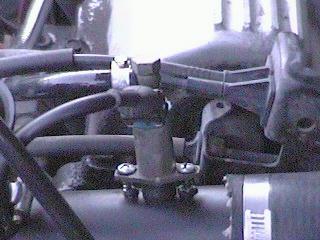
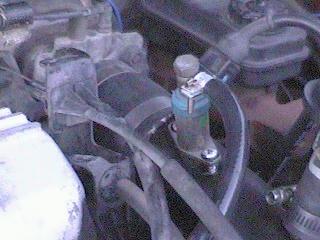
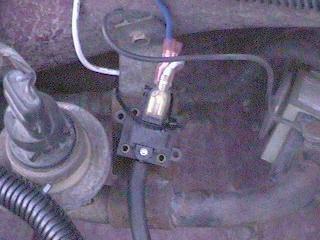
You need to mount a pressure switch to control the injector. (Go to NAPA and ask for NAPA part# 7011577. This corresponds to a Hobbs pressure switch #76052 which is a single circuit 5000 series normally open 2 terminal switch. It is factory set to 15 psi. but adjustable 14-24 psi.) I mounted my pressure switch to a bracket on the firewall above the intake manifold. This left a short piece of tubing to plumb it in. |
|
|
|
Speaking of pneumatics, you don't install an extra injector unless you're going to run more than 14 psi. of boost. And if you're going over 14 pounds then you'll also need to trick the MAP sensor. The solution most commonly used is to install a "cutout raiser," consisting of a Grainger spring-n-ball type valve, in the MAP sensor vacuum line. Rather than epoxy a plastic tee onto the valve you may use a brass barb, which screws onto the valve. This way you'll have little chance of messing up the machined seat for the brass ball inside the valve. |
|
|
|
 |
|
|
|
Part III: wiring it all in |
|
|
|
 |
|
|
|
Part IV: dialing it all in! |
|
|
|
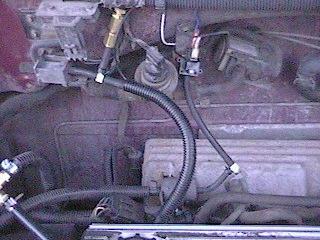
Now all you need to do is wire everything together. The injector has two wires and polarity does not matter--feed 12v to one and ground to the other and you'll get fuel. Attach one wire to a constant 12v source; this line contains a 1-amp inline fuse for safety. Then, connect the other injector wire to one of the terminals of the pressure switch. The switch's second terminal is connected to ground. When the threshold pressure is reached the switch closes and sends ground to the injector, turning it on. Once pressure falls below the threshold, the switch opens and the injector shuts off. |
|
|
|
For neatness sake, you should use as much of the injector's original wiring as possible. When you remove a cold start injector from a junkyard car try to cut off as much of the harness as you can--you'll *probably* appreciate it later. |
|
|
|
Now all that's left is making it all work. Gradually raise your boost level one pound at a time; make sure your fuel gauge says all is well. If you hit cutout adjust your raiser very slightly and try again. After a bit of experimentation you should get dialed in to your target boost setup. Once you do, be sure to read your sparkplugs to confirm everything is okay. If it is, you're all set! |
|