|
The Desktop
In Windows 98,
the main screen is called the desktop. This is your work area. Just like
the top of a real desk, this one changes depending on what you are doing.
You can also customize it to fit your needs and personality. The
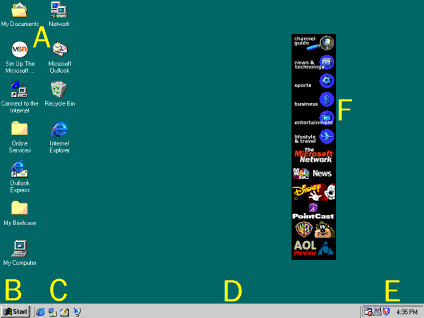
following illustration shows the Windows 98 desktop.
-
A. Icons
-
Double-click on of
these icons, or shortcuts, to open a program or folder.
-
B. Start Button
-
Click to open the
Start menu, your one-stop access to many of the features of Windows 98.
-
C. Quick Launch
toolbar
-
Use these icons to
start Internet Explorer, start Outlook Express, minimize all open windows,
or view channels.
-
D. Taskbar
-
When a window is open
but not active, an icon for the window appears here. Quickly switch between
open windows using the icon.
-
E. Time Clock
-
Displays the current
time set in the computer. Change the time and date by double-clicking here.
-
F. Channel Bar
-
Obtain instant access
to any of more than 3,000 active Web pages with this active channel "remote
control".
Windows
When you open something
on your computer like a program, a document, or a Web browser, it appears
on your desktop inside a window. There are two types of windows-program
windows which contain a program, such as Microsoft Word, and document windows
which contain documents inside a program window. You can have several documents
open in one program window, for example you can have more than one Microsoft
PowerPoint presentation file open at a time within the PowerPoint program
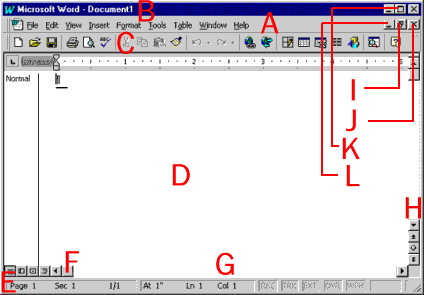
window. The following illustration shows the parts of a typical window.
-
A. Menu Bar
-
Contains menus for
the program. Click on the menu names to display the menus and their commands.
-
B. Title Bar
-
Changes color when
the window is active.
-
C. Toolbar
-
Available buttons
depend on the program you are using.
-
D. Document Window
-
E. Status bar
-
Shows you information
about the document.
-
F. Scroll box
-
Drag the box left
or right (up or down on the vertical bar) to see information which doesn't
fit in the window.
-
G. Horizontal Scroll
bar
-
Click at a point in
the scroll bar to move the scroll box, instead of dragging the scroll box.
-
H. Scroll arrow
-
Click to move through
the document.
-
I. Restore button
-
Smaller than maximized
but not minimized.
-
J. Close button
-
Closes document or
quits program.
-
K. Maximize button
-
Window fills the entire
desktop.
-
L. Minimize button
-
window becomes an
icon on the taskbar.
Moving, Sizing,
and Organizing Windows
Once you are familiar
with the parts of a window, it is easy to use several windows at once so
that you can accomplish more than one thing at a time. You can search the
Internet and import text or pictures into a Word document; or, you can
figure grades with an Excel spreadsheet, and write memos in Word Pad all
while you are reading your e-mail. The following are some tips for moving,
sizing, and organizing windows that you have open on your desktop at the
same time:
-
Move - Use
the Title Bar to move a window around on the desktop. Click on the
title bar, and while holding down the mouse button, drag the window to
a new location on the desktop. This is helpful when you are using more
than one program at a time and need to see them both simultaneously, such
as when you are editing a picture in Paint and then want to import the
picture into a Word document.
-
Resize - Customize
the size of a window with the resize pointers. You can drag the
window's borders to make the window larger or smaller. To try this, open
Notepad from the Accessories submenu (on the Programs menu). Move
the pointer over to the right edge of the window. The pointer will change
to a resize pointer, a short line with arrows at both ends. Hold down the
left mouse button and drag any part of the window's edge to make the window
wider. Or, drag the window from the corner to resize the height and width
at the same time.
-
Organize -
When you right-click on the taskbar, a menu appears. This handy
menu contains commands for cascading and tiling windows, and for minimizing
all open windows. To try out these features, open a few accessory programs
such as Word Pad, the calculator, and Paint, and then right-click an open
space on the taskbar and choose Cascade Windows or Tile Windows
Horizontally.
Dialog Boxes
Dialog boxes pop
up on your screen when Windows or a Windows based program needs information,
requires you to confirm an action (such as deleting), or has an alert or
other information. Dialog boxes look a bit like windows, but don't have
all the features of windows. For example, they have title bars, but not
toolbars. You can move them but not resize them. You can close them but
not minimize them. Most dialog boxes are intuitive, usually asking for
a simple Yes, No, or OK. Some are more complicated, especially those used
for changing settings.
Several Windows
98 dialog boxes you use to change system settings are subdivided into tabbed
categories, like a "real" file folder or card file. This allows you to
make multiple changes from a centralized location on your computer. Each
tab has a heading which categorizes the information on that tab. Click
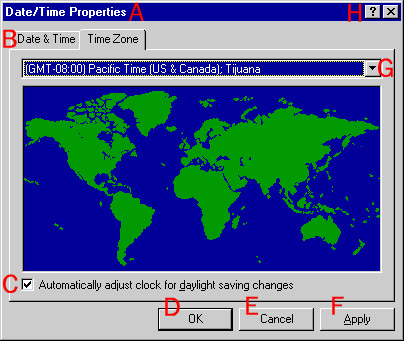
on the tab to change from one to another. The following illustration shows
the Date/Time Properties dialog box.
-
A. Title Bar
-
B. Tabs
-
C. Checkbox
-
Selected when checked.
Click to check or to clear check mark.
-
D. OK Button
-
Click to close the
dialog box and change settings as indicated.
-
E. Cancel Button
-
Click to close the
dialog box without changing any settings.
-
F. Apply Button
-
Click to change setting
but not close dialog box.
-
G. Drop Down List
-
Click the arrow to
open a list of options to select from.
-
H. Help
-
Changes the pointer
into a question mark. Click on an object for an explanation of it.
Identifying File
Box Features
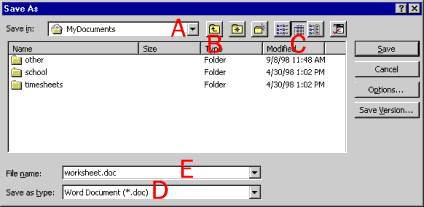
Another typical
dialog box is the file box. This box opens when you choose the Open or
Save As command on the File menu of most Windows programs.
-
A. Folder Tree
-
Click the arrowto
browse folders and select one.
-
B. Up one level
button
-
Click to go to the
folder one level higher than the current one.
-
C. File View Buttons
-
Allows easy access
to folders or functions. Buttons vary depending on which dialog box is
open.
-
D. Document type
field
-
Shows the file format
in which the document will be saved (Save as dialog box) or of the
documents displayed (Open dialog box).
-
E. File name field
-
Use this field to
select or type a name of a file you are saving (Save as dialog box)
or want to open (Open dialog box).
Pointing and Clicking
In Windows 98,
the mouse is the tool you will most often use to navigate through the operating
system and perform tasks. There are five basic actions you perform with
the mouse: point, click, double-click, right- click, and drag.
To point the mouse,
simply position the on-screen mouse pointer over an object. Sometimes when
you point to an object and "hover" over it, a small box called a tool tip
will appear that contains a description of the object. When you point to
some objects, the mouse pointer changes shape, alerting you to the fact
that you can perform some kind of command. For example, when the pointer
turns into a hand with a pointing finger, you are pointing to a clickable
item such as a hyperlink. A hyperlink is text or a picture that you can
click to jump to another location. A two-headed arrow allows you to resize
an object.
Click means to
press the left (primary) mouse button. When you click an object you make
it active. Double-click means to press the left mouse button twice quickly.
Right-click means to press the right (secondary) mouse button. To drag
an object with the mouse pointer, point to the object and press and hold
down the left mouse button. When you have moved the object to where you
want it, release the mouse button to "drop" the object.
To make the mouse
comfortable for you and your students to use, you can adjust the speed
of the mouse pointer, adjust the mouse for left-handed users, and make
the pointers larger or smaller. You can also show the trail of the pointer,
which is helpful if you are using the computer with a projection device.
For those who cannot use a mouse, keyboard alternatives are available through
the Accessibility Wizard.
To Adjust
Mouse Settings
-
Click Start
to display the Start menu.
-
Point to Settings
and then click Control Panel from the submenu.
-
Double-click the Mouse
icon to open the Mouse Properties dialog box.
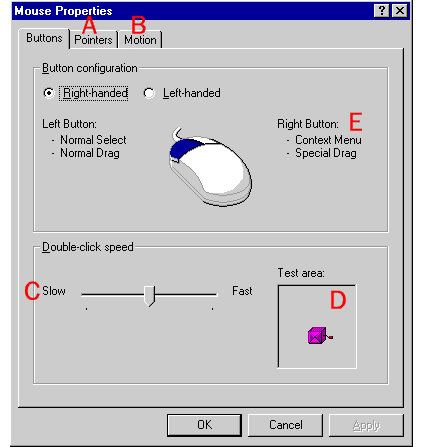
-
A. Pointers tab
-
Change the look of
pointers. Makae them larger for easier visibility.
-
B. Motion tab
-
Show pointer trails
and adjust tracking speed.
-
C. Slider
-
Click on the speed
indicator and, while holding down the mouse button, drag it to the left
or right.
-
D. Test area
-
Handle on the box
demonstrates the double-click speed.
-
E. Button Configuration
-
Change settings for
left-handed users.
-
Click either the Buttons
tab, Pointers tab, or Motion tab. Adjust the settings and
then click Apply.
-
Click OK to
close the dialog box.
Menus and Commands
A menu is a list
of commands or instructions that tell your computer to perform an action
(such as opening a program or saving a document). The main menu associated
with Windows 98 is the Start menu. Most software programs will have
their own menus that you will become familiar with as you use the program.
You will usually find these menus at the top of the program window in an
area called the menu bar. In Windows 98 you will use menus, cascading menus,
submenus, and shortcut menus. The following illustrations show some of
the kinds of menus and their parts.
Click the Start
button the open the Start menu. If an arrow follows a command on
a menu, pointing to that command opens another menu called a cascading
menu.
The following are
descriptions of the commands on the default Start menu:
-
Run - opens
the Run dialog box. You can type in the name of a program, folder,
document, or Internet resource and Windows 98 will open it for you. There
is also a Browse button to help you find what you want to open.
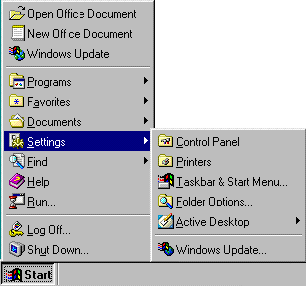
-
Settings -
opens a cascading menu with commands to open the Control Panel folder,
Printers folder, Taskbar Properties dialog box, Folder Options
dialog box, and Active Desktop commands.
-
Documents -
quick access to the last 15 files that you have opened, as well as a shortcut
to the My Documents folder.
-
Favorites -
opens a cascading menu, which helps you quickly access your Web page subscriptions,
Active Channel subscriptions, and My Documents folder.
-
Programs -
opens the Programs menu which contains shortcuts to the software programs
on your computer or that are available on your computer network including
Windows Explorer and the Windows 98 Accessories.
For information about
the Shut Down command, see the beginning of this section. For information
about the Find command and the Help command, see the end
of this section. Depending on what other types of programs you have on
your computer or network, you might have additional commands on the Start
menu.
There are some
other symbols, called indicators, that you will sometimes find on menus.
The following is an illustration of the View menu in Microsoft Word
97 showing the kinds of indicators you will find on program menus.
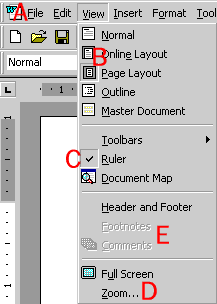
-
A. Menu bar
-
Click on the menu
name to display the menu.
-
B. Button
-
Indicates which of
several related options is selected.
-
C. Checkbox
-
Indicates that a command
is selected.
-
D. Ellipses
-
Indicates that a dialog
box opens and additional information is required before the command is
executed.
-
E. Unavailable
-
Commands that appear
"grayed out" are not available for the task you are doing.
In Windows 98 and
software programs that run on the Windows operating system, there are also
shortcut menus which you open by right-clicking an object or area on the
desktop or in a program window. The commands available on a shortcut menu
depend on the location of the pointer when it is clicked. For example,
the Windows 98 desktop shortcut menu allows you to create shortcuts
and arrange shortcut icons as well as customize your Active Desktop.
Benefiting from
Help and Windows Explorer
Windows 98 includes
several tools to help you find things you need on the computer and an excellent
online Help system that has information for all levels of users, from those
exploring Windows for the first time, to those who need access to detailed
technical support.
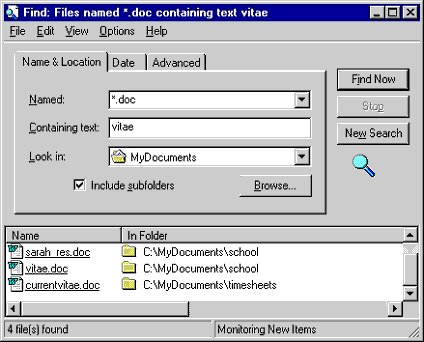
Using Find
If you need a file
or program located on your computer or network, but you cannot remember
its name or location, use the Find File command. Click the Start
button, point to Find, and then click Files or Folders.
When you choose this command from the Start menu, the Find
dialog box opens.
From this dialog
box, you can find the file or program based on several types of search
criteria, such as the file format (type), a partial file name, or words
in a file. The more specific you can make the search, the faster the search
results are displayed. For example, if you know the document you are looking
for is a Microsoft Word document, it contains the word "vitae," and it
is on your computer, you could choose "*.doc" from the dropdown list for
the Named field, type "vitae" in the Containing text field,
and select your hard drive in the Look in field before pressing
Find
Now to start the search. When the search is completed, a list of files
and folders matching your criteria appears in the field at the bottom of
the Find dialog box:
Open the files
or folders in this field by clicking on the file or folder (double-click
if you are using Classic style). You can also right-click the file or folder
for more options, such as printing it (for files), moving or copying it,
or deleting it.
The following options
are also available from the Find command on the Start menu:
-
Computer - search
for another computer on the network by name.
-
On the Internet -
launches the Web browser so that you can search the Internet.
-
Using Microsoft Outlook®
- opens the advanced Find dialogg box for the Microsoft Outlook messaging
and collaboration client. If you use Microsoft Outlook to schedule tasks,
meetings, appointments, and other items, you can search for an Outlook
item from this box.
-
People - opens your
personal address book if available.
Using Help
When you have questions
about Windows 98, you can quickly and easily find the answers in the Windows
98 online help file on the Start menu. Once you have chosen the Help command,
the Help dialog box opens:
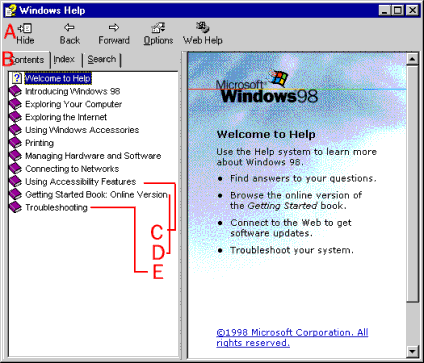
-
A. Toolbar
-
B. Tabs
-
C. Accessibility
information
-
-
D. Getting Started
guide
-
The online version
of the Getting Started guide.
-
E. Troubleshooting
-
Click here to access
the troubleshooting wizards.
In the Help
dialog box, you can search for information using one of three tabs:
-
The Contents
tab - Use this tab to find information as you would in a book's table of
contents. This tab displays Help information that is organized to look
like chapters in a book. Each "chapter" appears with a book icon next to
it. If you click the book icon, the pane displays the subheadings in that
chapter.
-
The Index tab
- Use this tab to find information as yyou would in a book index. As you
type a keyword or part of a keyword, the one in the list that is closest
to what you are typing is highlighted. You can continue typing more of
the keyword to define it more specifically, click the selected keyword
in the list to display it, or click one of the keyword subentries (if they
exist) in the list to display it. If you click a keyword and more than
one topic uses it, a list of the topics appears. When you choose one, its
contents are displayed in the right pane.
-
The Search
tab - Use this tab to search for information on a broad topic.
The Help window also
contains a toolbar with the following buttons:
-
Show/Hide -
shows or hides the left pane of the Help window.
-
Back and Forward
- like the back and forward buttons on the Web style standard toolbar and
the Internet Explorer Web browser, moves back or forward through topics
you have recently visited.
-
Options - a
menu of commands including Refresh, and Print.
-
Web Help -
opens a topic from which you can link to Microsoft's Online Technical Support
Web site.
Another great feature
of the Windows 98 Online Help system is the troubleshooting wizard. Troubleshooting
wizards walk you through a problem you might be having one step at a time
by asking you questions and offering information and possible solutions.
You will find the Troubleshooting Wizards on the Contents tab. Click
on Troubleshooting and then click Windows 98 Troubleshooters
and select from the list of available wizards. The following illustration
shows the first screen of the print troubleshooting wizard.
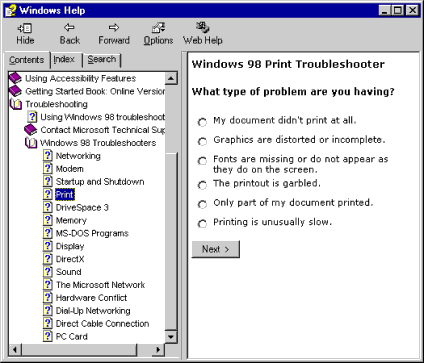
Click on the option
that is most like your situation and then click Next. The wizard
will continue to guide you through troubleshooting your problem and offer
solutions.
Using Windows
Explorer
Windows Explorer
is the comprehensive organization and management tool for Windows 98 files
and folders. Using this tool, you can view all the files and folders on
a selected drive (such as your hard drive, your floppy disk drive, or a
network computer), open the file or folder, move and copy them, rename
them, delete, print, and use files on other locations on the network.
You may want to
display the Windows Explorer icon on your office toolbar or your desktop
for easy access to this tool, which you will probably use often. However,
you can also access Windows Explorer by clicking Start, pointing
to Programs, and clicking Windows Explorer. The following
illustration shows the Exploring window in Web style (the Exploring window
will look slightly different if you are using Classic style). Learn more
about web style and Classic style in the next section.
-
A. Left Pane
-
You see all of the
available drives and folders. If a drive or folder has a plus sign next
to it, it means the drive or folder contains subfolders. Click the plus
sign to display the subfolders..
-
B. Right Pane
-
You see the contents
of the selected drive or folder. This includes all of the subfolders you
can see in the left pane, but it also includes all of the files on that
level of the drive or folder. (Files are not displayed in the left pane.)
With Windows Explorer
it is fast and easy to open, move, create and organize your files and folders.
And with Windows 98 and Microsoft Internet Explorer, you can even browse
the Web from the Exploring window (just click Internet Explorer in the
left pane, your default home page will open in the right pane and the URL
will appear in the Address bar). In the next section, you will learn how
to create folders and organize your files in them. |