Starting PowerPoint 97
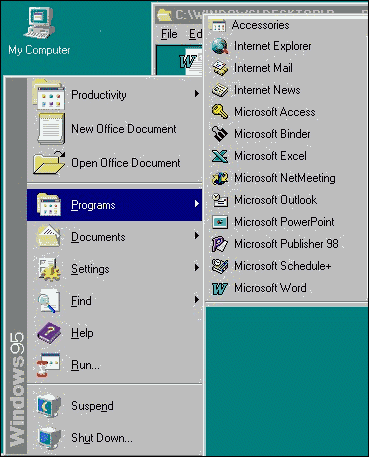
PowerPoint 97 dialog box
When you first open the program, the PowerPoint dialog box presents four ways to create a presentation: AutoContent wizard creates a slide set within the theme you select, Template creates slides from predesigned slide sets for standard presentations, Blank presentation creates slides that you design from scratch, and Open an existing presentation allows you to modify a presentation that you or someone else has already created.
Starting a presentation from the PowerPoint start-up window
 Using
Office Assistant
Using
Office Assistant
Microsoft PowerPoint in Office 97 has an Office Assistant that can answer your questions and give tips to help you improve your productivity. Wherever you are doing your task, your Office Assistant is available. Use it to learn more about and to discover faster and easier ways to use PowerPoint 97.
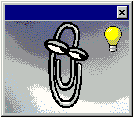
When you first install PowerPoint 97, Office Assistant looks like an expressive paper clip looking over your work.
Note The Office Assistant light bulb signals a tip about how a PowerPoint 97 feature could help you perform your current task.
Working with Office Assistant options
Before you begin this lesson, make sure you are in a new PowerPoint 97 presentation. If your Office Assistant is not visible, click the question mark button on the Standard toolbar, and Office Assistant appears.
Presetting topics for assistance
Asking a specific question

Although the paper clip is the default image for Office Assistant in PowerPoint 97, you can choose other images as your Assistant. There is a cat, a bouncing ball, a kindly genius, and several others.
Choosing a different image
You can create a new presentation at any time even if you have others open. You can use a wizard or template when you create a new presentation to save time. Wizards help you design meeting planners, project updates, personal home pages, and other presentations. You can also select from more than 25 presentation styles.
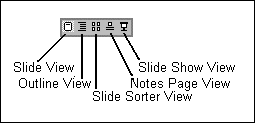
Viewing Presentations
There are five
different ways to view your presentations in PowerPoint. As you become
familiar with the PowerPoint 97 views, you can customize the menus and
add buttons to the toolbar to make it even easier and quicker to create
presentations. The views are accessed by buttons (shown below) , which
are located in the lower-left corner of your screen.
Creating a title slide
Using templates to create presentations in PowerPoint 97 saves time. You can create a series of slides or presentations with a common look, or you can create different designs to distinguish one set of concepts from another.
Using the AutoContent Wizard
The AutoContent Wizard is an easy-to-use wizard that helps you create a presentation by leading you through some basic questions. From your answers to the questions, PowerPoint 97 selects the best style and built-in outline to suit your presentation. The wizard asks you to respond to questions and then uses your answers to automatically lay out and format your presentation.
Note The AutoContent Wizard has many different types of presentations and options. After you complete the lesson, experiment with different types to see what you like best.
Using the AutoContent Wizard to create a presentation
Note If you exit the wizard before you finish creating your presentation, you will not be able to save your work.
Note
Each presentation is numbered consecutively until it is saved with a specific
name. The x used at above is a placeholder because the number will vary
from user to user.
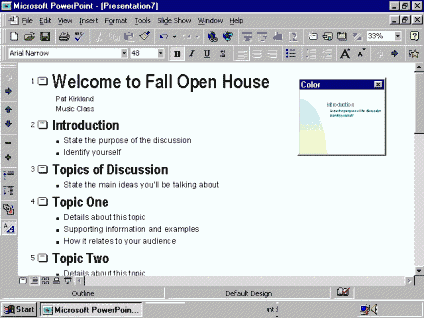
Creating and editing slides
Editing and creating slides in PowerPoint 97 is easy. PowerPoint 97 identifies the slide areas that you can fill by placing sample text in them.
Creating a slide
Note
Press Backspace to delete text in front of the insertion point.
Press Delete
to delete text after the insertion point.
Editing a slide
PowerPoint 97 provides several ways to create and view slides within your presentation. You can create master slide styles or default slide formats. The formats include bullets, two columns, tables, charts, clip art, and blank slides. These formats make it easy to quickly make slides that support your classroom instruction.
Creating a new slide from the menu bar
When you create a presentation you must save your work in a logical place on the computer. Just like filing a document in a file drawer, storing a computer document requires some attention to how you name it and where you place it, in order for you to be able to find it again. Once you have saved the presentation, the file name is displayed in the blue title bar at the top of the presentation. Saving files can be accomplished in many ways. If you forget to save, don't worry: Office Assistant will remind you.
Saving for the first time
When you save the file for the first time, you should name the file as descriptively, but as briefly, as possible. Sometimes, you will want to name it as a particular version or as a type of presentation (i.e., Fall Open House or Technology Grant).
Note Be sure to save to a location that makes sense and is easy to find.
Saving a new document
Saving to a different location
Saving with a different name or to a different folder or disk drive
Press enter to save the file.
Unless you specify otherwise, the program saves all files to a default folder on your computer called My Documents.
Saving your document as another file type
If you are saving your document to share with others who may have a version of PowerPoint that is different from yours or other kinds of presentation software or files, you may need to select a different file type. By saving your file as a specific type, you make it possible for others to read and download your presentation on their computer systems and software.
Saving to other PowerPoint file types
You may want to save your presentation in a different file type. Using PowerPoint 97 you can create a slide show presentation and present it on a computer that does not have PowerPoint installed. With the Pack and Go Wizard, you can take the presentation on a disk and run the slide show using only the PowerPoint viewer (instead of the entire software program) that the wizard copies on your disk or laptop computer.
Saving to earlier versions of PowerPoint
If you want to share a file with someone who has different presentation software or transfer the file to another computer that has different software, you can save your presentation in the file format used by another program.
Saving to another presentation program
PowerPoint 97 offers several print options to help you prepare your presentation. Using PowerPoint 97, you can print transparencies, slides, handouts, and notes to support your lessons.
Note When you print transparencies, make sure that film appropriate to your printer type is in the paper tray.
Printing presentation slides
You can print other
types of presentation output using the Print what list. Handouts
print two, three, or six slides per page. You may use Handouts to
provide an outline of your presentation to your class. Notes pages
print one slide per page and have room for your presentation notes. Outline
view allows you to print the outline you used to develop your presentation.
There are several ways to quit PowerPoint 97. Always follow proper procedures. All Office 97 applications prompt you to save changes if you try to quit a program with unsaved documents.
Note Always quit the program before you turn off your computer.
Quitting PowerPoint 97 with the Standard toolbar
Quitting PowerPoint 97 on the Standard toolbar
