 |
|
|
|
|
|
|
|
|
|
|
|
|
|
|
|
|
|
|
|
|
|
|
|
|
|
|
|
|
|
|
|
|
|
|
|
|
|
|
|
|
|
|
|
|
|
|
|
|
|
|
Introduction: |
|
|
|
Welcome to Reds ship texture modding for Freelancer. I will try to make this as simple as possible and easy to follow. Now before we start modding there are files required to do this (see below). In this we will be changing the Eagle standard skin into a Brentonian skin. |
|
|
|
Required files: |
|
|
|
Freelancer |
|
|
|
Photoshop 5.0,6.0,7.0 or 8.0 Home page here |
|
|
|
HCL's Freelancer UTF Editor, Included with tutorial |
|
|
|
NVIDIA's DDS.8di.dds Plug in for Photoshop ( Included Thanks to Kasdia ) Download here. |
|
|
|
NVIDIA's normal map filter plug in ( Included Thanks to Kasdia ) Download here. |
|
|
|
Some Experience with Photoshop maybe useful. |
|
|
|
Ok lets get started, Place the two plug-in files into there respectful places. |
|
|
|
 |
|
|
|
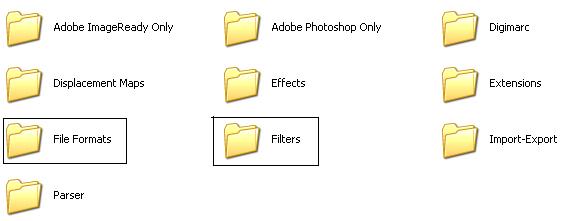
Place the DDS.8di.dds into the Filters folder and the Map filter into the File Format folder, you can find the plug in directory at file:///C:/Program Files/Adobe/Photoshop CS/Plug-Ins/Adobe Photoshop Only (Link is for version 8.0) |
|
|
|
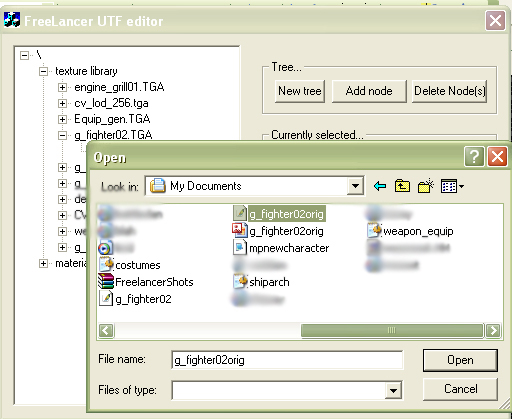
Ok, First thing first, Open up the Freelancer UTF editor and find the cv-Ships in the civilian folder in the freelancer directory. Don't Forget to back up any files you edit during this process! Otherwise your going to have to reinstall the game to get that file back. |
|
|
|
 |
|
|
|
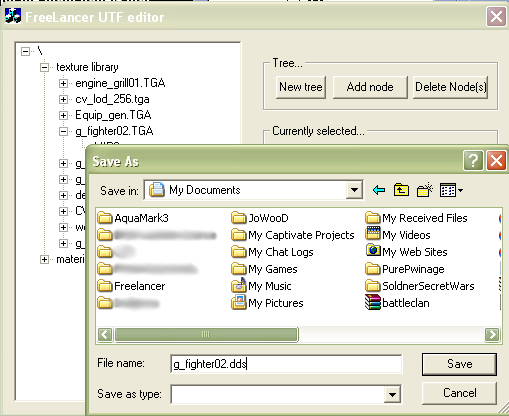
Double click on cv_ships or hit the open button, it will then load into UTF. Click on the first branch to open up too two Sub branches. They are called Texture Library and Material Library. Open up the Texture Library and look for g_fighter02.tga. When you have found it open up the sub branch to find MIPS. Click on MIPS and click the Export button. |
|
|
|
 |
|
|
|
When Clicking Export it will come up with a 'Save As' window. Give the MIPS file a name, It can be anything so long as you remember it! Also Remember to put the extension .dds after the name as .dds doesn't exist as a type so manual input is a must. After all that's done Click Save. |
|
|
|
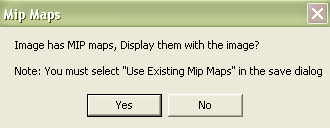
When you have located where you have saved that file open it up with Photoshop, You should receive a question from Photoshop asking you to display MIP maps with the image, Select Yes. |
|
|
|
 |
|
|
|
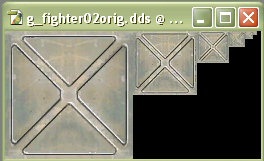
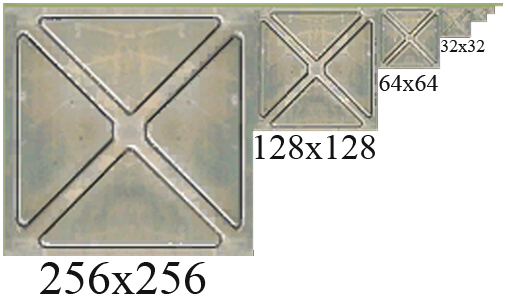
The following Texture should load. |
|
|
|
 |
|
|
|
Now we can edit the files :) |
|
|
|
You will notice that the texture on the far left is very large then it does a staircase effect and gets smaller as it goes to the right. These are different resolutions used through out freelancer. It depends on what angle you are looking at your ship and various other points. The first Texture is 256x256, the next one down is 128x128 then 64x64 then 32x32 and so on. |
|
|
|
 |
|
|
|
There is two ways you can go from here. You can Either Make/Edit the texture you have on now or get a different texture from another ship. I will show both ways here. It is very important at which resolution you make the texture at. It's wise to make it at 256x256 but when saving we can fix this anyway. Just remember what resolution you made it at! |
|
|
|
Ok, for those who want to edit a texture this is your part, If your looking to get one from somewhere else, that part is below. |
|
|
|
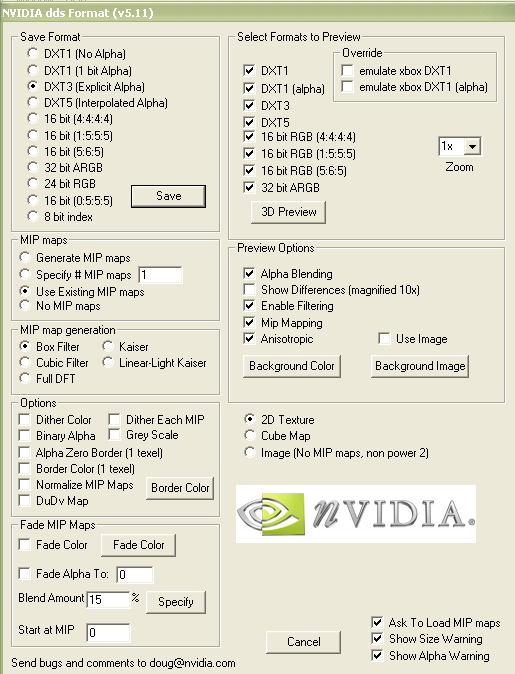
The save tutorial: After making your texture you have to save it in Photoshop. Open the texture in Photoshop and Click save as. Give your texture a name and Remember it. Scroll down in the file type menu and look for DDS. Hit save after locating it. A box will pop up. |
|
|
|
 |
|
|
|
Ok it looks complicated, you should be fine if you do the following: |
|
|
|
Under the MIP maps section make sure the ' Use # MIP maps' is highlighted. Now this is where I wanted you to remember what resolution the texture was made at. If you made it at 256x256 change the 1 in that box to 6. If you made it at 128x128 change it to 5. and etc. Under save format make sure it is set on DXT3 and all shall be fine. |
|
|
|
 |
|
|
|
Ok, now to import the texture. Locate the Cv_ships file and open the g_fighter02 sub branch to find the MIPS file Click on it and hit import then find the texture you have just finished making and highlight it. |
|
|
|
 |
|
|
|
Then hit the open button. It will load that texture as the Eagles Texture. Now this is where we save it. Click on save file and locate the Cv_Ships file and save it. now when you play the game you will now see that texture on all Eagles. Note: Works on Multiplayer but only you can see the Skin. Please obey all server rules as some servers do not allow customised skin Why I don't know, There just being mean :P |
|
|
|
For those looking to 'Cross Breed' Ships. In this part ill show you how to use another ships texture and put it on the Eagle. |
|
|
|
Open UTF editor. For this I'm going to put a Rhineland skin on my Eagle. First open up Rh_Playerships in the Rhineland ships folder, If you notice there is also a capital ship one, fell free to mess around with it later on. Open up the texture library and Select a Rhineland ship and extract the MIPS just like the way you did before. Export it and give it a name, Remember to put .dds after it! Open up Cv_ships again and open the sub branch on g_fighter02 to find the MIPS file. Click on import and import the Rhineland texture, Hit save file and save it as the cv_ships file. The Eagle will now have the Rhineland look to it. |
|
|
|
Ok start her up Steve and have a look at your creation. You have now just finished making your very own textures for Freelancer! You will also notice any player ships and AI ships that will use the Eagle will also have your customised skin. This applies for every ship you modify in Freelancer. |
|
|
|
All the Crappy Copy write stuff. |
|
|
|
Fell free to host this somewhere if you would like too. Just make sure you leave it intact and as is Please do not paste those pictures into another Tutorial with out asking me first. |
|
|
|
Freelancer is a copy write to Microsoft and Digital anvil. |
|
|
|
Copy write Redhaze 2005. Email me , I accept praises and thanks. I Don't accept winging and complainers. Use that email as well to get a hold of the web based version of the Tutorial. |
|
|
|
And Thanks too the people using this Tutorial. |
|
|
|
And Also thanks to Kasdia for the Photoshop Files. |
|