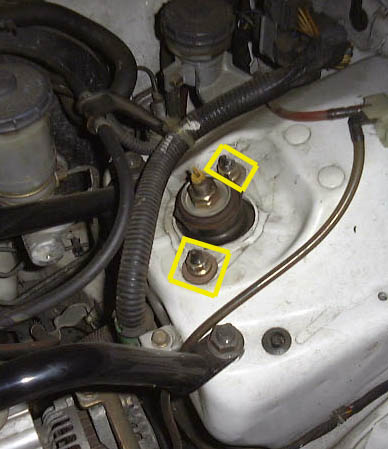
| 1. With vehicle on ground, pop the hood and loosen (not remove) the 2 bolts in picture "A". These are attatched to the top of the shock assembly. 2. Jack up front of car, and remove tire which is on same side as bolts you loosened. 3. Refer to picture "B" here. You need to remove the brake line which is attatched to the shock housing / base via the bolt in the picture. You also need to remove the other bolt pictured. This will allow you pull off the arm which is holding the base of the shock (so go ahead and do that now, just pull hard downward on the arm, and up on the shock, you will be able to separate them). 4. Fully remove the 3 bolts you loosened in step #1. Be careful and hold the shock from inside the wheel well, as these 3 bolts are all that are keeping it from falling to the ground (why I said losen only). You are now ready for the hard part! 5. Take your spring compressor and put it on the springs (far apart, so you compress the extreme top and bottom of the spring...maybe 2nd coil in on either side). **If you have a compressor like the one I described, you should have 2, one for each side. By only putting a compressor on one side of the spring, you will not get anywhere, as it will be lopsided (a pain in the @ss). You will see the springs are very solid, and can't be moved, so compress the springs until they become lose in the shock housing (so you can move them back and forth). 6. At this point you will need to remove the top nut on the shock. This is where you may need the miscellaneous items I wrote about. If you are lucky, you can just twist the nut off, and remove the top layers of the shock (bump stop, etc.). If not, then spray the hell out of it first and let it set. It may just spin, and this REALLY sucks. If so, then get the screwdriver, and slam it into the top of the nut (hammer it into it, so it sticks). Now, holding the screwdriver (so it doesn't spin), twist the nut off (you may need to use visegrips here too). 7. At this point, what you do depends on what you are installing. If you are just installing new shocks, then leave the springs compressed, and just swap shocks, reversing the process above and you are done (see #9 now). If you are installing springs, or shocks and springs (your best option) then you need to remove the compressors now (so continue on). 8. Take your aftermarket springs, and put them in to the shock housing before you even waste your time compressing them (you may not have to). Put the top parts of the shock back on, and if you can screw everything back on, then you are basically done, cause the spring is short enough to not compress it. But if you can't screw it on, then compress the springs, and put them back together. 9. Reverse the process from here on out, shove the 2 bolts through the bottom of the car, and screw them on losely, and continue (make sure the side the brake line connects to is lined up correctly!). Ok, you can handle the rest, so let me contine with the back of the car. 10. (coming soon!) |
| **You will want to buy/rent a spring compressor before doing this, otherwise you can potentially get hurt in the process of removing the "very tightly" compressed springs (they will shoot out fast when there are no bolts holding them on the shock). This is nothing fancy, simpily a metal rod with groves which house 2 metal "holders" that screw down, towards each other (in turn, compressing the spring). I take no responsibility for injury. I will list the best way to remove the springs without a compressor as well, but I don't recommend it. **A car jack and tire iron. **A metric socket set (mainly 2 sizes of which I have forgotten, used almost exclusively). **Possibly some wd-40, a screwdriver, hammer, rust remover (depends how old car is). |
 |
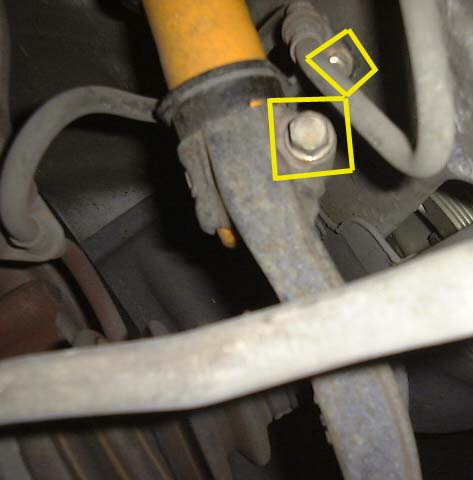 |
| Photo "B" (base of shock) |
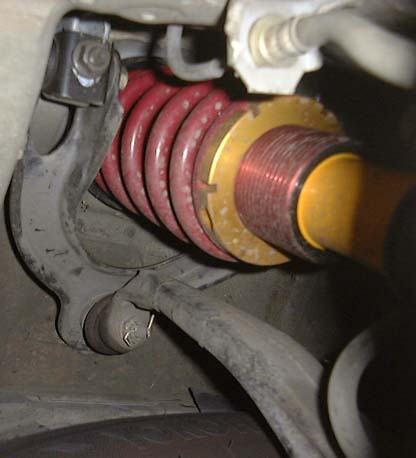
| Koni Yellow shock w/ GC coilover |
| Photo "A" (engine bay, upper strut) |
 |