One of the fins
I won an Estes Honest John kit at NYPOWER 2001.
It
sat on the shelf for a long time and I finaly got around to opening the
box.
I knew I would want to build it with dual deployment so I started
redesigning it.
I decided to put a 54mm mount in it, because it would fit.
That was when I
decided to run the 54mm mount all the way to the NC, I didn't like the way the
middle of the NC fit so I wanted the inside tube to strenghen it.
In looking
at it there was not going to be enough space in the 54mm tube for the chute so I
used a piece of 2.5in tube in the NC section.
I also wanted to use an
altimeter technique I saw once where you use a long coupler with a cutout in the
middle to access the electronics.
Here is the design I settled on.
Basic design(PDF file)
Construction Details
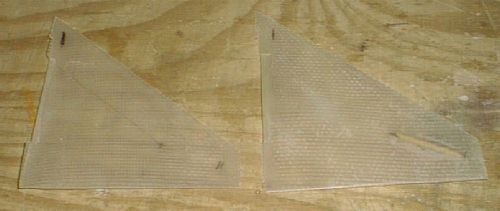
I do not like the plastic fins that come with this kit.
I thought about replacing them with Plywood fins but wanted to keep the airfoil
shape.
I also thought about glassing the outside of the fins to keep the
shape.
Thats when it hit me, glass the inside of the plastic forms using
them as
a mold and peal the glass out.
The fins come as two sheets with 4 halves on each sheet.
I put mold
release on the sheet, actually just used white glue as a mold release, and put a
single layer of fiberglass on it.
The glass would not lay down in the sharp
corners of the fins so I mixed some glass fibers into the epoxy and put this
into the corners so there would be no air bubbles.
It worked great, I pealed the glass out of the form the next morning, I
should have let it cure more because it was soft. I clamped it down to a piece
of wood and stuck it in the toaster oven for an hour to cure(If you cure epoxy
in a toaster oven, do not ever use it for food).
The second batch I didn't
even put the mold release in, the plastic was plenty smooth.
One of the fins
I cut each fin form out of the sheet and marked the halves so I knew which
two were paired together.
I then figured out how much space there was inside
the fins and made a shim for the fin tip that would keep the shape.
I needed a tab that would go to the MMT so I cut 3/16in ply into a triangle so it would go into the fin, I cut the root edge of the fin so the plywood would go into the fin as far as it could.
I glued these to the MMT and secured them with Kevlar cloth.
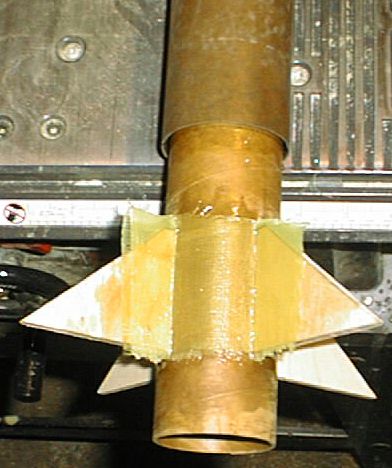
Fins with Kevlar
Fincan
Because it was an Estes BT I decided to glass it with 2oz fiberglass.

Glassing Estes tube
I cut the CR's from 1/8in plywood. I wasted alot of wood cutting these with the flycutter because the rings were just over 1/8in wide so the fly cutter would shatter them when cutting the center hole out.
I thought I would be slick and use Kevlar for the CR's since it was exactly
the correct thickness.
You can see it here glued to the MMT.

Kevlar rings
You can also see the recovery harness attachment point and the recovery harness sticking out of the MMT.
The Body tube slipped over nicley, and I thought it was going to work
perfectly. But once I glued the body tube on, I realized it wasn't round
anymore. Because it was a flimsy Estes tube, where the kevlar ends met it bulged
a bit so the tube is slightly oval.
Ahh, live and learn.
Because I was going to be cutting slots in the tailcone I was afraid it would
just split when I went to install it.
So I glassed the inside of the tailcone with 6oz
fiberglass. I inflated a balloon inside it once the glass
was in place.

Boattail Glassed
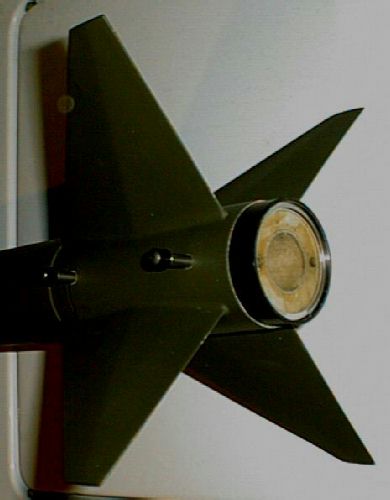
I cut had to slot the boat tail for the fins from the top because
I glued the BT on first.
In this shot you can see the lines where it was
cut.
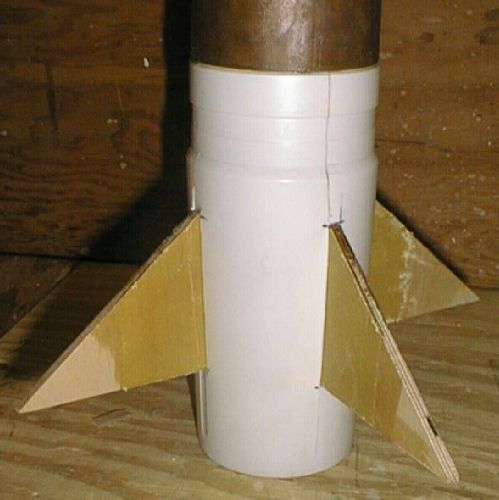
Fins with Kevlar
From the top you can see there is very little space between the
MMT and BT.
And yes the 5/8 Kevlar was overkill, but it was all I had.

Top view of fincan
Nose cone
I had some special concerns for the NC on this rocket. I was going to have it
seperate at the point that is normally glued together.
The lip on this
section is too small to hold it together so I needed to have a BT/coupler inside
to actually hold it together.
I was going to use a 54mm tube but realized that there wouldn't be enough room so I decided to use a 2.5in phenolic tube I had since it would fit. The problem was that I did not have a coupler for it. I found I had a tube that fit the outside of the phenolic tube, but it was thin walled so I , of course, glassed the inside of this tube.

Glassing tube
This tube would be glued inside the forward part of the nosecone. I decided to use another length of tubular Kevlar as the attachment point.
I cut a hole in the side of this tube for the Kevlar to feed through so I
could glue it to the outside of the tube.
I then frayed the end of the Kevlar
so the epoxy could soak in.

Kevlar Frayed

Ready to be glued
I then applied epoxy and covered with wax paper and wrapped with tape.

Glued down
Electronics bay
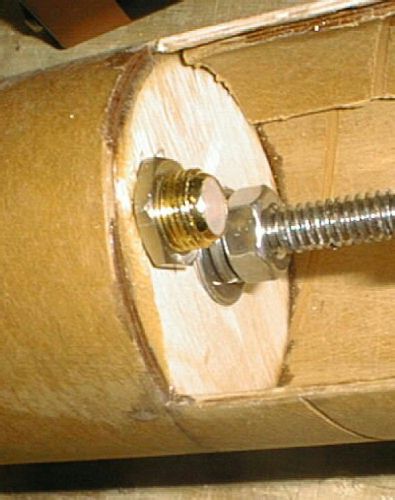
I formed the electronics bay with a long coupler and two bulk plates.

Ebay
The spacing between the bulkplates was perfect to allow a threaded rod
coupler to tie the bulk plates together. I could even fit a 9V if needed.
I used a push on/off switch for the electronics.

Because one of the bulk plates is so far in the tube I could not
put a terminal block on the bulk plate.
I decided to use a feedthrough made
from a coax connector.
Feedthrough
Mounted
I will drill out the connector to feed the ematch leads through and seal with either hotmelt glue or clay. This will ensure that its sealed well.
The bay is inside a 54mm coupler tube and 2 3/8in long so there wasn't
much room for an altimeter.
I installed a PICO altimeter and made a custom
2.4V NiCd cell for it.
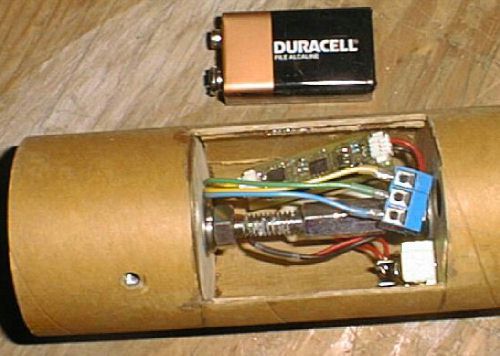
E-bay loaded
And here is a breakdown of the parts:

E-bay detail
I also needed a way to charge the battery so I made a charge adaptor so I could use my current charger.
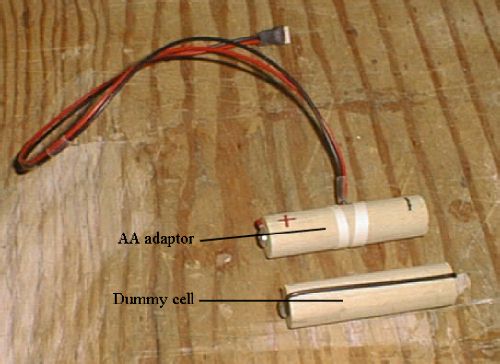
Charger adaptor
When assembled you can see the power switch through the vent hole
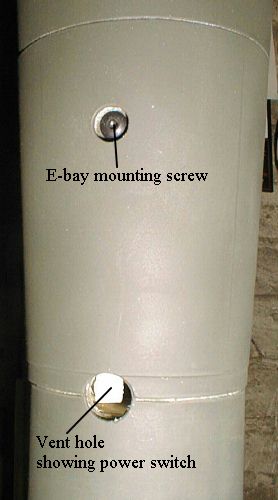
Vent hole showing switch
Rail guides
I had to come up with a good way to mount rail guides.
They had
to be on standoffs so they could clear the nose cone.
Mc Master to the
rescue. I got a couple 3/4in round stand offs. They are 1/4inOD with a 8-32
thread.
I drilled a 1/4in hole through the skin of the fincan so I could glue
right to the MMT.
I glued them in place with JB weld.
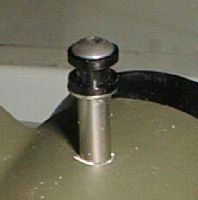
Rail guide closeup
Motor retention
I installed a slim line motor retainer to hold the motor in.
I also have a 29->54mm motor adaptor so I can fly on smaller motors.
I simmed a G80 to 750'.
Showing motor adaptor
Finishing
I primed in my usual manner with Rustoleum clean metal primer and sanded it.
I finished with Krylon Camouflage ultra flat olive drab(#8143).
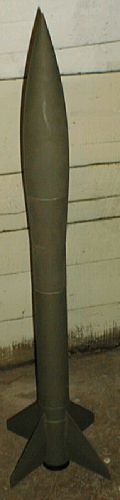
Finished