
Making a lucet from moose
antler
by Hjordis Olvirsdottir
"Why?" you ask? Well, why not? Follow along and watch me learn by doing...
 It began when
I went to a social meeting for a local shire, and one of the folks there
had a
lucet she
was working with. I'd seen them before - Sigrun has one and I've watched
her make a bit of cord with it. But for some reason, it really caught
my attention this time. I think it's because as soon as I saw the lucet
at the social, I thought of a picture I'd recently
seen...
It began when
I went to a social meeting for a local shire, and one of the folks there
had a
lucet she
was working with. I'd seen them before - Sigrun has one and I've watched
her make a bit of cord with it. But for some reason, it really caught
my attention this time. I think it's because as soon as I saw the lucet
at the social, I thought of a picture I'd recently
seen...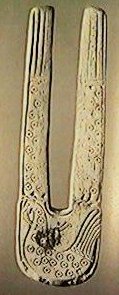
To the left is a picture from the book "The Vikings" book by James Graham-Campbell and Dafydd Kidd, and it's plate number 25. It is identified in the book as a "whalebone line-winder" and the text on the page refers to it because "being known that Vikings did line fishing because of the line-winders which had been found" (paraphrased).
Well... that line winder looks pretty darn similar to a lucet, to me.
When I got home from the social, I went into my craft room and started digging around. Sure enough, I found a chunk of moose antler that Hoskuld had given me a while back, and there was a portion of the antler which I thought might do as a lucet. I've never made anything with antler or bone, but... how hard could it be?
I got to work.
 The first thing
I discovered was that cutting into antler makes a lot of dust. If you
decide to work with bone, horn, or antler, make sure you wear a breathing
mask! The second thing I discovered was that the smell of cutting antler
is very reminiscent of having your teeth drilled on by the dentist. Ick.
I got used to it after a while, but not to the point of not noticing
it anymore. I understand that working with bone can be even nastier.
The first thing
I discovered was that cutting into antler makes a lot of dust. If you
decide to work with bone, horn, or antler, make sure you wear a breathing
mask! The second thing I discovered was that the smell of cutting antler
is very reminiscent of having your teeth drilled on by the dentist. Ick.
I got used to it after a while, but not to the point of not noticing
it anymore. I understand that working with bone can be even nastier.
I used a hacksaw to cut the portion I wanted to use from the antler. I'm thinking of using the lower portion of the horn, the round part, to make a needle case. We'll see how this first project goes, first.
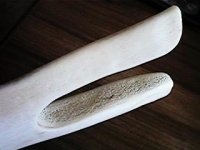
 Once I'd cut
it off, it became apparent (remember, I'd never done any work like this before)
that the antler was made up of different layers of material. The outside
parts are much harder, and the inner parts are more porous. In the
picture to the left, you can see the holes where the antler was supplied
nourishment by blood vessels.
Once I'd cut
it off, it became apparent (remember, I'd never done any work like this before)
that the antler was made up of different layers of material. The outside
parts are much harder, and the inner parts are more porous. In the
picture to the left, you can see the holes where the antler was supplied
nourishment by blood vessels.
I was a bit worried that the inner parts of the antler would not be strong enough for me to work with. But since I was already so far into the project, I decided to forge ahead, and did.
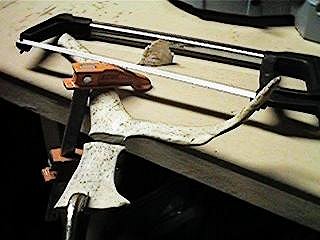
I used a pencil to draw the shape I wanted for the lucet onto the antler's
surface. Then I clamped the antler to the work table, placing a towel
between the clamp and the antler to protect the antler's surface, and, again
using the hacksaw, made two cuts down to where the lower circular portion
of the excised area would
be.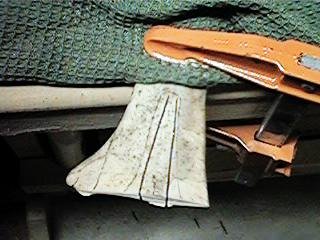
You know, that hacksaw didn't cut nearly as straight as I wanted it to.
But it was close enough. I was making these methods up as I went along, and it was so far, so good.
Once I got to this point, I faced a quandary. I realized that I didn't want to try to break that piece off. Doing so could "rip" a portion of the antler's surface away in a manner that would ruin the lucet's shape.
Steingrim came the rescue by suggesting using the drill. Of course!
Carefully standing above the antler piece, I drilled straight down.
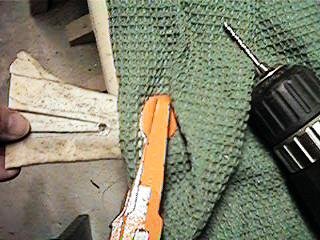 A couple
of holes later, I was able to pull the cut piece away from the larger one.
A couple
of holes later, I was able to pull the cut piece away from the larger one.
(I took that piece, by the way, and separated its halves apart, and might
try to make needles from it. I've read that antler for needles is not
as 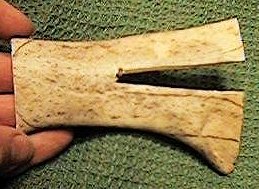 good as
bone, but since I have them anyhow I'll give it a shot.)
good as
bone, but since I have them anyhow I'll give it a shot.)
Okay, once I got that piece out, then it was time to begin some carving. Now, I could try to fool you and insist that I used a file to whittle away at those parts that needed removing... but the truth is that I used a Dremel. I thought about using a file, I really did. But as there's an upcoming event in just a couple days that I want to take my lucet to, I decided to do it the "easy way." Well, easier, at least.
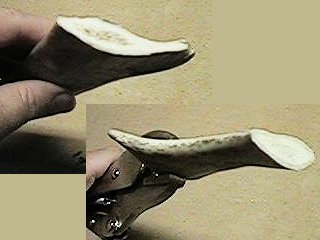
 After much noisy
work later (I wonder if my neighbors think I'm an amateur dentist?), I had
cut away all the bits I didn't want. I smoothed away some of the rougher
areas - parts of the antler which had "ripped" away from the surface. And
this is what I ended up with (left).
After much noisy
work later (I wonder if my neighbors think I'm an amateur dentist?), I had
cut away all the bits I didn't want. I smoothed away some of the rougher
areas - parts of the antler which had "ripped" away from the surface. And
this is what I ended up with (left).
Most of the reverse side had the grey, grainy antler texture, and I considered whether or not I should leave the colors as they were. However, since I'd had to strip away part of the surface on the right prong while cutting away the extra material, that part of the antler was a nice, ivory white.
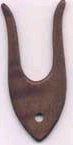
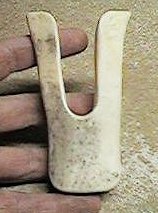
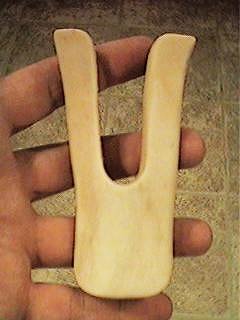 I decided to
go ahead and remove the grey coloring from the entire piece. It took
a bit of careful work (and more dentist noises late into the night), but
here is how it turned out with the coloring removed. I must say, it's
quite pleasing this way!
I decided to
go ahead and remove the grey coloring from the entire piece. It took
a bit of careful work (and more dentist noises late into the night), but
here is how it turned out with the coloring removed. I must say, it's
quite pleasing this way!
Now I get to tell you about the drawbacks of using a thick antler for this
rather than getting myself a large, flat bone.
 Remember
the "porous" bits of the inside of the antler? They're still there,
softer than the outside layer. After taking off the grey coloring and
sanding it smooth, I realized I probably shouldn't go any further with the
work until I find out more about sealing the antler, especially those inner
bits. That's one big benefit the Vikings had of having whale bone to
work with - the hard outer layer would be much thicker and they could simply
not use any of the porous parts. (Not that I want to go out and kill
myself a whale, mind you. No, not ever, not on purpose. If I
had bone from a deceased, beached whale, that might be different.)
Remember
the "porous" bits of the inside of the antler? They're still there,
softer than the outside layer. After taking off the grey coloring and
sanding it smooth, I realized I probably shouldn't go any further with the
work until I find out more about sealing the antler, especially those inner
bits. That's one big benefit the Vikings had of having whale bone to
work with - the hard outer layer would be much thicker and they could simply
not use any of the porous parts. (Not that I want to go out and kill
myself a whale, mind you. No, not ever, not on purpose. If I
had bone from a deceased, beached whale, that might be different.)
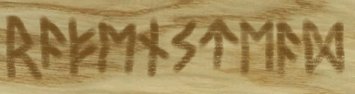
So that's where I am right now. Almost done with the majority of the work. What's left is to seal the surface and to carve in the decorations. I hope to approximate the carved decorations from the Viking "line-winder" on my lucet - wish me luck!
When it's complete, I'll give you an update...
--Hjordis
7/12/2001
Email to: Ravenstead Household
Back to main page...
The Ravenstead household is dedicated to studying the arts and sciences of the Norse culture during the “Viking Era” (700-1066 AD) and re-enacting the lifestyle of that era in our encampments.