Steven's Dreamcast Info
(How we fixed our Dreamcast)
Long before we got our X-Box, we had a Dreamcast. We didn't have a lot of games, but we enjoyed the games we had. Mom loved to play Hydro Thunder; Dad's favorite was Tokyo Extreme Racer; my sister, Rachel loves Space Channel 5 and we all went crazy playing Crazy Taxi...
Then one day, the DC stopped working... we put in a game and the DC would boot up to the menu screen and then just sit there. The DC could not read the disc. We tried different games, making sure that the discs were as clean as possible. We cleaned the laser with a Q-tip. That was the extent of our knowledge, so the DC sat, gathering dust, until we finally put it in a box and put it away in the closet.
Then, one day, when Dad was looking up some X-Box information on the Internet, he found a little post in a gamer's newsgroup about someone who adjusted his Dreamcast's laser to get his system working. I had my friend's DC, because he thought he had a bad motor and I was going to swap them out... anyway, we had both DCs on a towel on the kitchen table and started opening them up, and tried to make sense of all the different procedures and GOT BOTH OF THEM WORKING!!
Standard Disclaimer: The author provides this information freely and without reservation. This information is my compilation and interpretation of various other information and sources on the Internet. How you use this information is not the responsibility of the author, meaning if you totally mess up your Dreamcast, don't blame me.
METHOD 1 - Here's our procedure:
Click on thumbnail picture to get a better view
1. For safety, Unplug all power cord, video and game controller cables. Never work on your DC with power connected!

2. With the DC turned over, remove the modem. There's one screw underneath the modem!
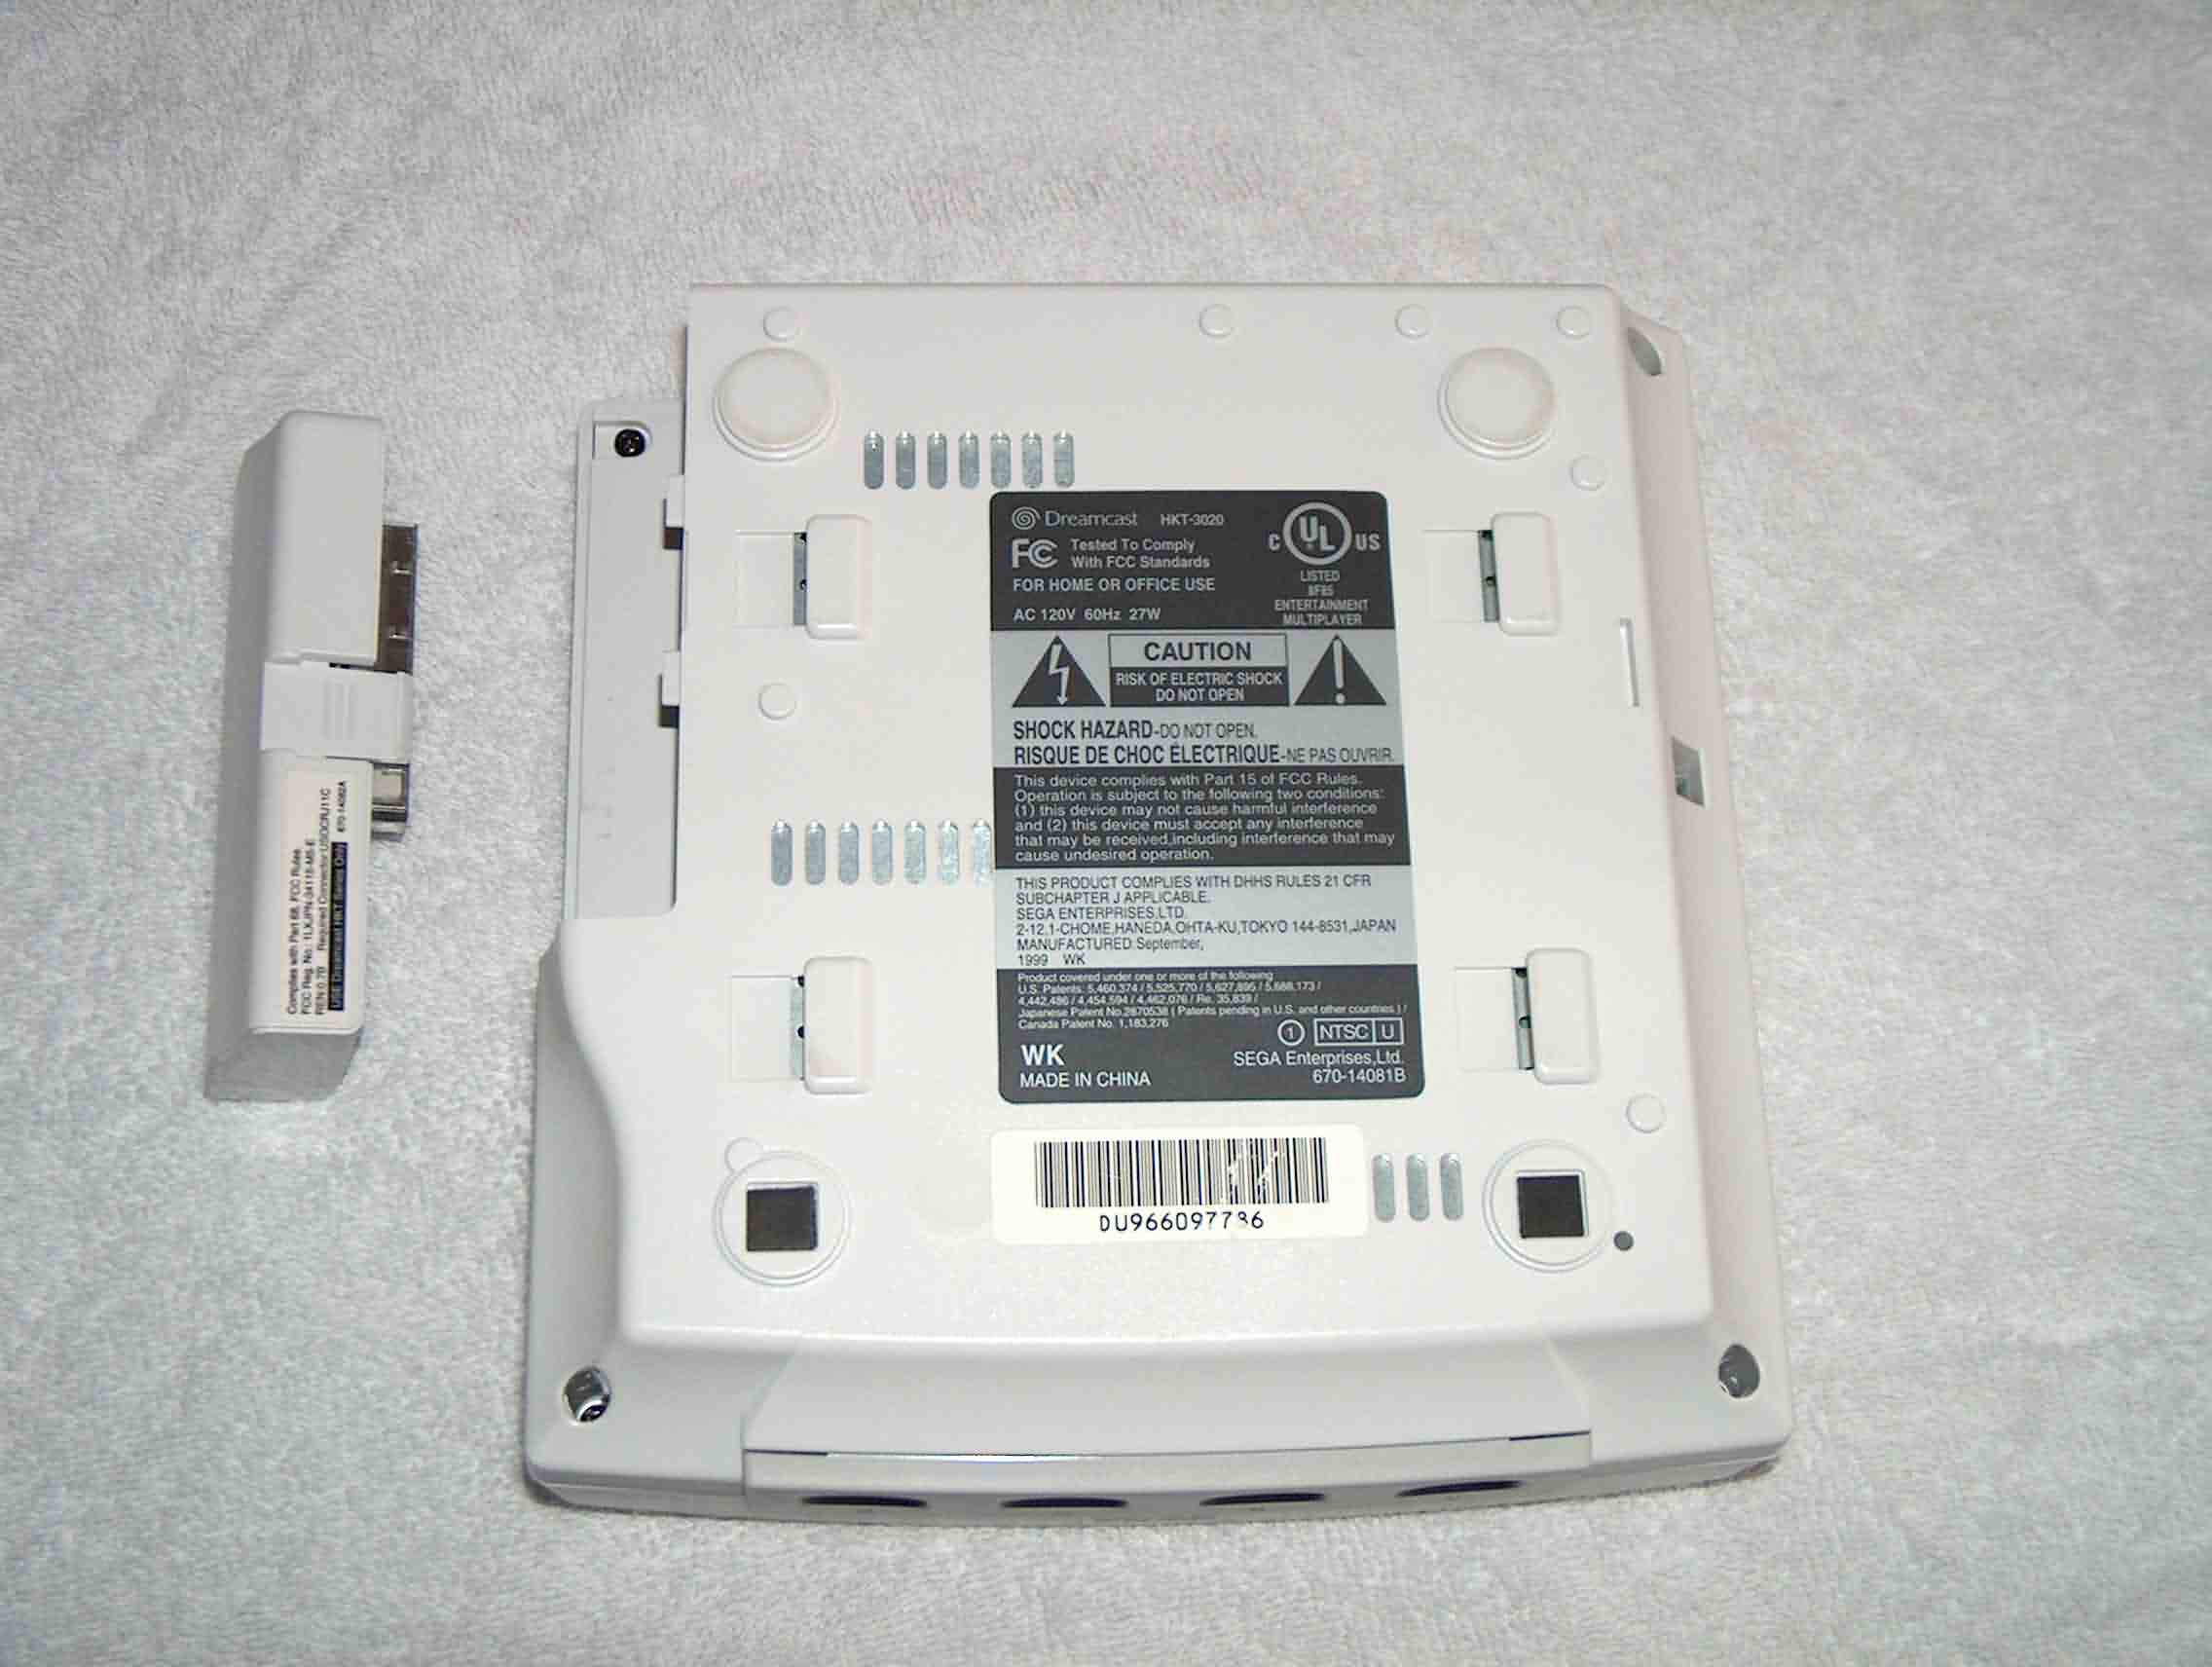
3. With the modem removed, remove the four screws at the corners
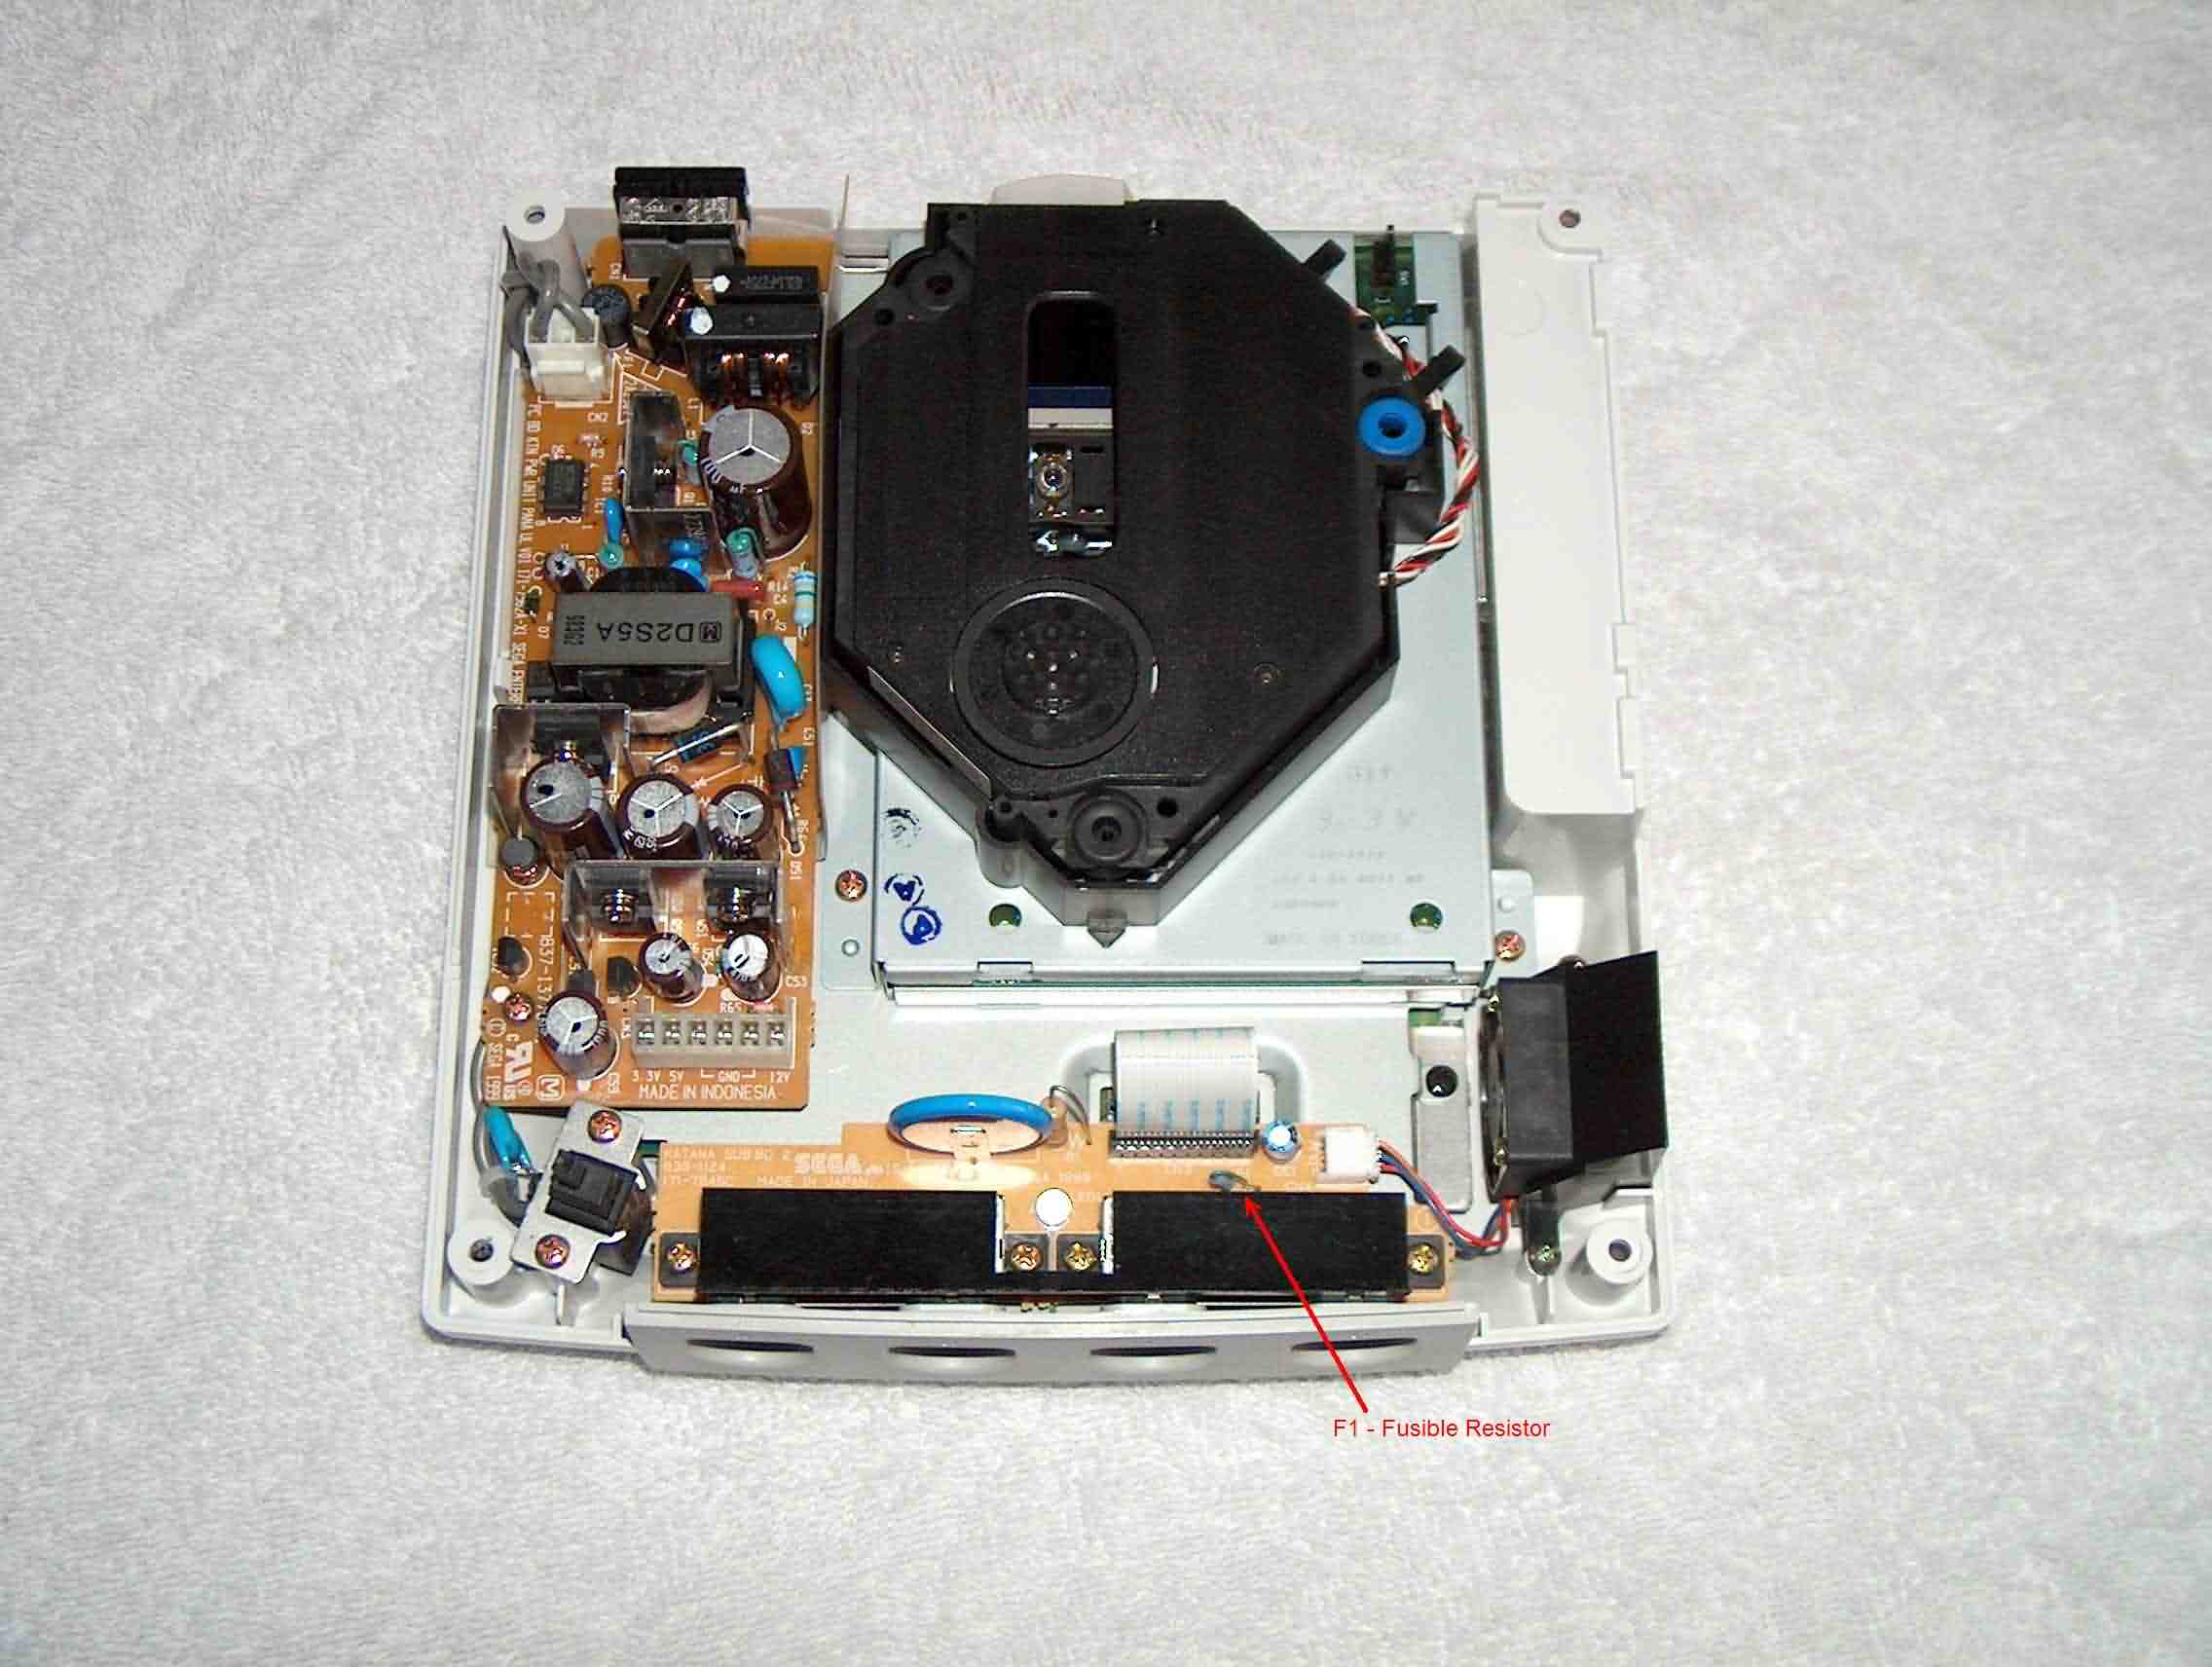
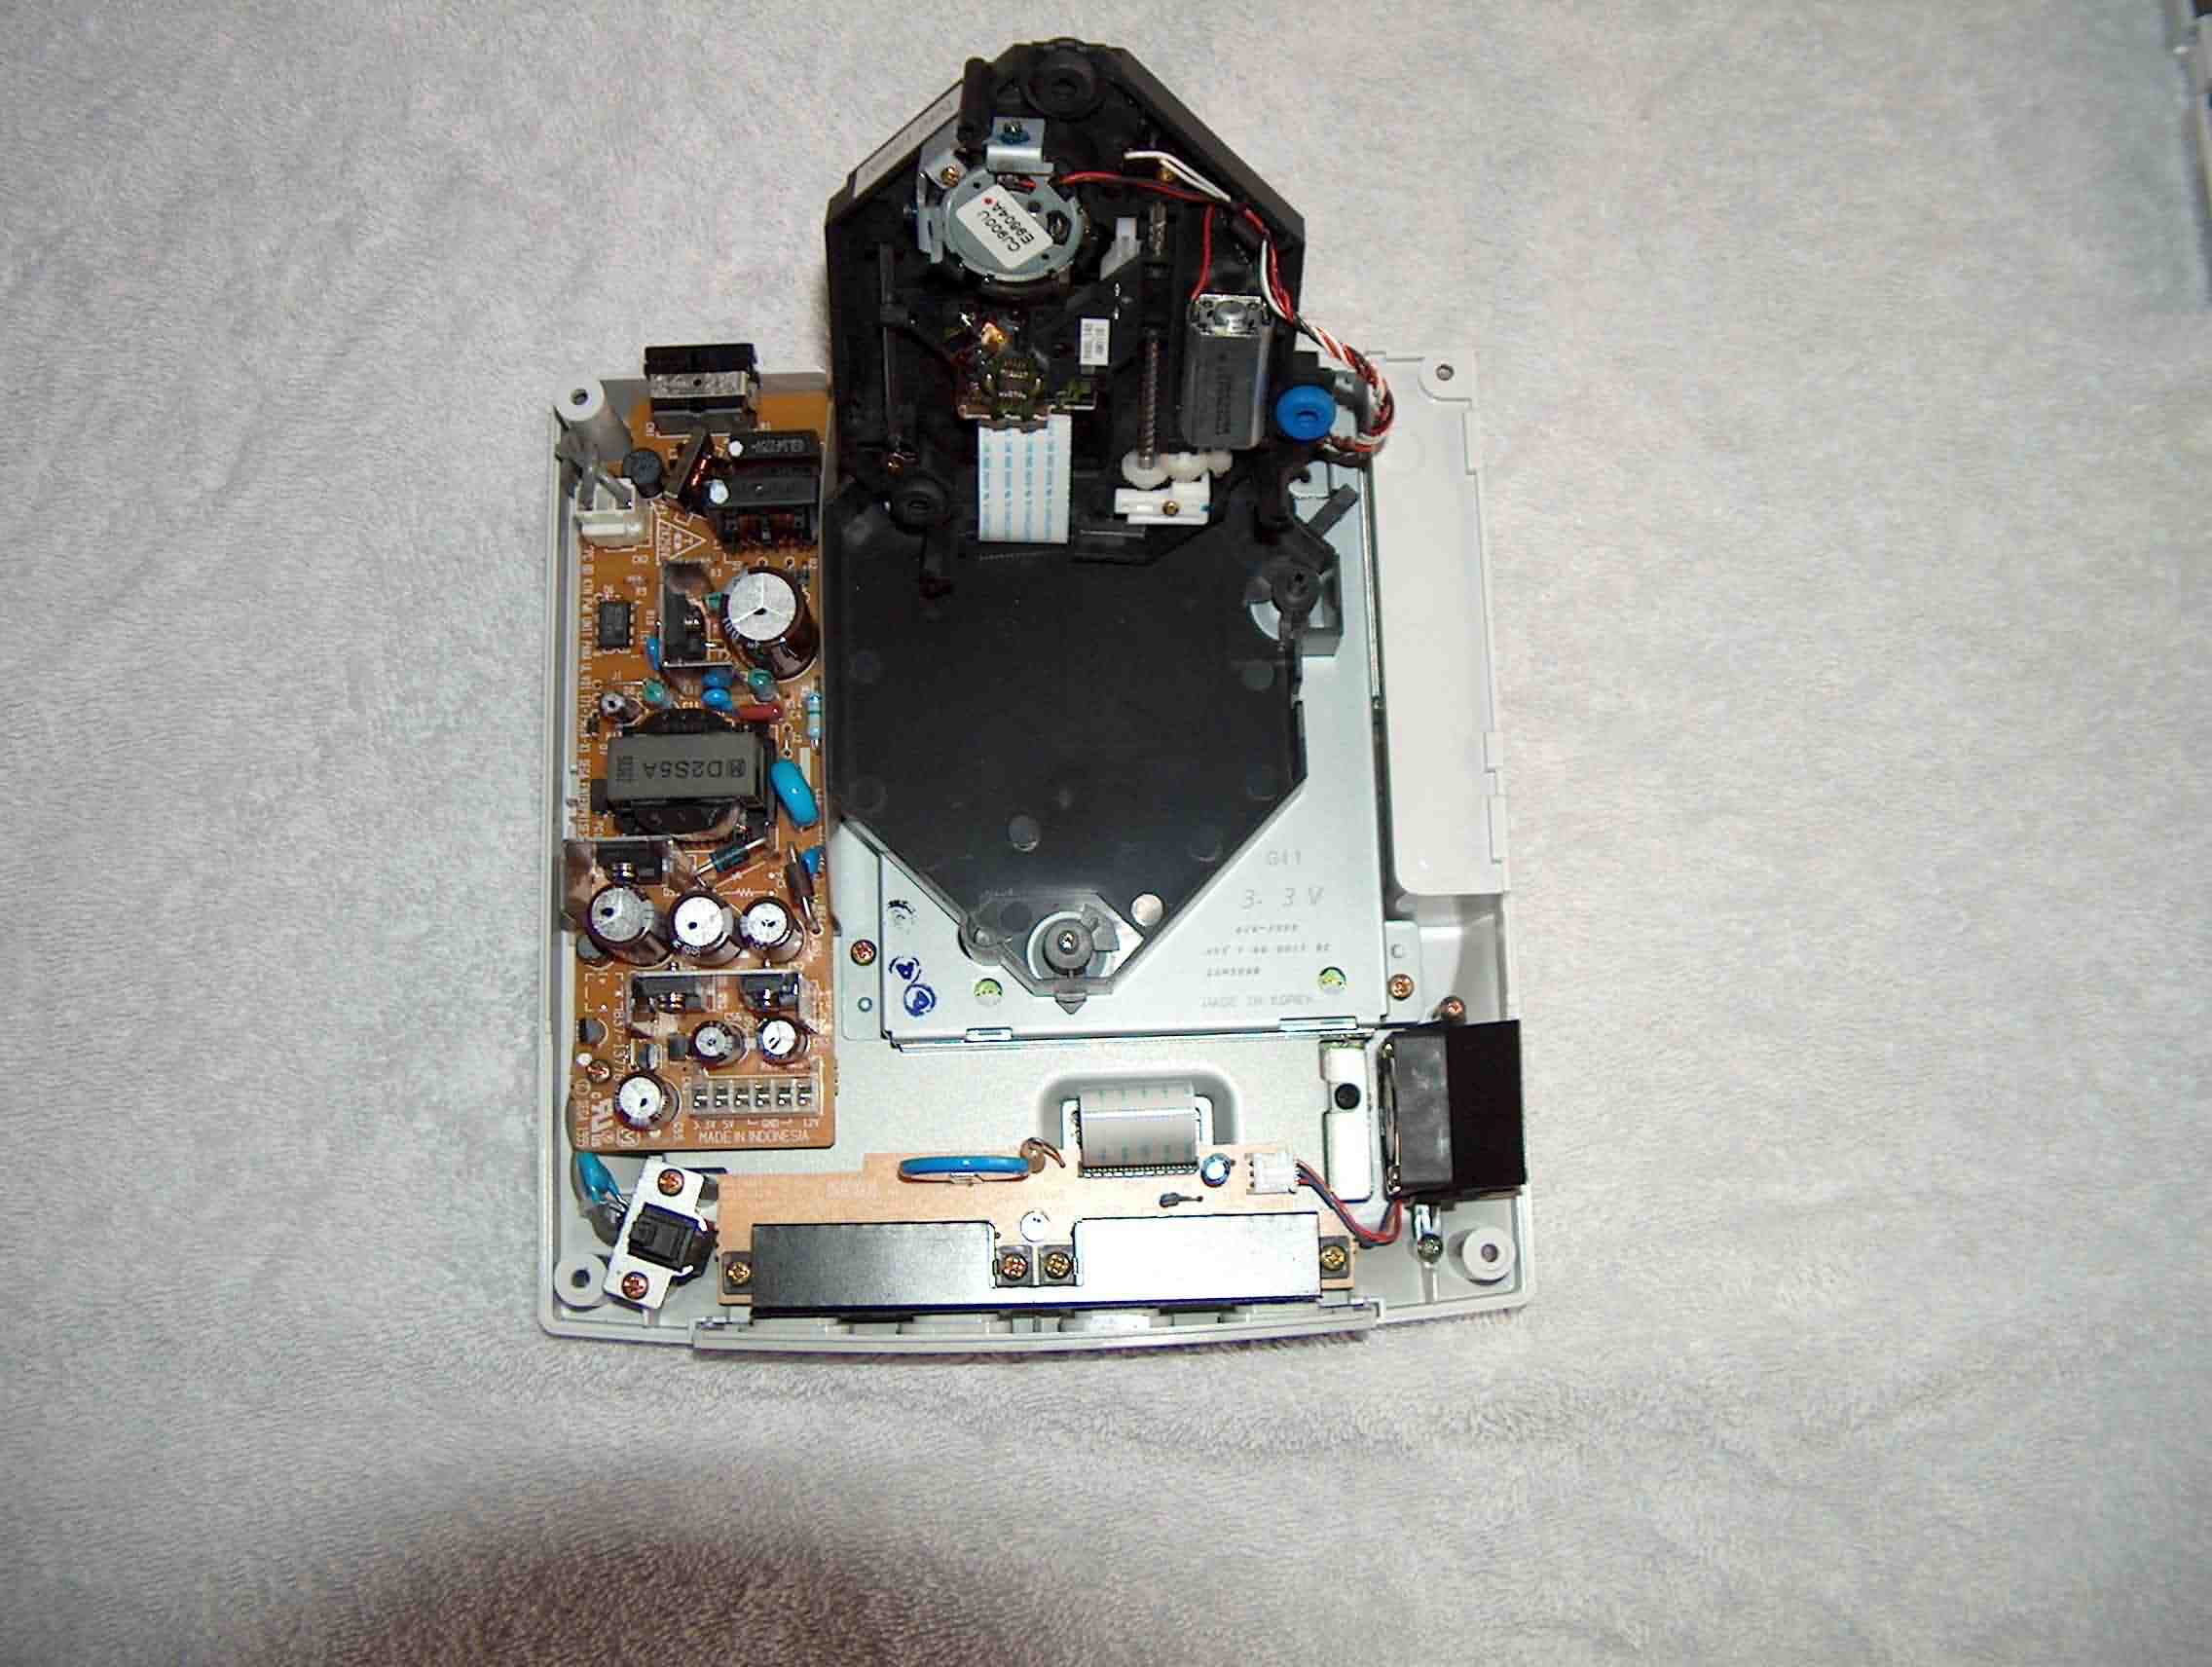
4. Carefully supporting top and bottom, turn the DC right side up again and carefully remove the top cover. (For the curious, note the position of F1, that had given some people some problems)
5. The laser / motor assembly is not fastened and attached only by the power wires and the data ribbon cable. Support the laser / motor assembly and turn the DC upright so it is sitting on the front game controller faceplate.
(Picture is just to show you how the laser / motor assembly can be moved.)
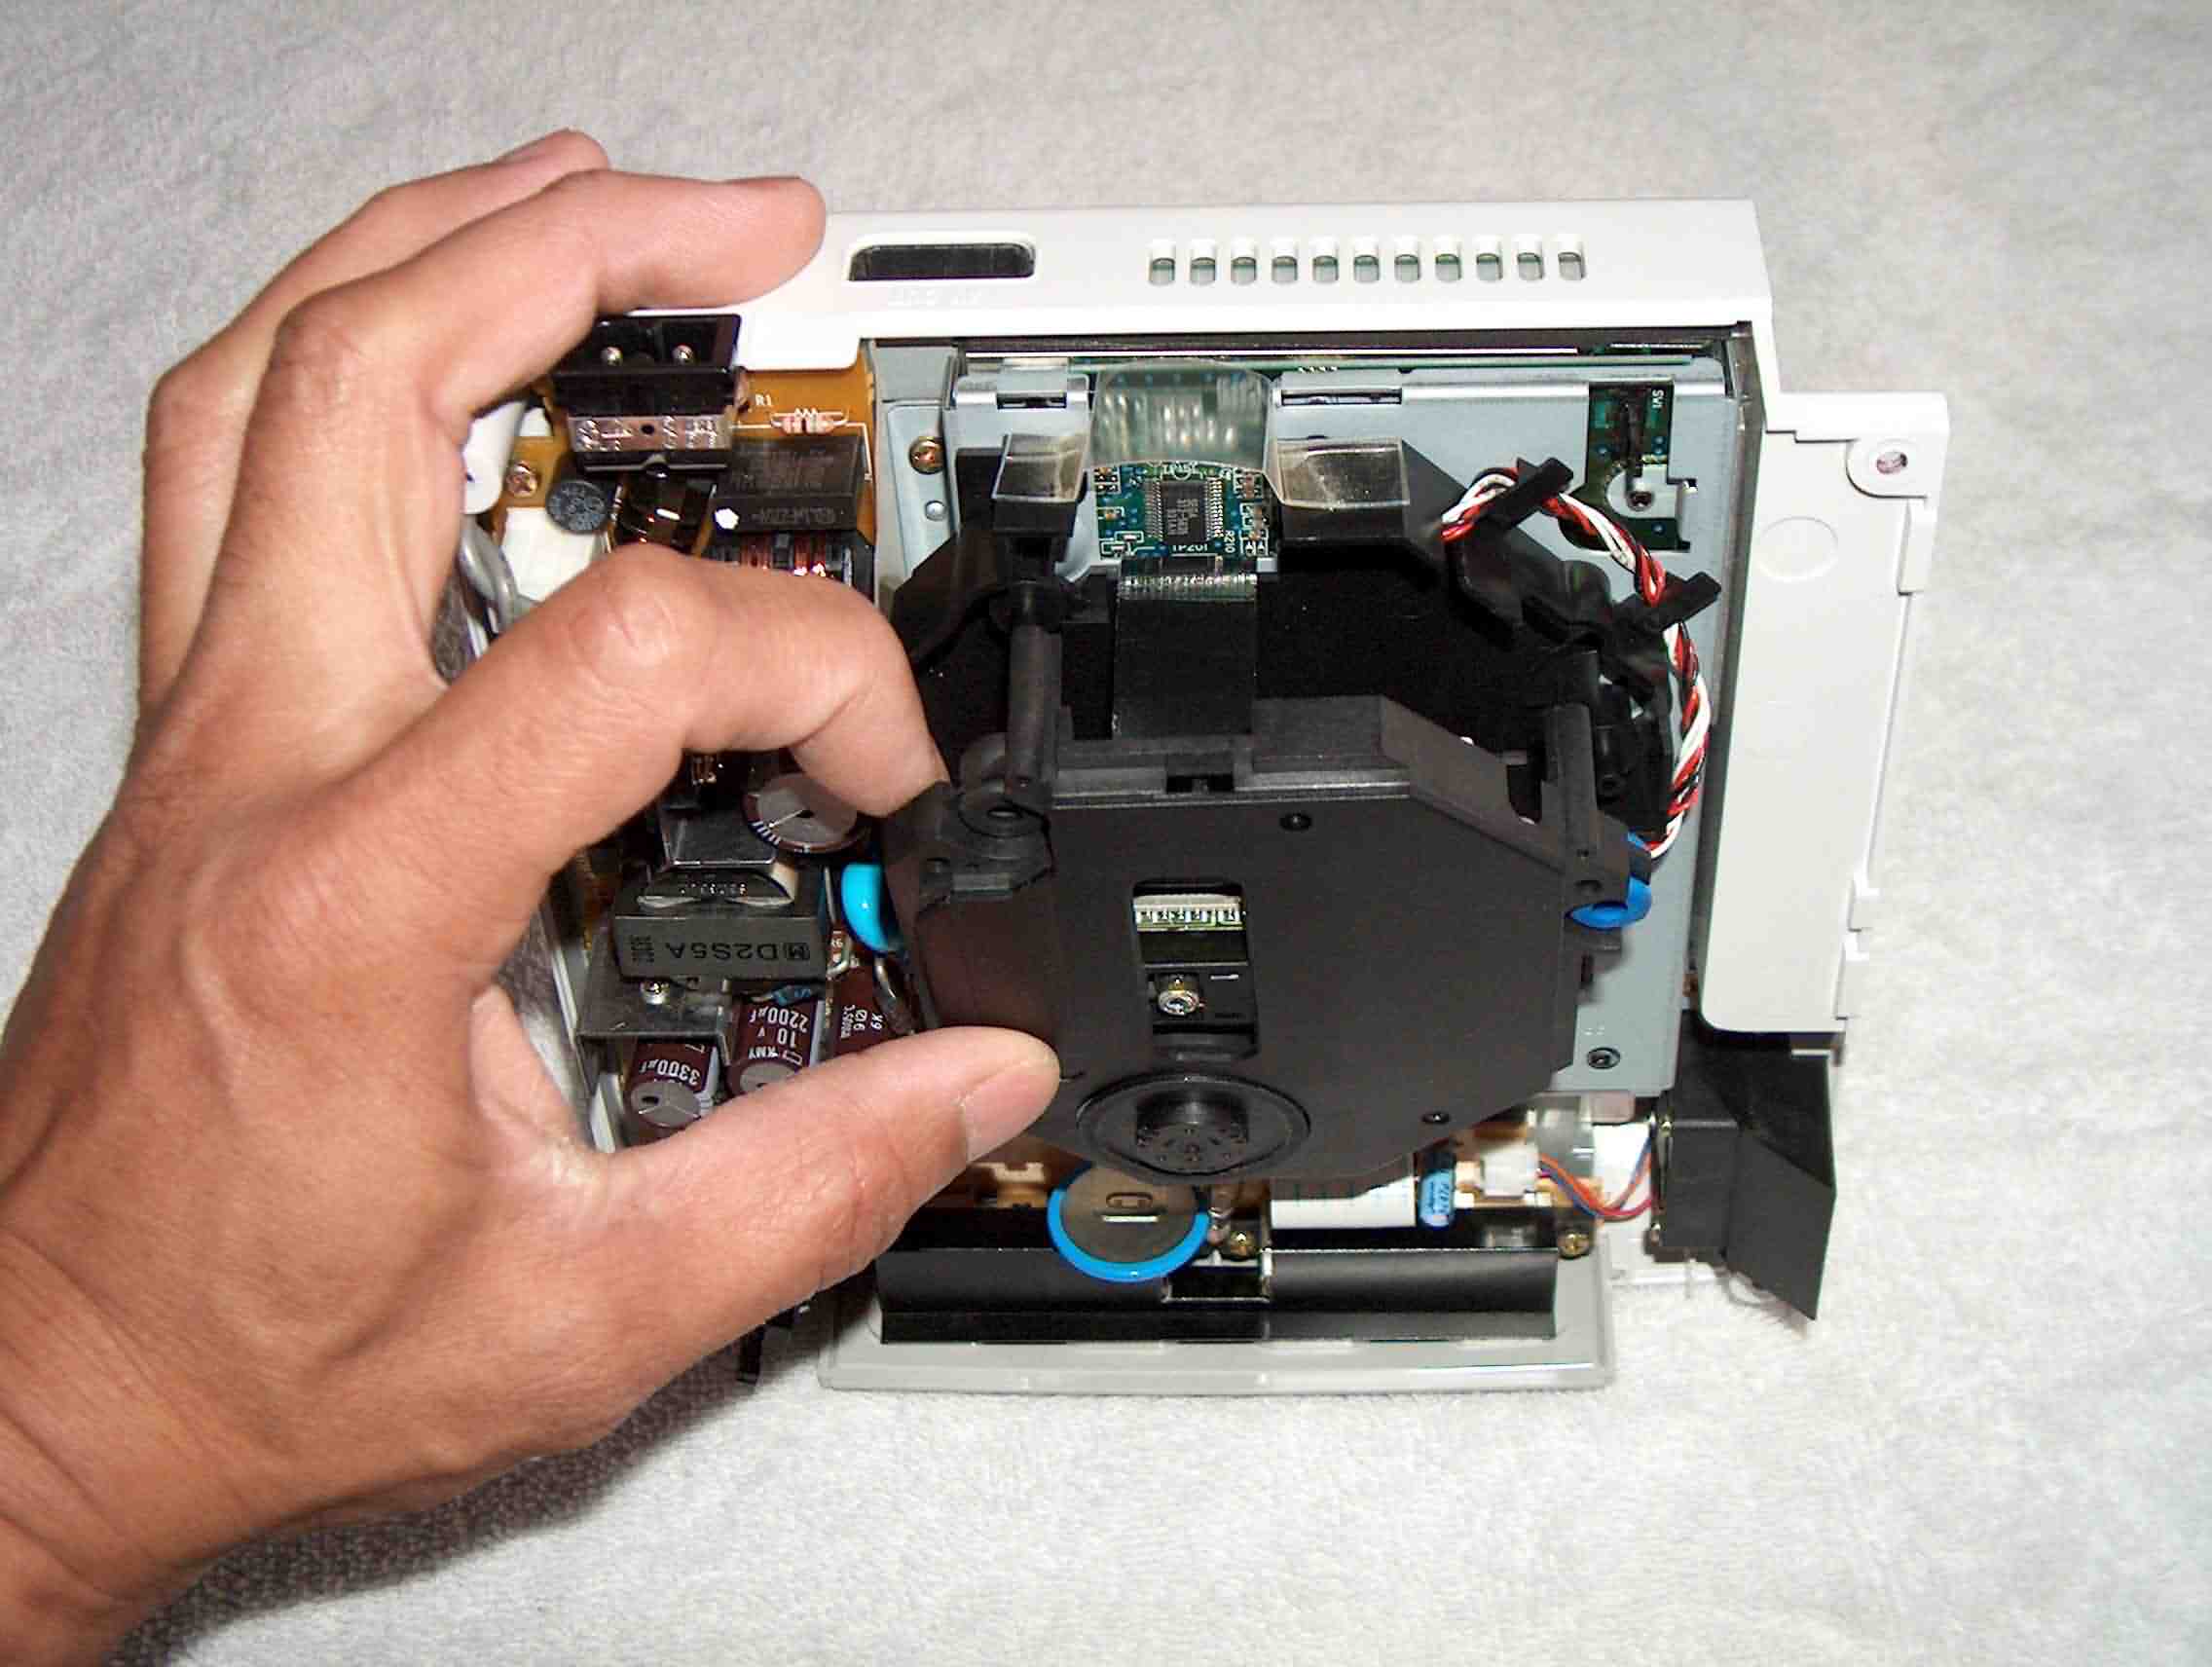
6. Tilt the laser / motor assembly from the top, you will be able to move it about 1 inch, the ribbon cable will be holding it back, but that's plenty of room to work.
7. Looking down into the space between the laser / motor assembly and the housing, you will see where the ribbon cable is attached to the circuit board. Be very careful not to pull the ribbon cable out. It is another difficult job in itself to put the ribbon cable back in.
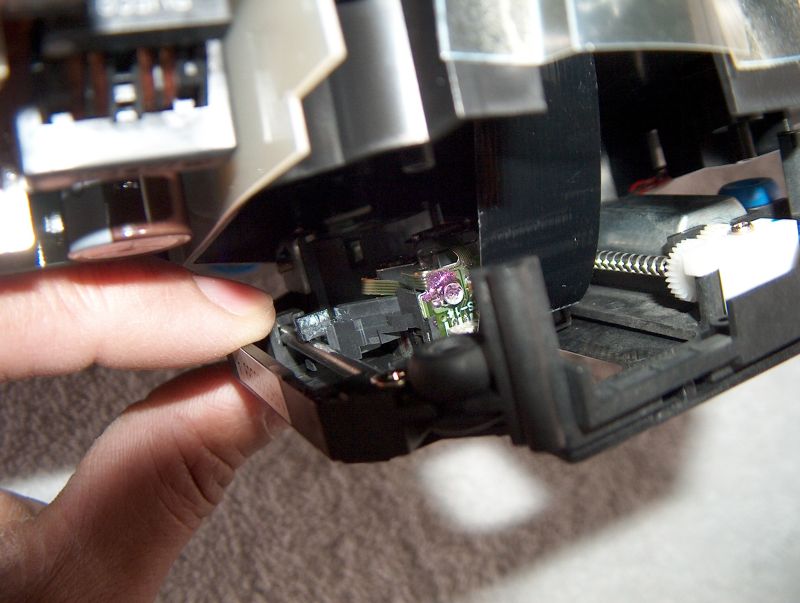
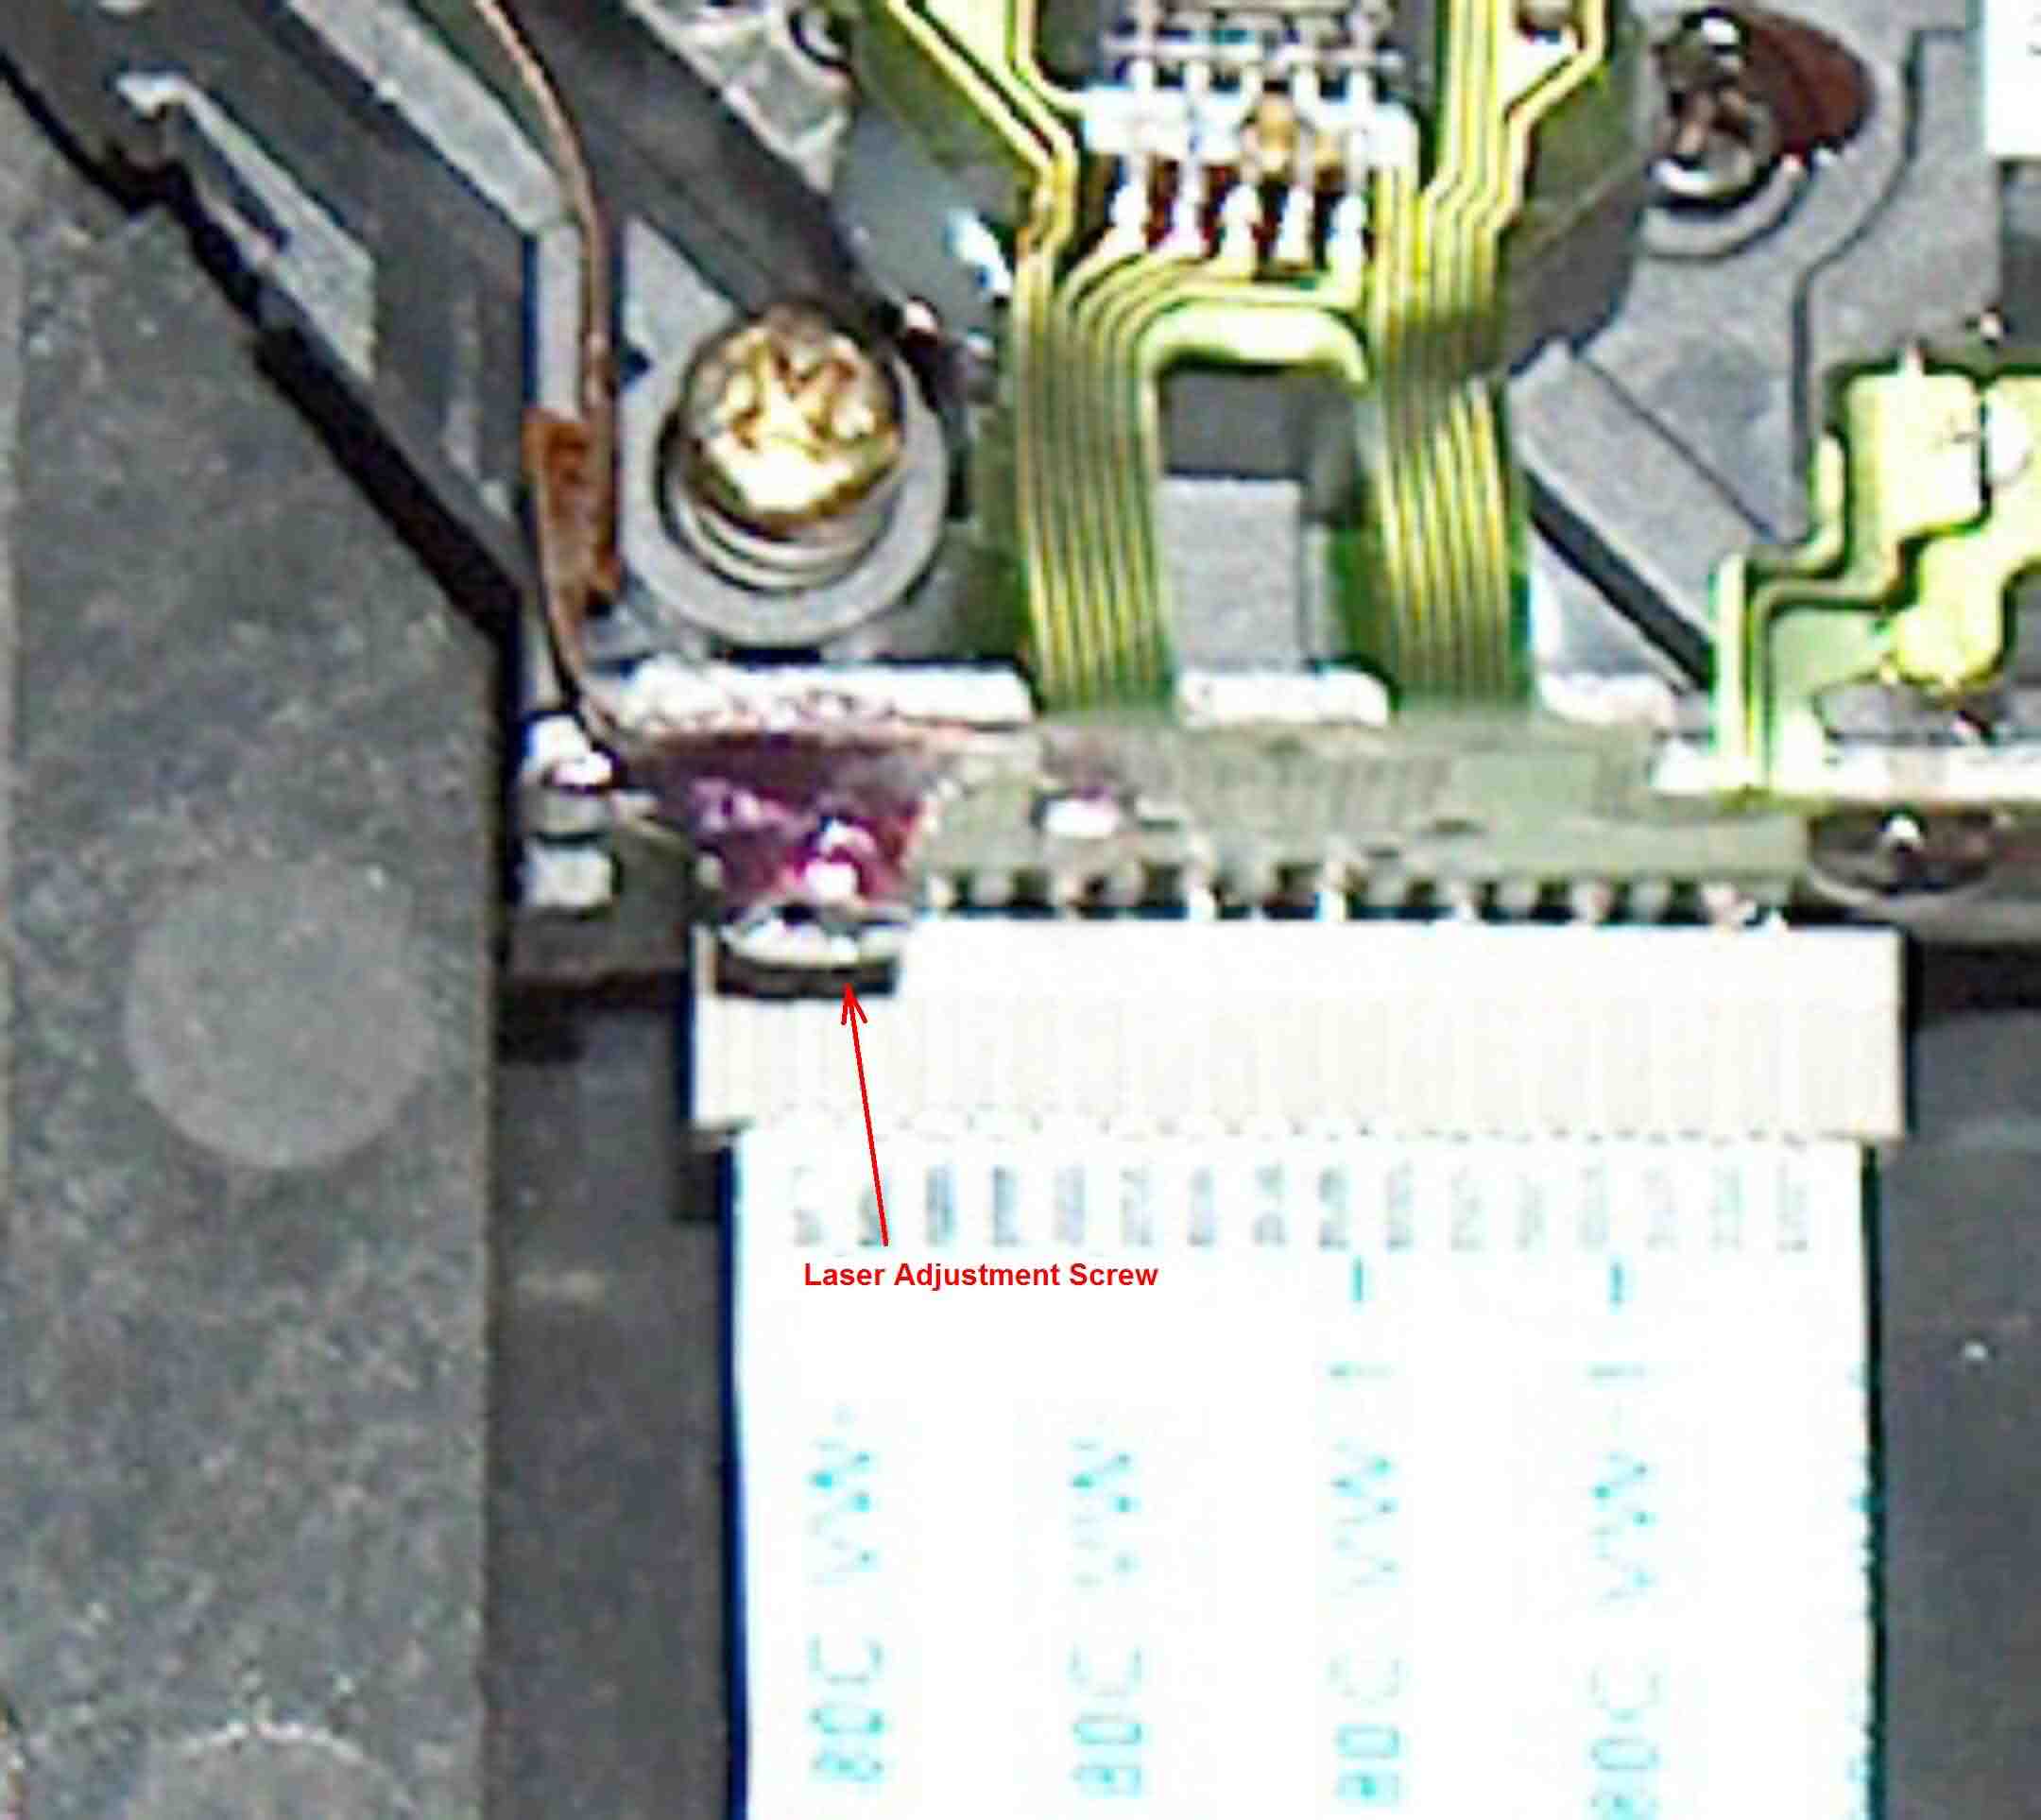
8. The ribbon cable is Black in color on this side. Just to the immediate left of the ribbon cable is the laser adjustment screw. It must be a variable inductor or variable capacitor rather than a potentiometer for voltage regulation. Very carefully, put a small Phillips-head screwdriver into the screw. The ribbon cable will have to be moved a little to allow access to the screw. Looking at the screw, imagine that is a clock and turn it 5 minutes to the right, it's not much, 30 degrees for you fellow Algebra 2 types.
9. Lay the DC back down, make sure the laser / motor assembly is correctly fitted in it's housing and replace the top cover. You don't need to replace the bottom screws or modem yet.
10. Connect the DC normally to power, the monitor / TV and the controller and test it with a game. If it works, Celebrate!! If it doesn't, then power it down and disconnect all connecting cables. Then you have to go back in and adjust the laser adjustment screw another few degrees to the right. You may have to keep adjusting and testing until you have turned it a quarter turn (90 degrees). If you don't have any luck, you may have to go back to the starting point and start adjusting the screw to the left.
11. Once your DC is working again, you may want to put a drop of nail polish or glue on the laser adjustment screw to prevent it from moving and getting out of whack again.
Put all the parts back together and screw the top back on. Then go call your foolish, PS2 playing friends, invite them over and continue that argument about why they should have waited for the X-Box.
Remember though - Arguing with a PS2 fanboy is like competing in the Special Olympics, even if you win, you're still a retard...
METHOD TWO - Here's another method that may work easier for you.
Steps 1-5 are almost the same as the above method, refer to pictures above.
1. For safety, Unplug all power cord, video and game controller cables. Never work on your DC with power connected!
2. With the DC turned over, remove the modem
3. With the modem removed, remove the four screws at the corners
4. Carefully supporting top and bottom, turn the DC right side up again and carefully remove the top cover
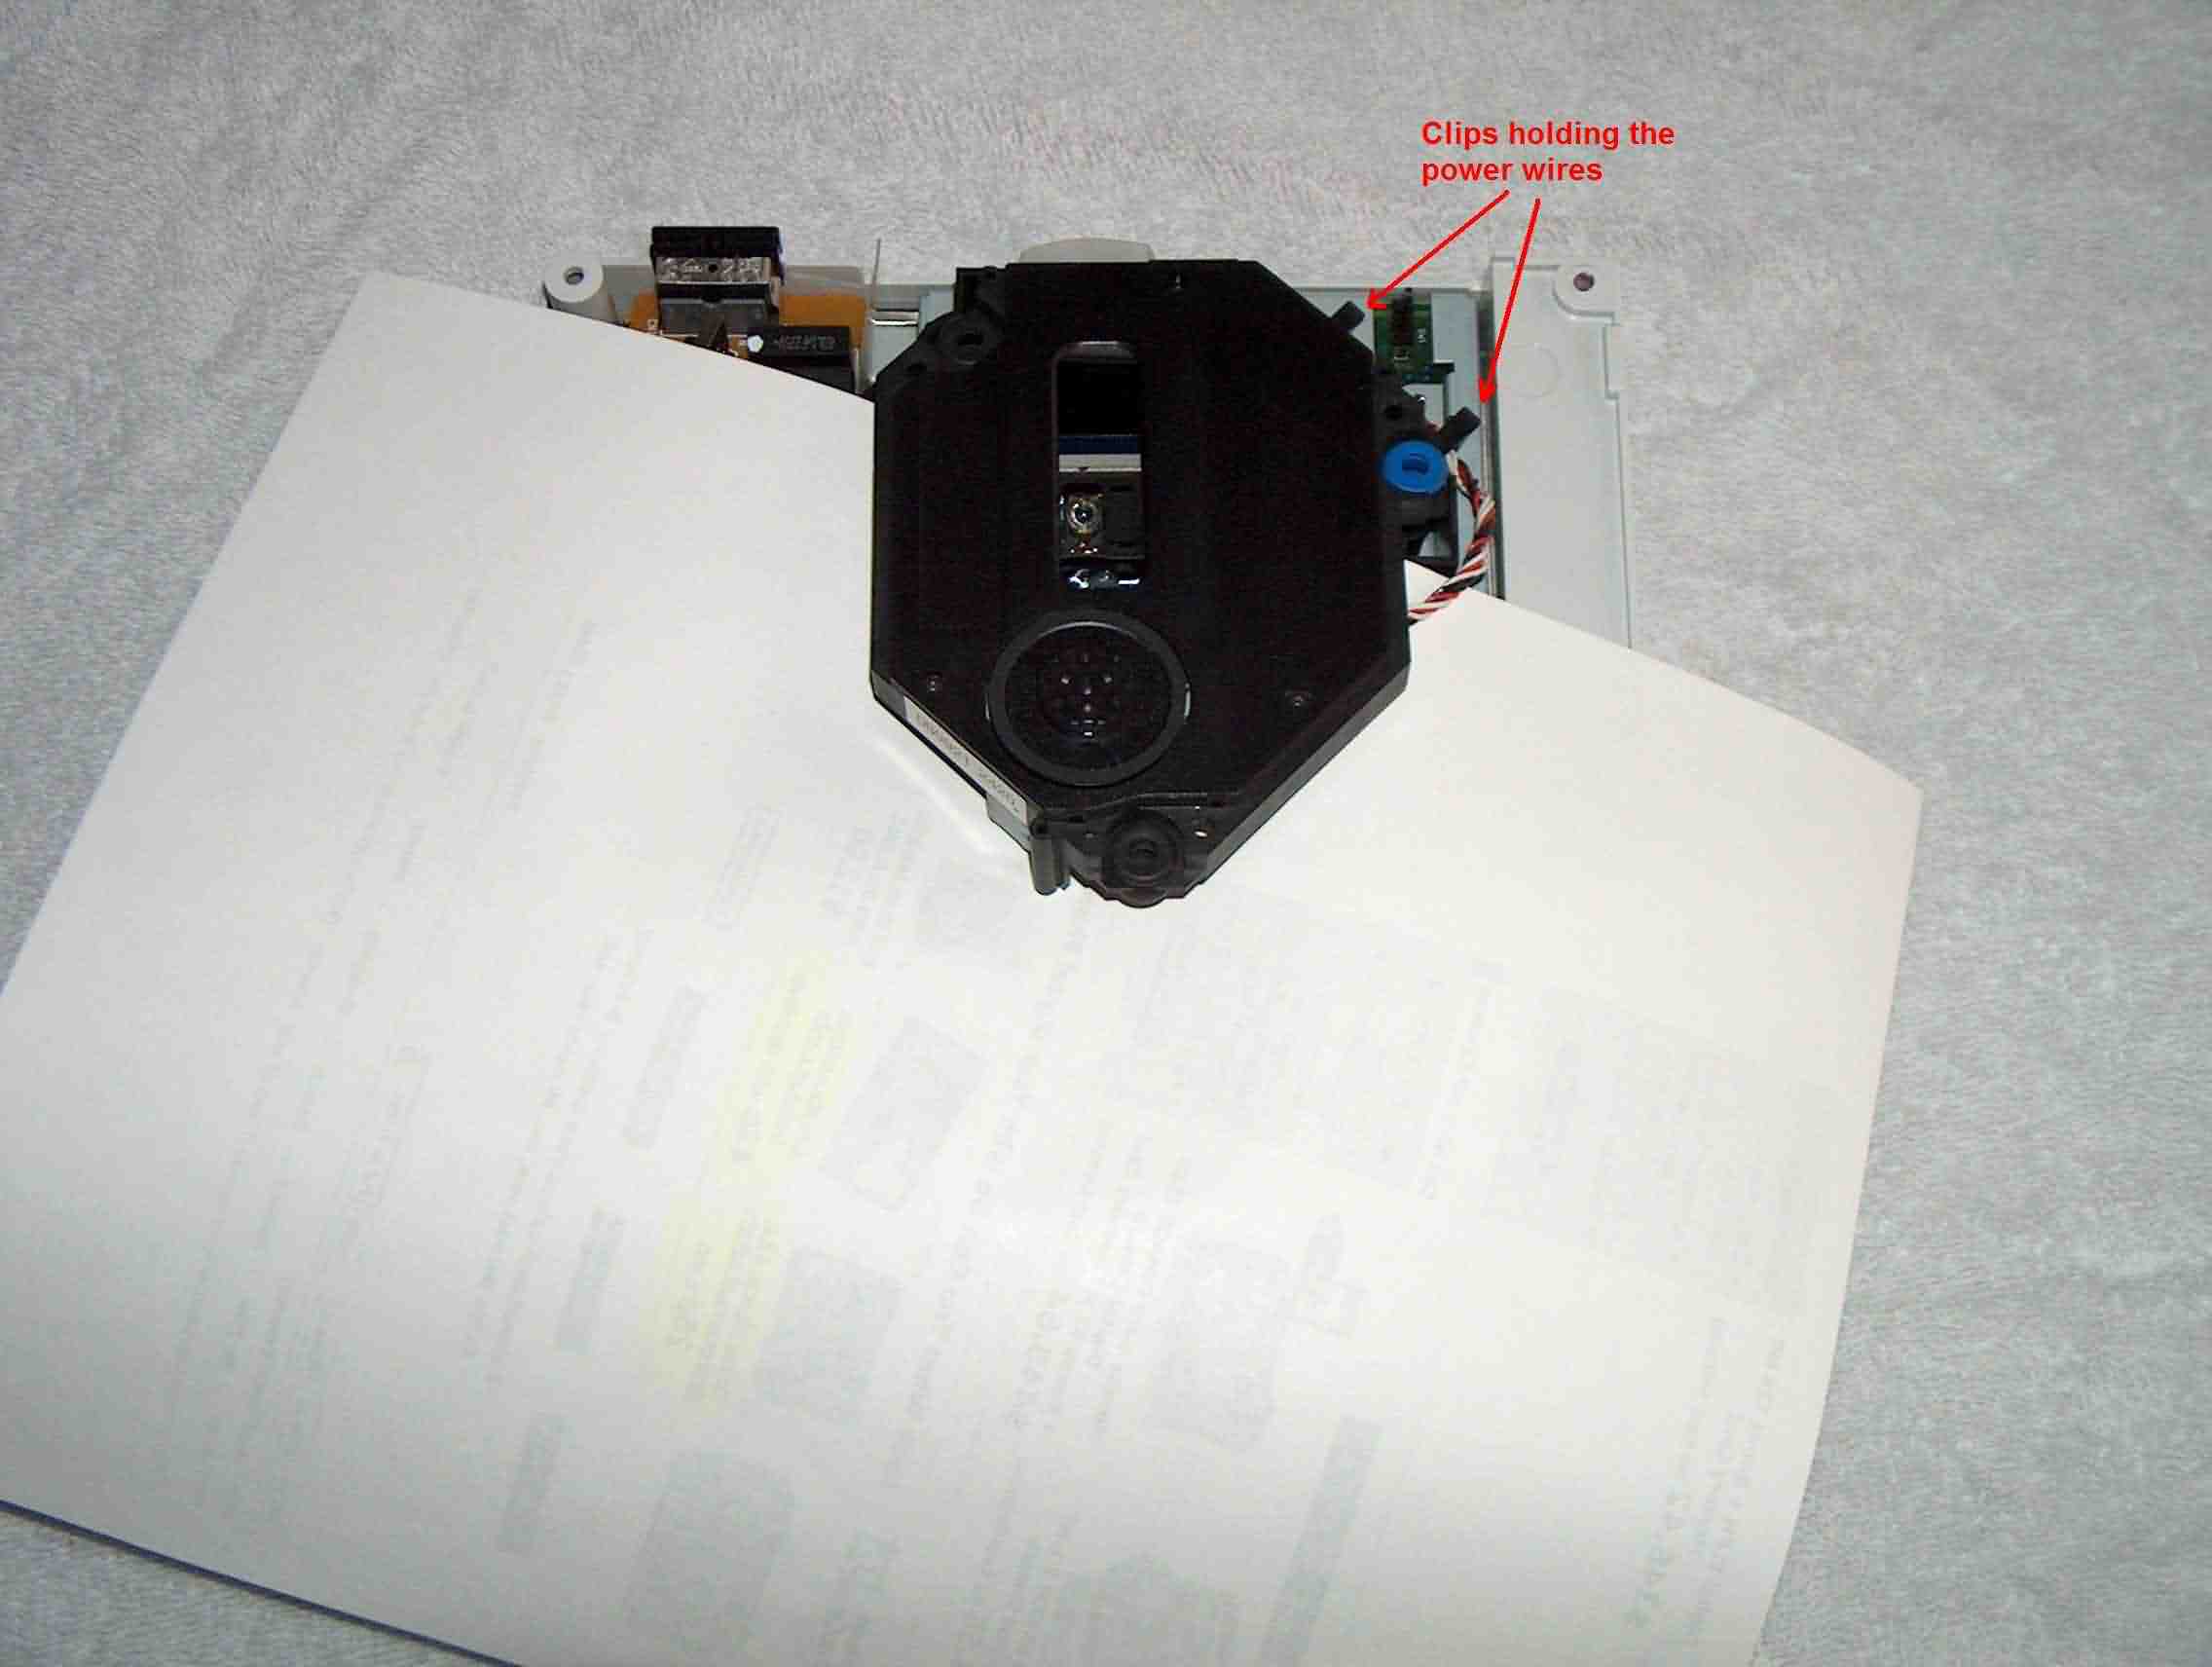
5. The laser / motor assembly is not fastened and attached only by the power wires and the data ribbon cable. The power wires are Red and White and are at the upper right-hand corner of the laser / motor assembly. Take the power cables out of the clips. Now the only thing holding the laser / motor assembly is the data ribbon cable.
Click on the thumbnail to get a better view
|
Take the power wires out of the clips |
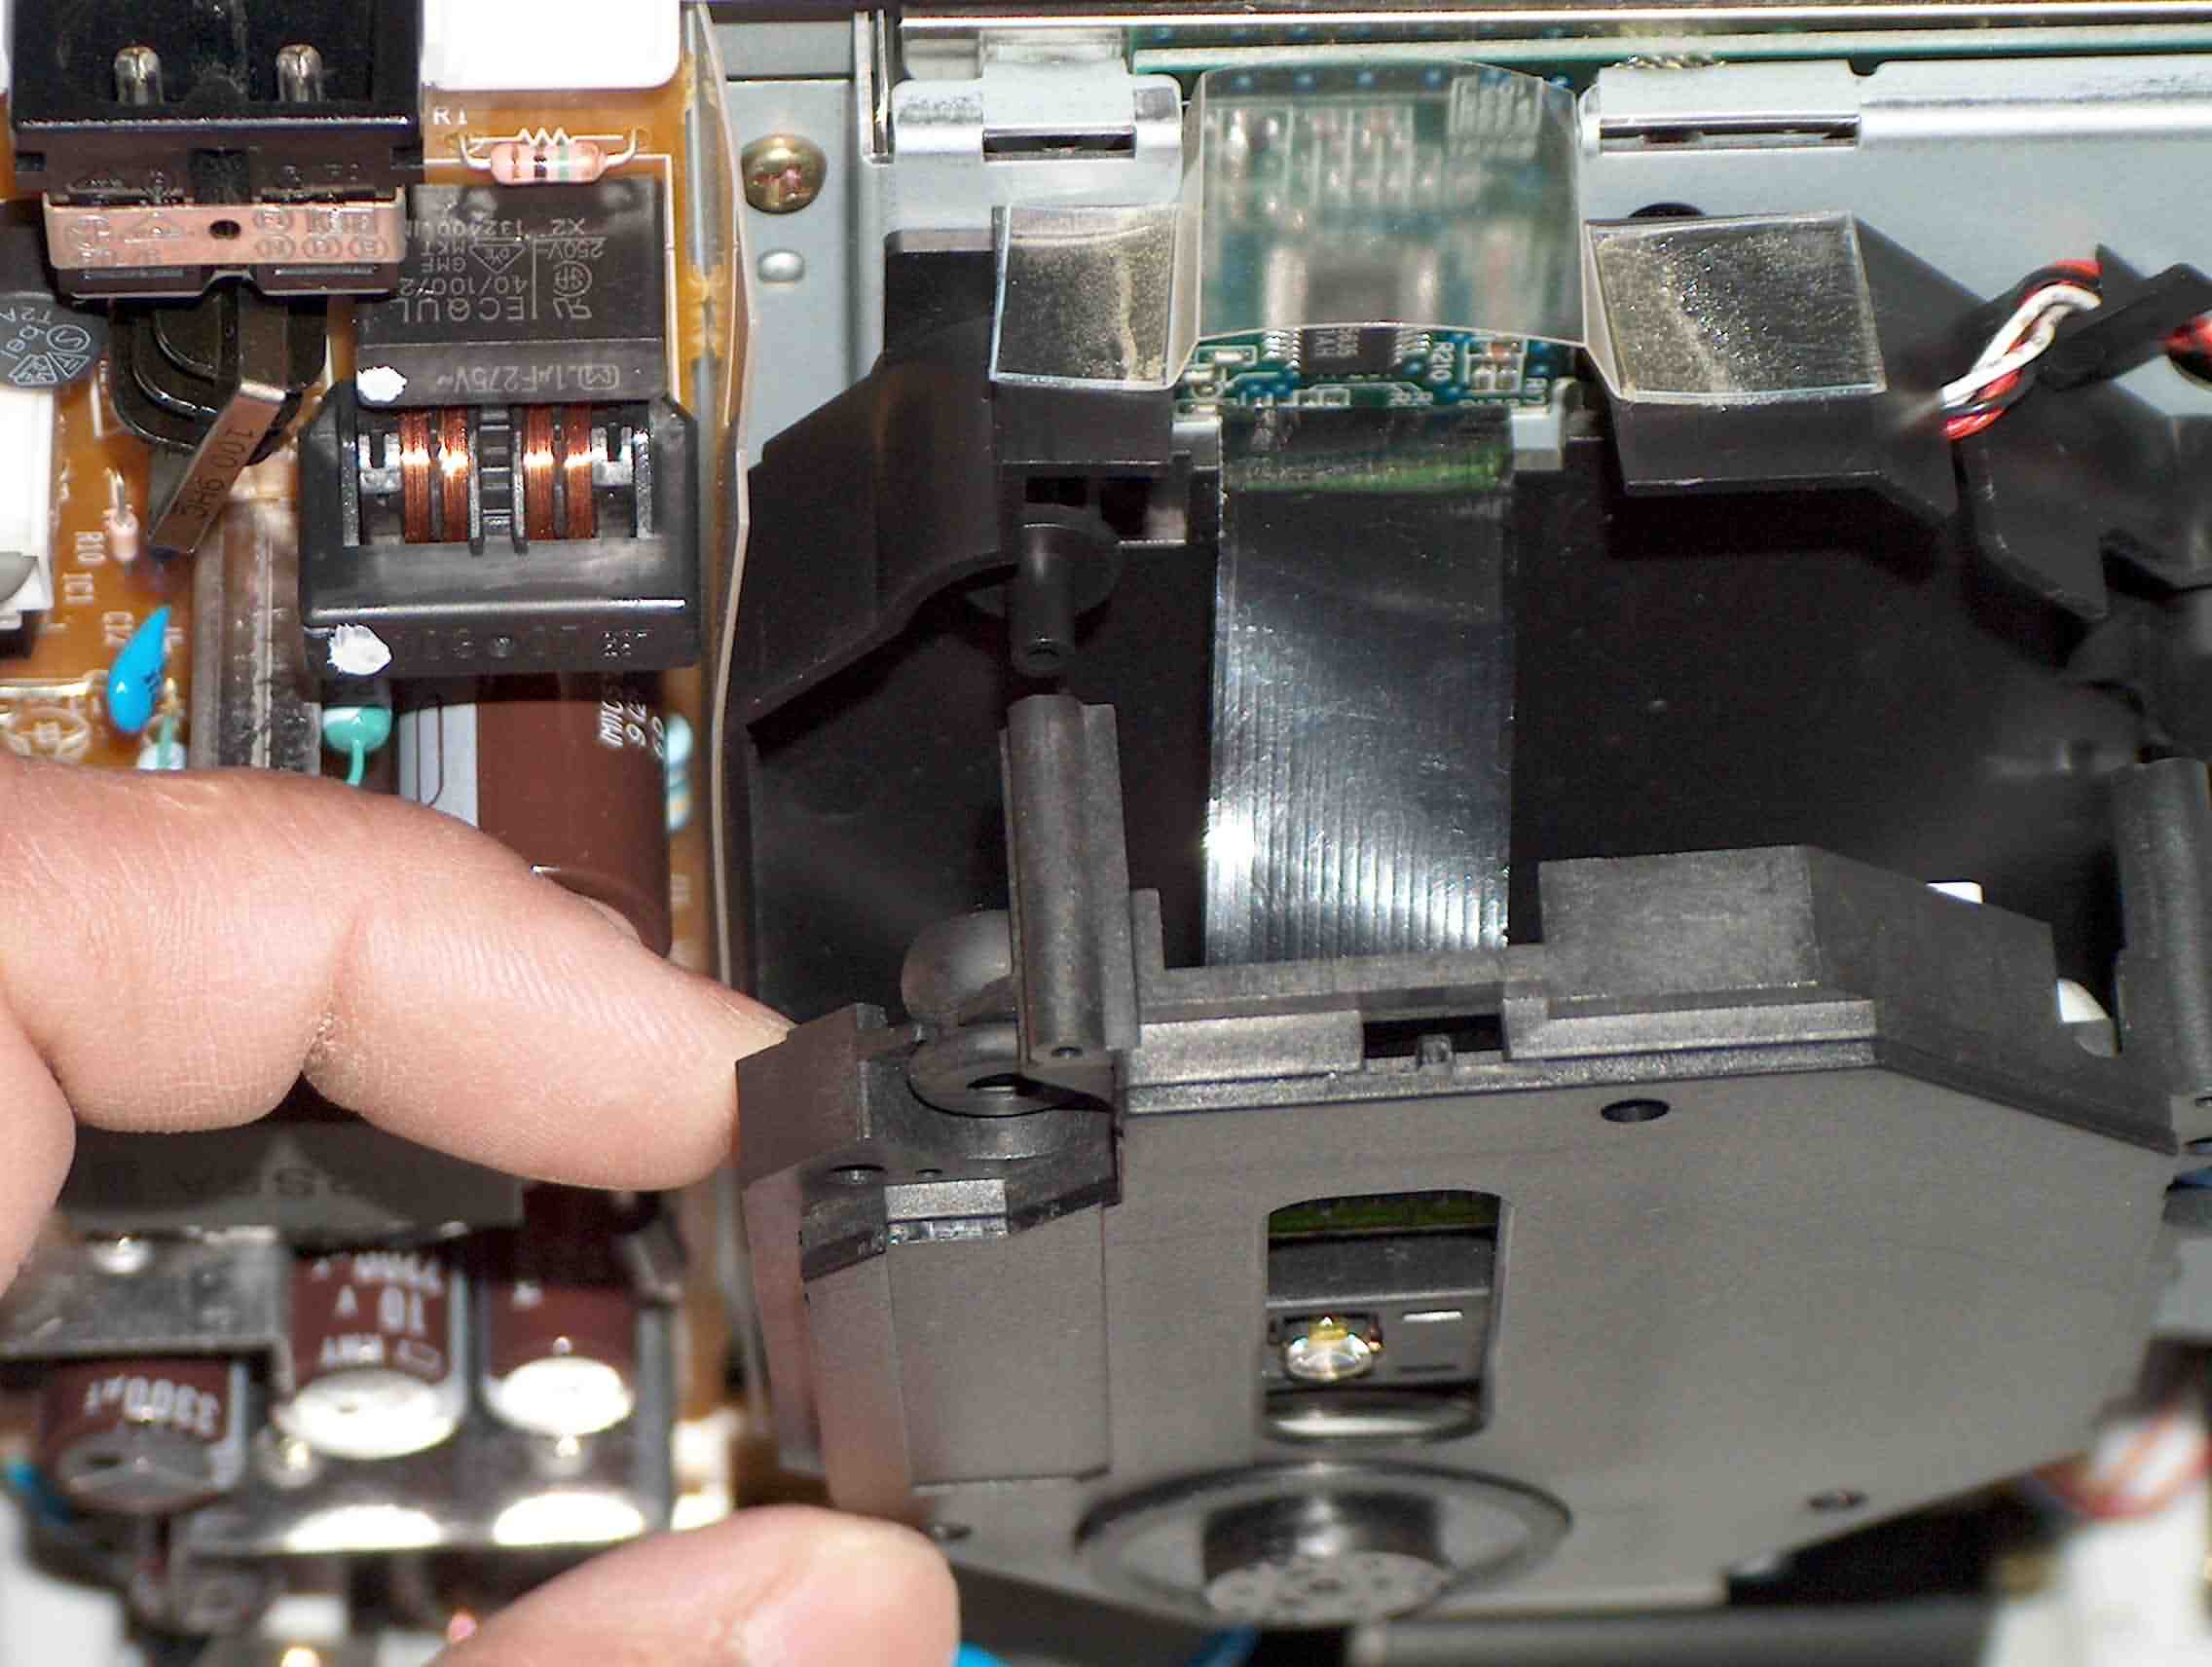
Laser & motor assembly tilted up
|
Assembly tilted - laser adjustment screw visible
|
Laser adjustment screw - close-up
|
6. The red, black and white power wires are routed in little holders. Just take them out carefully and then you can flip the laser / motor assembly up. The ribbon cable is White on this side. The laser adjustment screw is to the immediate left of the ribbon cable. Be careful not to move the laser / motor assembly too much or you will pull the ribbon cable out and then you have the difficult task of putting it back in. Start adjusting the screw and testing as noted in the previous method.
Hope this works for you.
To show your sincere appreciation for any help you get here, you can help me build up my DC game library.
Email me if you have any further questions, comments or helpful tips.
[email protected] or here [email protected]
Back to "The World's HARDEST World War Two Quiz!!"
![]()