Practical CORBA Programming using
TAO
Your First CORBA Application
Table of Contents
-
Introduction
-
Step 1: Setting Up Tao
-
Step 2: Writing and compiling IDL file
-
Step 3: Your First Server
-
Step 4: Your First Client
-
Step 5: Some practice with options
Introduction
This chapter takes you through the process of setting
up ACE/TAO environment on your machine. We will limit our discussion to
Windows NT platform and Visual C++ as development environment. Most of
the process is applicable to other operating systems and tools, however,
certain specific settings might be needed on them. After going through
this chapter, you should be able to create a simple CORBA client and server.
The chapter deals with setting up environment on your
machine from scratch. TAO can be used on wide variety of platforms and
with variety of tools. For details please see Building
and Installing TAO.
In the tutorial we will use WindowsNT system and Visual
C++ 5 as development environment. The users of other platforms and development
tools can refer Building
and Installing TAO. we will discuss some general aspects of CORBA and
TAO also.
The aim of this chapter is to give you a good starting
point and hands on experience with CORBA. This discussion assumes working
knowledge of Windows, Developer Studio and C++. Some initial knowledge
of CORBA will be helpful.
Step 1: Setting
Up TAO
TAO (The ACE ORB) is CORBA compliant ORB
developed at Washington University. that gives c++ mapping. More details
on TAO can be obtained at ACE+TAO
Overview
Create a new directory in c: drive and name it as corba
where you would like to place the source code of ACE/TAO and other tools.
(Users can choose different drive and directory. They need to replace the
references of c:\corba with the path they have chosen)
-
Obtaining TAO
TAO bundle is available in various formats.
On most Windows NT systems zip format TAO can be easily
used. Just click on the link below to download a single zip file.
Download
TAO (zip) ACE 5.1/TAO 1.1 version
You might be asked the location of file depending upon
the settings of browser. Specify the directory c:\corba you created earlier,
where you want to place the downloaded file.
Latest versions, other formats and more details can be
found at Obtaining
TAO.
-
Setting up Environment
-
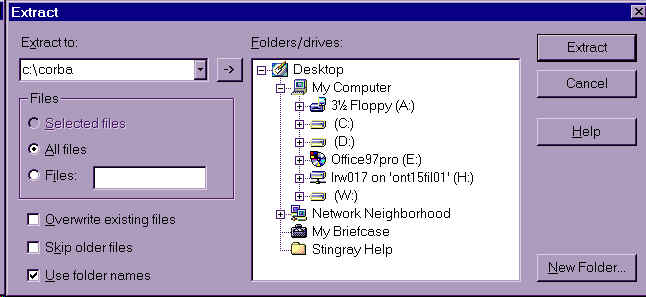
Uncompress the downloaded file:
Now open the file you have downloaded with WinZip
or your favorite uncompresion utility. Click on Extract
button and specify to extract all files in c:\corba The ACE\TAO bundle
is uncompressed in ACE_wrappers sub directory under c:\corba. It is recommended
to keep the directory structure as created by WinZip. Image shows how the
screen might look like.
Before we can compile and use ACE/TAO in our
project, we need to set some environment variables. These are explained
below. As mentioned (and I am not going to repeat it now) the discussion
is applicable to WIndows NT and Visual C++. For other operating systems
and development tools please refer to Building
and Installing TAO.
-
Open Control Panel. (See
Windows NT documentation, if needed)
-
Double click on the System
icon.
-
Click on the environment
tab.
-
Write "ACE_ROOT" (without quotes) in the area in space for
Variable.
-
Write "c:\corba\ACE_wrappers" (without quotes) in area in
the space for Value.
-
Click on Set button.
This will set variable ACE_ROOT
to value c:\corba\ACE_wrappers.
Similar way you can set other variables also. Complete
list of variables is presented below.
| ACE_ROOT |
c:\corba\ACE_wrappers |
| ACE_TAO_ROOT |
%ACE_ROOT%\TAO |
| TAO_ROOT |
%ACE_TAO_ROOT% |
Apart from this we need to setup the path. Add following
path to existing one. (See windows documentation for more information)
| PATH |
-
%ACE_ROOT%\bin;
-
%ACE_TAO_ROOT%\orbsvcs\orbsvcs
|
Click OK to close the dialog.
The Visual C++ needs some environment to be properly
access the files in ACE/TAO framework. These settings are essential for
compiling ACE/TAO as well as for our sample projects. To setup proper environment
for Visual C++, proceed as follows:
-
Click on Options under
Toolsmenu
-
Click on Directories
tab.
-
Select platform Win32
-
Select show directories forInclude
Files
-
Now add following entries in directories
-
c:\corba\ACE_wrappers
-
c:\corba\ACE_wrappers\TAO
-
c:\corba\ACE_wrappers\TAO\orbsvcs
-
Now select show directories forExecutable
Files
-
Now add following entries in directories
-
c:\corba\ACE_wrappers\bin
-
Now select show directories forInclude
Files
-
Now add following entries in directories
-
c:\corba\ACE_wrappers\ace
-
c:\corba\ACE_wrappers\TAO\tao
-
c:\corba\ACE_wrappers\TAO\orbsvcs\orbsvcs
After you are done with settings for Visual C++ compiler,
there should be settings as shown in table.
|
Show Directories for
|
Directories
|
| Include Files |
c:\corba\ACE_wrappers |
| c:\corba\ACE_wrappers\TAO |
| c:\corba\ACE_wrappers\TAO\orbsvcs |
| Executable Files |
c:\corba\ACE_wrappers\bin |
| Library Files |
c:\corba\ACE_wrappers\ace |
| c:\corba\ACE_wrappers\TAO\tao |
| c:\corba\ACE_wrappers\TAO\orbsvcs\orbsvcs |
-
Compiling TAO
The next step is to compile ACE/TAO source files.
Start the Developer Studio. Click on Open
Workspace in File menu.
Change directory to c:\corba\ACE_wrappers\tao
and choose TAOACE.dsw. Click OK.
The workspace will be opened. If the workspace window is visible you can
see following projects in it:
-
ACE DLL
-
gperf
-
gperf_lib
-
Naming_Service
-
ORB Services DLL
-
TAO DLL
-
TAO_IDL Compiler
Since TAO can be used on variety of
platforms, it is necessary to define what platform we are going to use
it. We are going to create a file called config.h. Proceed as follows:
-
Click on New..
menu item under File. (See the image)
-
Click on Text File and uncheck theAdd
to project check box.
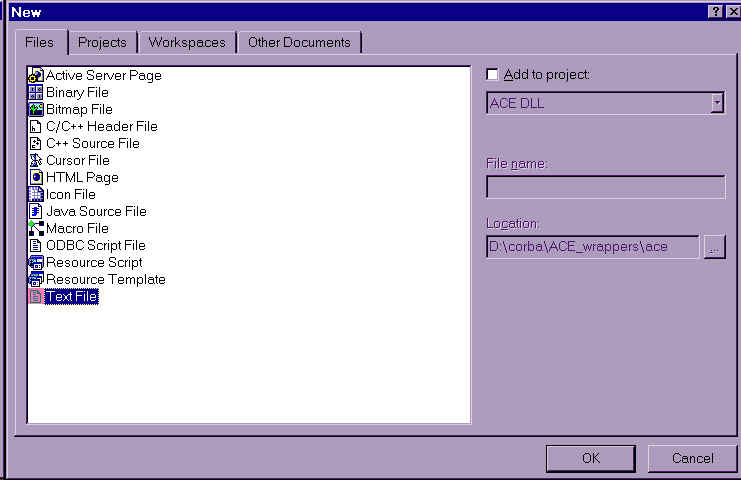
A blank window will be created. Now add following
text to the file:
#include "ace/config-win32.h"
To save the file as config.h in c:\corba\ACE_wrappers\ace
directory, proceed as follows:
-
Click on Save As.. menu
item.
-
Choose c:\corba\ACE_wrappers\ace
directory
-
Specify config.h in the space for filename
-
Click Save.
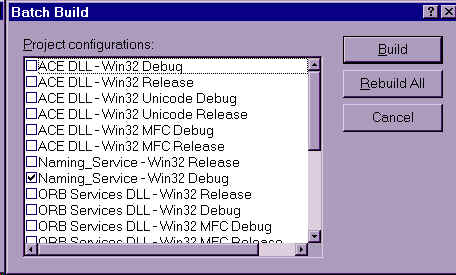
We are now ready to compile the code. Proceed with instructions
below:
-
Click on Batch Build
under Build menu.
-
Check Naming_Service -Win32 Debug
option
-
Click on Build button.
Note: You
might get error like "Cannot open include file: 'config.h': No such file
or directory" or other errors, if you have not created config.h properly
or if you have not saved it in proper directory. If this happens, stop
the build. Visit the section Setting up Environment.
Identify and fix the problem and rebuild again.
Step 2: Writing
and compiling IDL file
Voila. You have successfully compiled ACE/TAO
source files. (If not, go back to step 1 and have
it compiled. Without the tools and dlls you will not be able to proceed.)
Now we are ready to write a sample application to get
hands on CORBA (and TAO). Proceed as follows:
-
Creating
new workspace and project.
-
Close the workspace (TAOACE.dsw) you had opened in step 1.
-
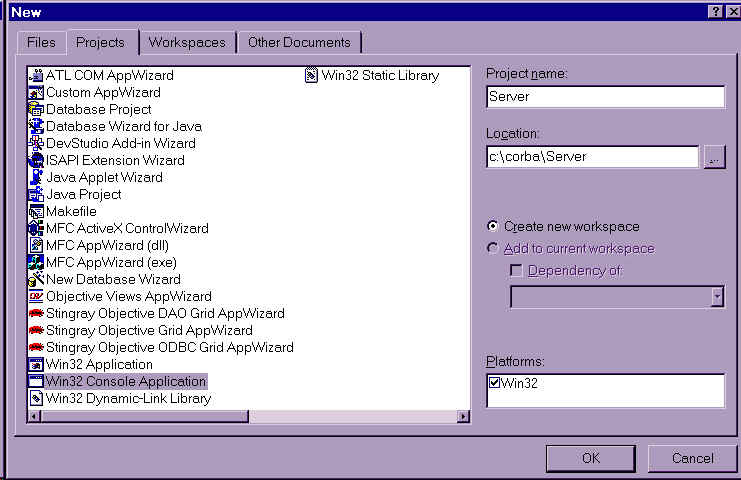
Click on New.. in File
Menu. (See fig.)
-
In the dialog click on Projects
tab.
-
Click on Win32 Console Application
option.
-
Select c:\corba directory
in place for Location.
-
Enter Server in the place
for Project Name.
-
Click OK
A project called server shall be created for you, in the
workspace (whose name is also server).
-
Creating
interface definition.
-
Now create a Text File, the way you created in step 1(for
config.h).
-
In that file write:
        module HelloApplication{
                interface Hello{
                        string sayHello();
                };
        };
-
Save the file as Hello.idl
in c:\corba\server directory.
-
Adding
the file to the project.
This file now needs to be included in the project.
Here is procedure if you don't know how to do:
-
Click on Server Filesor
Server
Classes(project) in the workspace window.
-
Click on Files.. menu
item under Project->Add to Project
-
Change to directory c:\corba\server.
-
Select Hello.idl file.
-
Click OK.
-
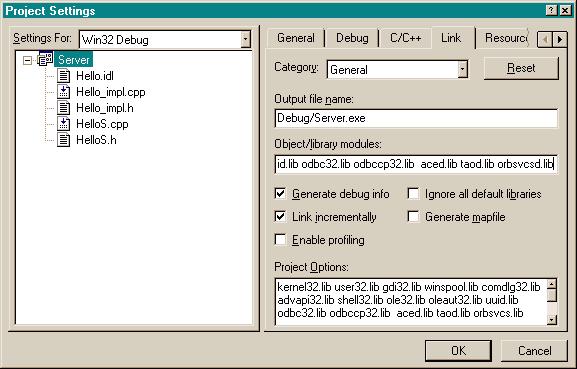
Custom
Compilation Settings.
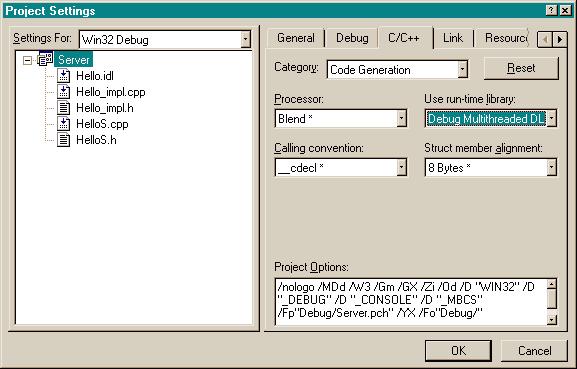
Now we have the interface declared in the file
Hello.idl. The interface is defined using Interface Definition Language.
The tao_idl.exe, the IDL compiler, will be used to map the IDL to C++ mappings.
We will specify custom compilation options for Hello.idl in the developer
studio.
-
Click on File View pane
of workspace window and select Hello.idl
under Server Files.
-
Click on Settings menu
item under Project.
-
In the General section,
make sure Always use custom build setup is
checked.
-
Now click on Custom Build
tab.
-
Select All Configurations
in Settings For.
-
Write Compiling IDL files..
in place for Description.
-
Write tao_idl $(InputPath)
as one of the Build Commands
-
In the Output Files area enter following entries one by one.
-
$(InputPath)C.h
-
$(InputPath)C.cpp
-
$(InputPath)C.i
-
$(InputPath)S.h
-
$(InputPath)S.cpp
-
$(InputPath)S.i
-
$(InputPath)S_T.h
-
$(InputPath)S_T.cpp
-
$(InputPath)S_T.i
-
Click OK.
If anybody knows how to customize the Developer Studio for
IDL files compilation, please email it to [email protected].
The idl file has been set up for custom build.
Now proceed with compilation as follows:
-
Click on the Hello.idl
in workspace window.
-
Click on Compile Hello.idl
under Build menu.
The idl file is compiled when you see 0 errors 0 warnings
in output window. This process has generated 9 files in your c:\corba\server
directory. We will discuss about these files later.
Open the directory c:\corba \server with explorer, and
confirm that these files are present. Their names are:
-
HelloC.h
-
HelloC.cpp
-
HelloC.i
-
HelloS.h
-
HelloS.cpp
-
HelloS.i
-
HelloS_T.h
-
HelloS_T.cpp
-
HelloS_T.i
Note: If you see any
errors or if you do not see the (9) files generated, identify and fix the
problem. Experts could go to command prompt and issue tao_idl Hello.idl
command
in c:\corba\server directory to see what is wrong. The path could
be checked for spelling mistakes.
Step 3: Your
First Server
In step 2, you have setup the environment. This
is essencial part of the whole process.
Now, You are ready to take first test flight of CORBA.
The best way to understand what is going on, is to write a small application.
This section deals with steps involved in making of a test server.
The server development involves few steps. Implementing
the interface and finally making it available to the world. The first step
involves defining a class that shall implement Hello.idl. Other steps are
consolidated in developing the server.cpp and we will discuss in detail
later.
-
Defining
a Hello_impl class.
-
Creating Hello_impl Class.
-
Open the workspace "server" (if
you have closed.) you had created in step 2.
-
Click on New Class.. under
Insert
menu. (See Image )
-
Enter Hello_impl as
Name
of the class.
-
Click Ok
This will create class definition
-
Developing
the server code.
Follow the steps below:
-
Create a text file, the way you created for config.h
-
Save the file as server.cpp
in directory c:\corba\server
-
Now in that file write following code:
#include "HelloS.h"
#include "HelloC.h"
#include "Hello_impl.h"
#include "orbsvcs/CosNamingC.h"
#include "conio.h"
#include <iostream>
int main (int argc, char* argv[])
{
try
{
char
fileName[80];
bool
bFound = false;
for
(int i = 0; i < argc-1 ; i++)
{
if (strcmp(argv[i], "-o")==0)
{
bFound = TRUE;
strcpy(fileName, argv[i+1]);
break;
}
}
if (!bFound)
{
cerr << "Usage: server -o filename..";
return 1;
}
CORBA::ORB_var
orb =
CORBA::ORB_init (argc, argv,
"" /* ORB Name.. */);
// check for the remaining argument
CORBA::Object_var
poa_object = orb->resolve_initial_references ("RootPOA");
PortableServer::POA_var
poa = PortableServer::POA::_narrow (poa_object.in ());
PortableServer::POAManager_var
poa_manager = poa->the_POAManager ();
poa_manager->activate
();
Hello_impl server;
HelloApplication::Hello_var
hello = server._this();
CORBA::String_var ior =
orb->object_to_string(hello.in());
FILE* ior_file =
ACE_OS::fopen (fileName, "w");
if (ior_file)
{
ACE_OS::fprintf (ior_file, "%s", ior);
ACE_OS::fclose (ior_file);
orb->run ();
}
else
{
cerr << "Failed to create CORBA IOR file";
}
poa->destroy (1,
1);
}
catch (CORBA::Exception
&ex)
{
std::cerr << "CORBA exception raised!" << std::endl;
}
return 0;
}
-
Save the file.
-
Building server.
We are ready to compile the application. Click on Build
server.exe under Build menu
(or press F7). The build process should generate server.exe with 0 errors.
In case there are any errors, go through the steps again and fix them before
proceeding.
The troubleshooting section for errors is under construction.
-
Running server.
It is good idea to test run the server. The client is
not yet ready, therefore we will not be able to see the complete process.
Still it will make some things more clear.
Follow the steps below:
-
Go to command prompt.
-
Change directory to c:\corba\server\debug.
-
Issue command such as server -o c:\corba.ior
This will start the server and a file called corba.ior
will be generated at c:\. This
file contains stringified reference for the server. Client will use this
file to have knowledge about the server. We will see the details about
obtaining reference later. The file generated can be viewed in a simple
editor like notepad or wordpad. The file has contents like:
IOR:010000001f00000049444c3a48656c6c6f4170706c69636174696f6e2f48656c6c6f3a312e300000010000000000000070000000010101cd0a0000006c6f63616c686f737400670d1b00000014010f00525354e721a8390e730d00000000000100000001000000cd03000000000000000800000001cdcdcd004f4154010000001400000001cdcdcd01000100000000000901010000000000004f41540400000001cd0000
Step 4: Your
First Client
Under Construction
Step 5: Some
practice with options
Under Construction.

 ry.
ry.