![[ photo ]](wprdj2.jpg)
Looking into the Wild Planet Radio DJanalysis and possible modifications of this affordable toy AM transmitter note: These comments apply to the blue-purple version of the toy and revision PR6 of the circuit board. There is also a white version of the toy with an external speaker, which reportedly contains the same or a very similar circuit board. introduction Wild Planet's Radio DJ (called the WPRDJ for short) is a fun little self-contained AM radio station containing a microphone, cassette player, audio mixer and FCC certified Part 15 transmitter, all for less than $25. Although some people have criticized its extremely weak signal, how much transmitter power do you really want to put into the hands of six year old kids? One source says the RF output power of this unit is 1.3 milliwatt. Judging by the range of the signal, the effective isotropic radiated power (EIRP) must be much lower than this, down in the vicinity of 10 to 20 microwatts. Here are some thoughts on improving the performance of this rig.
antenna and ground There's a proverb that says "the three most important factors in real estate are location, location, and location." With an extremely weak transmitter the three most important things to improve are antenna, antenna, and ground. The antenna of the WPRDJ should be vertical, upright in a straight line, and as far away from any metal objects as you can get it. The ground clamp should be connected to a real electrical ground stake hammered into moist earth, or connected to an artificial ground plane such as a set of wires radiating out from a central point. (An artificial ground plane made of wires can be hidden under the carpet in a large room.) One experimenter took a WPRDJ to a riverside location, dropped a 40 foot ground wire into the river, and reportedly got much better range. If you must operate indoors and you have a choice of upstairs and downstairs locations, upstairs will probably produce better results. However, your mileage may vary.
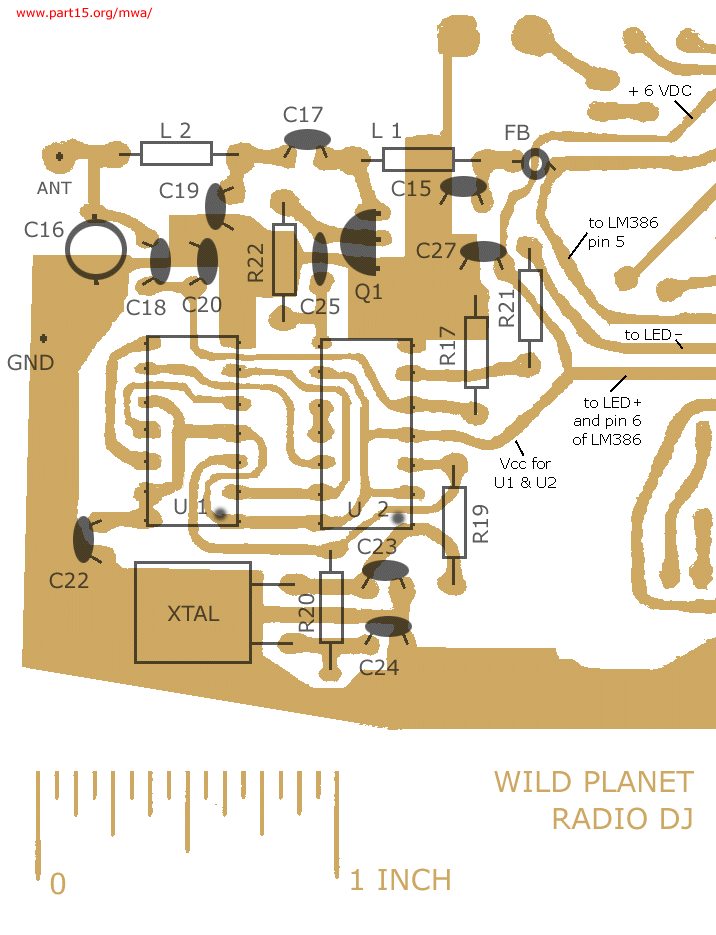
opening up the device Opening the case of the WPRDJ and modifying it may void your warranty and, in areas under FCC jurisdiction, may nullify your authority to operate the device. Put a set of fresh batteries into the WPRDJ before you start this process. To begin opening the WPRDJ, turn the unit "bottoms up" and remove the visible screws. You will also find two screws hidden under the rear rubber foot-pads. Now you can remove the bottom cover. You will notice two adjustable components on the underside of the board: a variable capacitor near one edge, and a trimpot (variable resistor) kind of near the middle. The trimpot (variable resistor) will adjust the speed of the cassette player. If you need to adjust this, turn the unit right side up. While playing a cassette that contains a reference tone or a song familiar to yourself, adjust the trimpot with an insulated screwdriver until the player reaches the correct speed. Then put a blob of glue or nail polish on the trimpot to help keep it set where you want it. Also on the underside, located very close to where the antenna and ground wires are attached to the board, is a variable capacitor for tuning the antenna. If you have some way to measure the RF power output of the unit– perferably a field strength meter– you can use an insulated tuning tool or insulated screwdriver to adjust this capacitor for maximum power output. When you make this adjustment, the WPRDJ should be grounded and its antenna should be straight up vertical. In my opinion, for the very best results possible, you should make this adjustment with the unit attached to the antenna and ground system that you will be using all the time. The setting that works best on an electronic workbench is likely to be a little different from the setting that works best with your everyday antenna and ground system. In a message on the Community Radio USA board, Pat Ryan wrote the following: |
| After removing the bottom cover, I found the antenna trimmer capacitor, (located right at the antenna lead) then while using a Radio Shack field meter and my scope I was able to adjust the trimmer for maximum output and according to the "scope" was about 4 times its output set by the factory. Be sure that the Radio DJ is GROUNDED while making this adjustment. The only drawback to this "mod" is that the LED will be on all of the time (apparently RF sensitive). However, I'm sure all I have to do is replace a resistor in the LED circuit. |
|
After making these adjustments, most people should stop fooling with the transmitter. Put the bottom cover back on and enjoy the WPRDJ for what it really is– a cheap but enjoyable toy. If you must know what the top side of the circuit board looks like, just eyeball the photo at the bottom of this page.
removing the motherboard Hardcore tinkerers with some electronic experience may want to go farther into the circuit. Here are some tips for loosening up the main circuit board. The knob for the microphone fader is glued to a slider pot which is soldered onto the circuit board. This makes it difficult to remove the circuit board without breaking something :-) In the LWCA mailing list, Les Rayburn offered the following disassembly tips: "Remove [the] cassette player drawer. There are two screws inside the tape deck that secure it to the base. Using a pair of wire snips, break off the plastic slider volume control. It is glued to the pot underneath, and if you try to force it, you'll only break the pot. (I did!)"
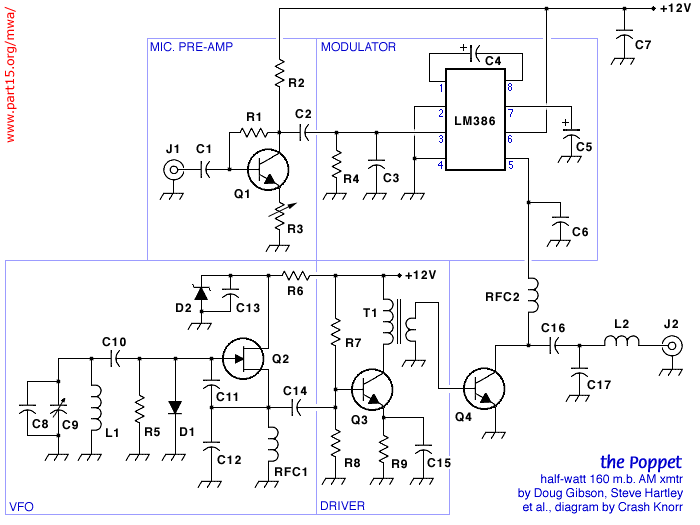
frequency change The crystal is 6.44 MHz. The 74HC00 and 74HC74 chips oscillate at that frequency and then divide by 4 to create the 1610 kHz carrier wave. You could operate the WPRDJ on a different frequency by installing a new crystal; you could probably move to 1590, 1600, 1620 or 1630 without needing to change any other components. You would have to order a custom made microprocessor crystal from a company such as Crystek or Bomar, and that would probably cost more than you paid for the transmitter.
modulation level increase The collector of Q1 gets its current supply from pin 5 of an LM386 amplifier chip. This is the same modulation scheme used in the Vectronics kit and in the Poppet QRP transmitter. For some reason, the WPRDJ doesn't modulate as well or sound as clean as those other circuits. Pat Ryan was reportedly able to get the modulation up to 100% and improve the fidelity by making the following set of modifications: |
|
(1) Unground the emitter of Q1. (2) Install a 33 to 47 ohm resistor from the emitter of Q1 to ground. (3) Install a 220 microfarad 16 volt [electrolytic] capacitor across the 33 to 47 ohm resistor (make sure that the negative lead of the capacitor is soldered to ground). (4) Remove C25 .1uF capacitor. (5) Re-align the rf output trimmer cap for maximum output with an insulated alignment tool. |
|
(In a later message, Pat also said "I installed a .001uF cap from the collector to the emitter of Q1.") Update: It is possible to do these modifications without removing the circuit board by cutting the traces at the correct locations. In the newsgroup alt.binaries.pictures.radio, Robert Casey reported: “Looking at the picture at the bottom of http://www.part15.org/mwa/ tech/circuits/wprdj.html ...and looking at the back of the board after taking the bottom off, I determined where I could cut traces to achieve the mods. I also removed the speaker, and to conserve battery life, disconnected the "ON AIR" LEDs.”
power supply When the cassette motor is not running, the WPRDJ draws about 50 milliamps at 6 volts. There is no voltage regulator to protect the CMOS oscillator chips, so one thing you don't want to do is supply more voltage. The abosulte maximum rating on those chips is 7 volts; with a fresh set of batteries the chips are nearly maxxed out. Some people will be tempted to replace the batteries with a plug-in transformer (sometimes called a "wall wart"). Keep this in mind: AM transmitters that are powered by wall warts often interact with the AC wiring in unpredictable ways and this can cause a very annoying hum to appear in the signal. If you try a wall wart and the hum from heck appears in your signal, go back to battery power.
additional info Below is a photo of the board. If you would like to see a parts placement diagram of the RF section with the PCB traces visible underneath, click here. To read Jonathan Smick's analysis of the circuit with suggested modifications and a nicely done schematic of the RF section, go to home.att.net/~weatheradio/wprdj.htm |
re-enter the Medium Wave Alliance website