
| Most of us don't have the luxury of building a 5/8 wavelength vertical antenna. We have to settle for something a little shorter. (A lot shorter, in the case of people following the FCC's Part 15 rules, which limit them to 3 meters in size.) Shorter vertical antennas can give acceptable (not spectacular) performance. |
frequency selectionIf you are using a shortened vertical antenna, you will get much better results using a frequency on the high end of the band (above 1500 kHz). For any given combination of transmitter power and vertical antenna size, your range at 1600 kHz could be up to 10 times greater than your range at 530 kHz. (If you want to know how that was calculated, follow this link.) components of a shortened vertical
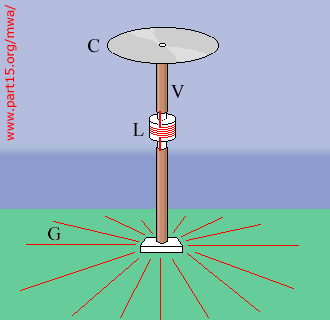
As illustrated here, shortened verticals usually consist of a capacitance hat (C), a loading coil (L), a vertical radiator (V) standing on an insulator, and a ground system (G). There are many different ways in which these elements can be built and connected. constructionground systemThere are two basic choices: a set of ground radials, or a square ground plane (also called a "ground screen"). square ground plane A conductive metal screen such as chicken wire is suspended above the earth or laid on the ground to make a big counterpoise (artificial ground-plane) for the antenna system. It's not pretty but it reportedly works well. Several sections of material are soldered or welded together to make a large square patch of conductor, and the vertical radiator is suspended above the middle. How large should the counterpoise be? Generally, larger is better. However, there is a point of diminishing returns, and any ground screen extending beyond a 1/4-wavelength radius from the base of the antenna will only make a very subtle improvement in field strength. ground radials How many radial wires do you need and how long should they be? Should they be buried in the ground, laid on the surface of the ground, elevated a few inches above the ground, or elevated several meters above the ground? These are the questions that have plagued users of shortened verticals since the dawn of radio. There have been many arguments about these questions. It is important to keep in mind that many of the opinions you will hear are based on less than perfect information, such as unverified computer models, experiments done with antennas in different locations where differences in soil conductivity might have affected the results, and so forth. A lot of people hold very strong opinions without a shred of scientific evidence to back up their beliefs. Number of radials: More is better, up to a point. In carefully controlled experiments, it has been proved that increasing the number of radials from 2 to 15, or from 4 to 16, produces significant increases in signal strength. Further increasing the number of radials to 60 only produces 1 to 2 dB of increase in field strength. Follow this link to see some of the empirical data. Where to put the radials: For a semi-permanent installation, it is customary to bury the radials a few inches down in the soil. This makes it much easier to mow and walk in the area around the antenna. However, some experimenters have gotten an improvement in performance by raising the radials and the antenna base a few inches above the soil. Raising the antenna and ground system several meters above the earth, for example by installing the base of the antenna on a roof-top, can improve the antenna's performance by reducing capacitive earth losses. Length of radials: In most cases, radials work best when they are 1/4-wavelength or longer. Considering the large size of a wavelength at medium wave frequencies, this is not practical for most experimenters. There are (at least) three ways to cope with not having enough space for quarter-wave radials:
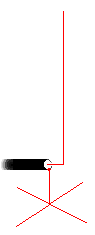
NEC, the famous computer program for modelling antennas, indicates that 1/4-wavelength is not always the best length for radials if the vertical radiator is much shorter than 1/4-wave. If the radiator is 1/16-wavelength tall, and if the radials and antenna base are suspended 20 feet above soil of average conductivity, a radial length of 0.15 to 0.18 wavelength would produce peak radiation efficiency, according to one computer simulation I've seen. This is interesting but I won't put too much faith in it until people with the proper test equipment verify it with controlled experiments. Materials: Bare copper wire is the traditional material for making radials. Don't use wire smaller than 18 gauge; you want to keep resistive losses to a minimum. Some people say it's okay to use cheap insulated wire to make the radials, but I think the insulation could add some capacitive losses to the system. base insulatorRubber pads, fiberglass and plexiglass rods, and assorted bits of plastic have been used successfully as base insulators. High power broadcasters use porcelain insulators. Don't use materials like wood and concrete that can absorb moisture. vertical radiatorNearly any low-resistance conductor can be used as the vertical radiator. Copper wire, copper pipe, and aluminum TV antenna mast are often used. Larger diameter is better for several technical reasons. Several pieces of copper wire, connected together at the bottom and then running parallel up the sides of a large-diameter PVC pipe, could be worth a try. capacitance hatThe capacitance hat can be a large metal disk, or a small metal disk with spokes of stiff copper wire radiating out from it, or several wires in the shape of an upside-down pyramid, or simply 2 or 3 wires coming out horizontally from the top of the antenna. The capacitance hat does not radiate a significant amount of signal, but it increases the effective height of the vertical radiator. If there is no capacitance hat, the RF current in the antenna decreases toward the top and the upper portion of the radiator puts out very little signal. Increasing the effective height of the antenna has the beneficial side-effect of reducing the losses caused by nearby shrubs and buildings, assuming your antenna is taller than these objects. loading coilRelatively short antennas behave like lossy capacitors and present a high impedance load to the transmitter due to the large amount of capacitive reactance that is present. The loading coil helps to tune out that reactance. Tuning out the reactance is important because a tuned antenna will accept and radiate much more power than a mismatched antenna. We will talk about how to build and optimize a coil later, in the Antenna Tuners chapter of this Handbook. When the loading coil is installed at the bottom of the vertical radiator, we call it a "base loaded" antenna. Base loading requires the smallest amount of inductance to achieve resonance. However, if we experiment with inserting the coil into higher locations in the vertical radiator, we find that the current distribution on the antenna improves and we get better radiation of the signal. Center loading— putting the coil in the middle of the radiator, or two-thirds of the way up from the bottom— is generally accepted as a good compromise among all the factors that have to be considered. Top loading is also possible, but generally requires a larger loading coil. Although center loading is often used in CB radio antennas and other frequency ranges, most LPAM experimenters use base loading. It is just plain easier to install the coil at the base of the antenna. The following ideas are offered for anyone who wants to try center loading. The drawing above shows how to begin inserting a loading coil into the middle of a center-loaded antenna. Start by cutting the vertical radiator in half, if necessary. (Maybe you already have two segments of material that you're planning to join together.) Use a hacksaw to cut some slits into one end of the radiator, so that the clamp will be able to squeeze it down to a slightly smaller size. Next insert an insulator that has an outside diameter the same as, or slightly smaller than, the inside diameter of the radiator. The insulator has to be long enough and strong enough to hold the overall antenna structure together during rough weather. This insulator can be a plexiglass or fiberglass rod, or a piece of wooden dowel. If you use wood, you must drive out the moisture and then waterproof it before installing it. You can do this by heating the wood in a slightly warm oven (180 to 200 degrees Fahrenheit) for an hour, then removing it from the oven and applying a coat of spar varnish to it. Apply another coat of varnish after the first has dried, and repeat until you have 4 coats total. Later on, remember to cap the top end of the radiator so that rain-water can't fall into it and de-tune the antenna by saturating the wood. Insert the insulator into the radiator, then use a hose clamp to secure it. Put the loading coil over the insulator and secure it with glue or other non-metallic materials. Now attach the other half of the radiator to its end of the insulator, then electrically connect each end of the loading coil to its portion of the radiator. Tighten the clamps well, but not so tight that the insulator gets cracked or crushed. connectionsAll connections must be weatherproof and must have very low resistance. Don't try to make do with a soldering iron if a torch is required to solder large wire to large conductors. Spray the solder joints with defluxer or scrub them with alcohol and a toothbrush to prevent flux from lingering around and speeding up corrosion of the materials. Some people like to apply a thin layer of Vaseline or silicon gel to outdoor solder joints, to slow down the weathering process. Coaxial cable connections can be weatherproofed with gummy black goop made especially for this purpose; it is available from ham radio suppliers and other electronics dealers. supportsA thin vertical object will not stand up by itself; some kind of support will be required. Three or four non-conductive guy lines (perhaps synthetic rope or twine) attached near the top of the antenna and anchored to some stakes in the ground will do the trick. It is true that you can use aluminum or steel guy wires and electrically connect them to the top of the antenna to add some capacitance. However, that style of antenna works best with a feedpoint in the middle of the radiator and a complex antenna tuner. To keep things simple, use non-conductive guy lines. locationAs with all antennas, shortened verticals work best when they are "in the clear" — many meters away from any other objects. Trees, shrubs, power lines, buildings, and vehicles all have a subtle, negative effect on antenna performance. A small transmitter can be placed in a weatherproof box at the base of the antenna. Eliminating the need for a feedline eliminates the problem of feedline losses. For US citizens who acknowledge the FCC's jurisdiction, it also makes it easier to comply with the FCC's Part 15 rules which limit the combined length of the feedline, ground lead and antenna to 3 meters. bandwidthThere is one possible problem with a shortened and tuned antenna. If the Q is too high and the bandwidth is too narrow, the sidebands will be attenuated and the audio quality of the signal will suffer. However, you probably will not have this problem. It's almost impossible to accidentally build a high-Q antenna system. If you want or need to experiment with antenna bandwidth, the following actions will lower the Q and increase the bandwidth:
safetystatic dischargesDuring dry windy weather, a large vertical antenna can gather a static charge that can harm the final amplifier transistors of a transmitter. If you are in an area where dry windy weather is common, you can deal with this by installing a 5,000 or 10,000 ohm power resistor between the antenna and ground system. This allows the DC static energy to be discharged to ground but has little effect on RF flowing through the system. The resistor must be rated to handle more power than your transmitter is putting out, e.g. for a 750 milliwatt transmitter, use a 1 watt resistor. If you use a wire-wound type of resistor, be advised that it will add some inductance and change the tuning of the antenna system. lightningIn areas that have a lot of thunderstorms, a vertical antenna with a good ground system will be hit by lightning sooner or later. Licensed radio stations deal with this by installing a pair of metal balls with a small gap between them. One of the balls is connected to the bottom of the vertical radiator, and the other is connected to the ground system. If lightning strikes, most of the energy will jump across the gap and be discharged into the ground, rather than flowing into the transmitter. Most home-made vertical antennas and low power transmitters will simply be destroyed if hit by lightning. It may be a good idea to turn off the transmitter and disconnect it from the antenna system when lightning storms are approaching. humansIf your transmitter puts out more than a couple of watts of power, do something to keep people from touching the antenna. If they touch it, they might get an RF burn, which can be painful. So put up a wooden fence or a warning sign, or get a watchdog. | |
go to: table of contents | next chapter
copyright 1998-2002 by "Crash" KnorrII
![[drawing]](ant6.gif)
![[drawing]](ant7.gif)