![]()
customs
last updated: 1�2�2003
![]()
last updated: 1�2�2003
toy customizing projects. i tend to take on several projects at once, which lends to the problem of never fully completing one single project. enjoy the lack of updates
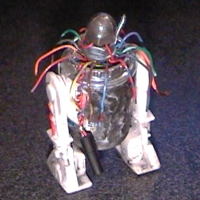 my nearly-finished "battle damaged" R5-D4. a little history lesson on collecting... these vintage R2 and R5 figures had a nicely detailed sticker on their barrel "chest" showing their doors and gadgetry. unfortunately for many a kid, the nice, clean sticker would turn brown and eventually rub off after being played with a lot.
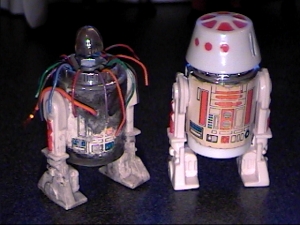
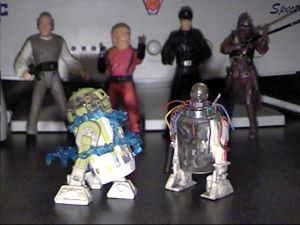
i bought the beat-up figure for a buck or two. what you see now is not what he looked like before i took my dremel drill and paints to him. here's a comparison shot of an "unaltered" R5-D4 with the one that i "charred." (in that picture, you can see the back of the "charred" R5, and the sticker starting to turn yellowish on the "normal" R5.) and here's a picture of the Epsiode 2 figure R3-T7, probably not feeling so bad about having electricity coursing around his body after seeing an R5 unit without a head.
to make this, first I removed the head -- easy enough, it is attached with a screw. then i cut some gouges into R5's chest with a drill, and finished the body (chest and legs) with a "wash" of black paint so he looks like he got burned. you can't see it too well here, but what was left of the sticker I kept in place. i put a bolt through his chest, where the screw once held his head. i made a ring with a bunch of small wires tied on it, and "locked down" the ring using a washer and nut on the bolt. finally i crowned the figure with some kind of screw point cover. i like to think that it is his "brain," which we might see if his head was taken apart.
i'm going to make a new R5-D4 using the head and a newer R2-D2 figure's body.
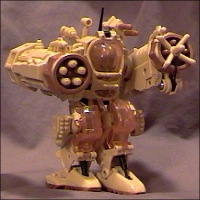 "Tech Wars" is a 2001 reissue, of sorts, of the 1993-95(?) Exo Squad toy line. the E-Frame vehicles are pretty much the same in the reissued line, recolored and without stickers, but the figures' heads are all changed (and some have different arms/legs than the originals). unfortunately I got rid of about 99% of my old toy collection, including a nearly complete Exo Squad collection.
now I have something of a second chance to recapture the fun I had customizing some of the old E-Frames. this particular E-Frame will get souped-up detail, from the hoses on the legs to the cockpit interior. it will be a desert camo theme, considering it's cast in a tan plastic.
the first step was to take the entire toy apart. easy enough since screws hold most of it together. i decided to work on this thing "from the ground up," so the right leg was the first to go under the knife.
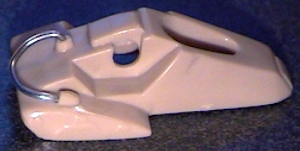
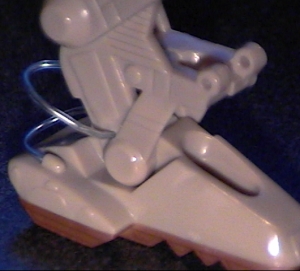
 here you can see the left leg as an example of what the legs look like when the toy is purchased. (i forgot to take a picture of the right leg before i started work.) the black bracket on the picture shows the hose on the leg, which is molded "in place." you can clearly see the hose molded on the back of the foot (it looks like it's in two pieces). i decided to go all-out on the details, so i removed these molded hoses by drilling them away with my Dremel-type drill [a Sears version...], and cutting at it with a hobby knife. finally i sanded the area, then "hand drilled" holes for the new, "real" hoses to fit into. i hand drilled the holes for the hoses to fit into because I don't trust my drill with something so delicate. it took awhile to do, but it was worth it. i left parts of the molded hose in place, so that it looks as though the "real" hose fits into some kind of receptor. for now i'm using some clear wire to represent the hose (it'll be changed to something better later on).
